Zoom H1 XLR Quicktour
Handy recorder
Hide thumbs
Also See for H1 XLR:
- Installation manual (10 pages) ,
- Operation manual (140 pages) ,
- User manual
Table of Contents
Advertisement
Quick Links
H1 XLR
Software and documents related to this product can be found at the following
website.
You must read the Usage and Safety Precautions before use.
© 2024 ZOOM CORPORATION
Copying or reprinting this manual in part or in whole without permission is prohibited.
You might need this manual in the future. Always keep it in a place where you can access it easily.
The contents of this manual and the specifications of the product could be changed without notice.
Proper display is not possible on grayscale devices.
Handy Recorder
Quick Tour
zoomcorp.com/help/h1xlr
Advertisement
Table of Contents

Related Manuals for Zoom H1 XLR


Summary of Contents for Zoom H1 XLR
- Page 1 You must read the Usage and Safety Precautions before use. © 2024 ZOOM CORPORATION Copying or reprinting this manual in part or in whole without permission is prohibited. You might need this manual in the future. Always keep it in a place where you can access it easily.
-
Page 2: Inserting Microsd Cards
64 GB – 1 TB We recommend using microSD cards that have been confirmed to work with this product. See the ZOOM website (zoomcorp.com) for informa- tion about microSD cards that have been confirmed to work with this unit. - Page 3 Good! Remove dead batteries as soon as possible. Remove batteries when not using them for a long time. A dedicated AC adapter (ZOOM AD-17) or a commercially-available portable USB battery can also be used. AC adapter Portable (ZOOM AD-17)
-
Page 4: Language Setting
Making settings when first turned on Accessibility setting A function that enables setting audio guidance and beep sounds is included to assist users with vision impairments. Press and hold when the Home Screen is open to immediately turn on/off the guide sound. to select a setting item, and press to confirm. -
Page 5: Date And Time Settings
Date and time settings Select a setting item, and press Change the value, and press to confirm. to confirm. After setting all the items, select “OK” and press to complete setting the date and time. If power is not supplied by an AC adapter or batteries for a long time, date and time settings will be reset. If the Set Date/Time Screen appears during startup, set them again. - Page 6 We recommend running SD card tests on microSD cards after purchasing them new or using them with a different device. A quick test can check the performance of a microSD card in a short time (about 30 seconds) regard- less of its capacity. A full test will check the entire microSD card, so the amount of time required depends on its capacity (about 15 hours for 64 GB).
-
Page 7: Preparing To Record
Preparing to record ■ Setting the file format... -
Page 8: Connecting Equipment
Connecting equipment ■ Connecting mixers and other line-level equipment Switch on the left (and/or right) side to LINE. Keyboard TRS plug TRS plug XLR plug XLR plug PA mixer... - Page 9 ■ Connecting dynamic/condenser mics Switch on the left (or right) side to MIC. Dynamic mic Condenser XLR plug • Setting phantom power Turn on phantom power for inputs that have condenser mics connected. Do not supply phantom power to devices that are not compatible with it. Doing so could damage the device.
- Page 10 ■ Connecting wireless mics Switch on the left and/or right side to LINE. Receiver XLR plug When disconnecting an XLR plug, pull it while pushing on the connector.
- Page 11 ■ Connecting mics that require plug-in power The MIC/LINE IN jack can be used for recording instead of the INPUT 1 and INPUT 2 jacks. • Setting plug-in power...
- Page 12 Turn on plug-in power. When using a mono lavalier mic, the left channel signal can be recorded alone as a mono file by pressing to select “MONO (L)”.
-
Page 13: Adjusting The Volume
Adjusting the volume ■ Connecting headphones and adjusting the volume Headphones ■ Adjusting the balance of input sounds Select a track and confirm. The balance adjusted here will be used for recording. Adjust the balance of the input sound and confirm. - Page 14 By setting the low cut function, wind noise and vocal pops can be reduced.
- Page 15 Recording The indicator will light red and recording will start. Slide toward HOLD to prevent misoperation when recording. ■ Operations during recording This adds a marker for cueing during playback. This stops recording and moves the file to the trash. This starts and pauses playback.
-
Page 16: Playing Recordings
Playing recordings This starts playback. ■ Operations during playback Normalization, exporting and A-B repeat playback are possible, for example. Use these to move the file playback position backward/ forward. This moves the file to the trash. This stops playback. Press this when stopped to return to the Home Screen. - Page 17 Accessing online help (2D code) Select the Help menu item to show a 2D code. Scan it with a smartphone to access detailed documents about the product. zoomcorp.com/help/h1xlr...
-
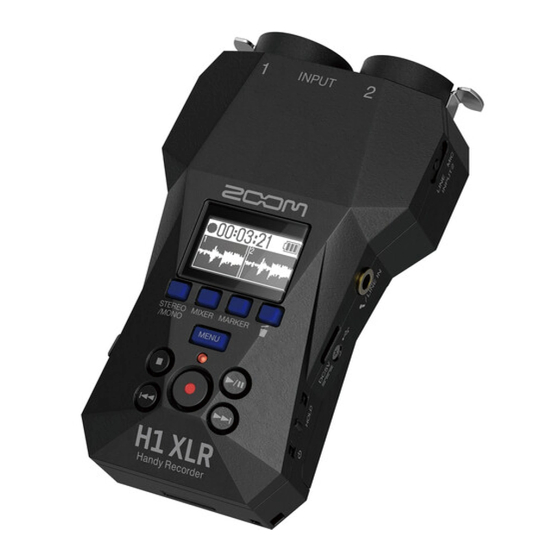
Page 18: Functions Of Parts
Functions of parts ■ Top ① Display This shows various types of information. ② Operation buttons When the Home Screen is open, use these to make file format and mixer set- tings, add markers to recording files and move files to the trash. When the Home Screen is not open, these have functions shown by icons at the bottom of the screen. - Page 19 ■ Left side ① Input level switch (MIC/LINE) ③ VOLUME dial Use this to adjust the volume output Set this according to the equipment con- nected to INPUT 1. from the speaker and headphones. ② PHONE/LINE OUT jack ④ microSD card slot This outputs sound to headphones or a Insert a microSD card here.
- Page 20 ■ Bottom ① Speaker Sound is output here during file play- back. ② Tripod mounting threads Use these when connecting a tripod. ③ Battery cover Open this when installing and removing AA batteries. ■ Back ① INPUT 1 and 2 jacks Connect mics and instruments to these.
-
Page 21: Other Functions
Connected to a computer, smartphone or tablet, this can be used as a 2-in/2-out audio interface. A driver must be installed to connect with a Windows computer when using the 44.1 kHz/32- bit float or 48 kHz/32-bit float setting. The latest driver can be downloaded from the ZOOM website (zoomcorp.com/help/h1xlr). • File transfer By connecting with a computer, smartphone or tablet, files on the microSD card can be checked and moved. -
Page 22: Troubleshooting
→ Check the headphone and LINE OUT connections. See the Operation Manual for details. → Use the H1 XLR to format the microSD card. → Confirm that the headphone volume and line → We recommend using microSD cards that have output level are not too low. - Page 23 Recording from copyrighted sources, including CDs, records, tapes, live performances, video works and broadcasts, without per- mission of the copyright holder for any purpose other than personal use is prohibited by law. ZOOM CORPORATION will not assume any responsibility related to infringements of copyrights.
Need help?
Do you have a question about the H1 XLR and is the answer not in the manual?
Questions and answers