Table of Contents
Advertisement
Quick Links
User manual and technical description
Model:MET-6600 Hydraulic Stretcher Series
Version:2019-A-1
⚫ Our company reserve rights to revise the technical parameters, appearance, structure,
color...etc. of the products including in this user manual without previous notice.
⚫ MET-6600 Recovery semi-electric stretcher will relaunch after 4
th
quarter of 2022.
Medical-Master Co., Ltd
1
Advertisement
Table of Contents

Related Manuals for Medical Master MET-6600 Series


Summary of Contents for Medical Master MET-6600 Series
- Page 1 User manual and technical description Model:MET-6600 Hydraulic Stretcher Series Version:2019-A-1 ⚫ Our company reserve rights to revise the technical parameters, appearance, structure, color…etc. of the products including in this user manual without previous notice. ⚫ MET-6600 Recovery semi-electric stretcher will relaunch after 4 quarter of 2022.
-
Page 2: Table Of Contents
Table of Content 1 Component name and location -------------------------------------------------------------------------------------- 1.1 MET-6600 Transport --------------------------------------------------------------------------------------------- 1.2 MET-6600 Trauma --------------------------------------------------------------------------------------------- --- 1.3 MET-6600 Pediatric ----------------------------------------------------------------------------------------------- 2 Technical specifications ------------------------------------------------------------------------------------------------ 2.1 MET-6600 Transport series ------------------------------------------------------------------------------------ 2.2 MET-6600 Trauma series --------------------------------------------------------------------------------------- 2.3 MET-6600 Pediatric series -------------------------------------------------------------------------------------- 3 Symbolic and Safety prevention ------------------------------------------------------------------------------------ 3.1 Symbolic descriptions -------------------------------------------------------------------------------------------- 3.2 Safety preventions ------------------------------------------------------------------------------------------------... -
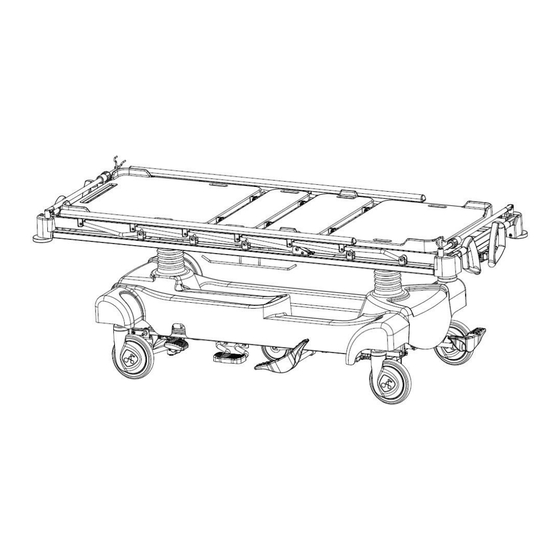
Page 3: Component Name And Location
1 Component name and location 1.1 MET-6600 Transport Right Head Foot Left Side rail 2 pcs 15 High pedal 2 pcs Gas-spring for back section board 1 pcs 16 Oxygen tank store space 1 place Drainage bag hook frame 2 sets 17 Store compartment 1 place Buttock section board 1 pcs 18 TR, RTR and lower pedal 2 pcs... -
Page 4: Met-6600 Trauma
1.2 MET-6600 Trauma/ Advance Trauma Right Head Foot Left 17 Central locking and steering system 4 sets Side rail 2 sets 18 Hydraulic pump cover 2 pcs Gas-spring stick 2 pcs 19 Bed chassis stand 1 set Bakelite back section board 1 pcs 20 8”... -
Page 5: Met-6600 Pediatric
1.3 MET-6600 Pediatric Right Foot Head Left 12 Hydraulic pump 2 pcs Long side rail 2 sets 13 Hydraulic pump cover 2 pcs Short side rail 2 pcs 14 Central locking and steering system 4 sets Operation switches 8 pcs 15 8 inch brake caster 4 pcs Vertical pole 4 sets 16 Oxygen tank store space 1 place... -
Page 6: Technical Specifications
2 Technical specifications 2.1 MET-6600 Transport: Specification Overall dimension 800 x 2100 mm Platform dimension 622 x 1869 mm Adjustable height 560~910 mm 0~90˚ by single gas-spring Back adjustment Trendelenburg 0~18˚ by foot switch Reverse Trendelenburg 0~18˚ by foot switch Knee adjustment 0~40˚... -
Page 7: Met-6600 Trauma Series
2.2 MET-6600 Trauma: Specification Overall dimension 800 x 2100 mm Platform dimension 619 x 1885 mm Adjustable height 590~940 mm Back adjustment 0~90˚ by double gas-spring Knee adjustment 0~35˚ by double gas-spring (Adv. Trauma) Low leg adjustment Trendelenburg 0~18˚ by foot switch Reverse Trendelenburg 0~18˚... -
Page 8: Met-6600 Pediatric Series
2.3 MET-6600 Pediatric: Specification (manual/ semi-electric) Overall dimension 970 x 1760 mm Platform dimension 860 x 1600 mm Adjustable height 750~920 mm Back adjustment 0~50˚ by manual ratchet 0~50˚ by electric motor Foot adjustment 0~50˚ by manual ratchet 0~50˚ by electric motor Trendelenburg 0~9˚... - Page 9 Patient transport, facilitate treatment, and diagnostic Expected service life The MET-6600 Series stretcher has 10 years expected service life under normal use conditions, and with appropriate periodic maintenance. The casters have a minimum expected service life of 5 years dependent on normal use, conditions, and with appropriate periodic maintenance.
-
Page 10: Symbolic And Safety Prevention
Indicates precautions on action that may result on personal injury or propertyd amage if ignored(described as “Usage Precautions” in the appendix.) Indicates prohibited behavior (described as "prohibited" in the appendix). Fig. Serial Label for MET-6600 series (reference only) Manufacturer Information (address, phone and origin) GS1 Code... - Page 11 Do not repair or modify the bed yourself Note! (If the safety label removed or defaced, replace with a new one obtained from your dealer.) Read user manual CE mark of conformity with EU regulation Safe working load Max weight of patient Safety Mark Production time Do not put into household waste (follow manufacturer instruction)
-
Page 12: Safety Preventions
3.2 Safety preventions ❖ Stretcher should be left in its lowest position when the patient is unattended in order to reduce risk of injury due to falls! ❖ Side rails of stretcher should be located in the “up“ position to reduce the risk of the patient accidentally slipping or rolling off the mattress! ❖... - Page 13 ❖ Don’t climb on the stretcher in the raised position. Otherwise, the base supports are subjected to excessive weight, and may damage or deformed. ❖ Don’t put oversize items underneath the stretcher. It interferes the movement of hi-low. It can lead to a deformation and damage to related parts of the stretcher.
-
Page 14: Clinic Application
The MET-6600 Series stretcher frame, litter mounted accessories, mattresses, and siderails can contact human skin. The MET-6600 Series stretcher is not for use for long-term (more than 24 hours) inpatient treatment and recovery. This product is not for use in a home healthcare environment, as a sterile product, in a home health setting, in the presence of flammable anesthetics, as a support for a patient in a prone position, with patients who have unstable spinal cord injuries, or with an oxygen tent. -
Page 15: Assemble And Use Instructions
5 Setup and use instructions To unpack your product, please kindly follow manufacturer unpack instruction. ⚫ Always allow the product to reach room temperature before you set up the product or test functional operations. Permanent product damage may occur. ⚫ Always operate the product only when all operators are clear of the mechanisms. - Page 16 Before Use Prepare the bed for use as follows: ⚫ Perform bleeding procedure of hydraulic units in the highest bed position by pressing lifting pedal 10 times. ⚫ Raise the Mattress Support Platform to the highest position. ⚫ Lower the Mattress Support Platform to the lowest position. ⚫...
-
Page 17: Back Section Adjustment
5.1 Back section adjustment Gas-spring stick Gas-spring handle 5.1.1 Transport & Trauma Back section board Press gas-spring handle to adjust the back-section angle. Back-raising from 0 to 90 degrees a. Raise up Press the operation gas-spring handle by 2 hands and rise the back section. -
Page 18: Knee Section Adjustment
5.2 Knee section adjustment Operate the manual crank to adjust the knee section angle. Knee-raising (0˚ to about 40˚) ○ 2. Open handle grip as 1. With holding part pull out handle shaft shown above and turn completely. 1. completely. ⚫... -
Page 19: Height Adjustment
5.4 Height adjustment The platform could adjust the height by operation Hi-Low pedal by feet. a. Height Up Pedal Step the operation pedal by feet and rise the platform. When it arrives suitable height, please stop step it and the stretcher will lock at the position safety. -
Page 20: Trendelenburg & Reverse Trendelenburg
5.5 Trendelenburg & reverse Trendelenburg The platform could adjust tilt angle by TR & RTR pedal. When ER bed is in tilt position, the platform could return to flat position by press the pedal together. The tilt angle will influence by ER bed height. TR and RTR Pedal Operation (-18˚... - Page 21 b. Head up and Foot down position → Press right side of pedal The foot side go down. Please step on the right pedal. Operation symbol Please lock the casters except when moving the bed. Otherwise, the patient maybe injured ⚫...
-
Page 22: Castor Control And Bed Transport
6 Castor control and bed transport a. Central locking and steering system Operate any pedal could lock or release 4 casters. There are 4 pedals on head, foot, right and left side. The pedal install under the chaise. Central locking and steering system. Height up pedals. - Page 23 b. Caster Pedal Operation 1. Lock 4 caster Press left side of pedal. All casters will lock at the same time and the bed could not move. 2. Release 4 caster Press middle side of pedal. All casters will release for lock/ steer situation at the same time and the bed could move to any direction.
-
Page 24: Side Rail
7 Side rails a. 3/4 length Collapsible side rail 1. Lower side rail Release the switch wrench and lower the side rail slowly. 2. Raise up side rail Rise up the side rail to top position and switch wrench will lock automatically. When it locks, you will hear “click” sound. - Page 25 b. Full length stepless side rail (only available for MET-6600 Pediatric) 1. Lower side rail Release the switch on both sides and lower the side rail slowly. It can stop in any height during the pathway. Fig. Stepless bed side rail Height adjustment 2.
- Page 26 4. Openable siderail (option) It is possible to equip the bed with openable siderail bars. This allows using e.g. redon bottles without having to fold whole siderail down. Openable siderail bars are equipped with safety brake. Risk of damaging due to incorrect use! ⚫...
-
Page 27: Infusion Stands (Iv Pole)
8 Permanent Infusion Stands (IV pole) 2 units IV pole attached on bed diagonal corner. IV pole could hang Intravenous injection items and other small instruments. Using method Sliding rod Adjustment bolt 1. Rise up the pole and insert to the socket with sliding track. (as left photo) 2. -
Page 28: Transport Handle
10 Transport handles Foldable transport push bar equip on head and rear side. Storage method Using method 1. Hold the push bar and rise up vertically. 1. Rise up the push bar from the socket. 2. Insert the push bar into the socket 2. -
Page 29: Mattress
11 Mattress (1) Each type of stretcher is installed with mattress stopper (MET-6600 Transport/ Recovery/ Pediatric is plastic one on corner and side. MET-6600 Trauma is steel one in the head and rear.). (2) Be sure to choose a correct size of mattress according to stretcher type. (3) Be sure that the mattress is 100% fit with mattress stop before using. -
Page 30: Patient Strap
13 Patient straps Only for MET-6600 beds. Patient strap could fasten the patient on the bed (especially coma or stupor patient). There are several strap holders on platform (back, buttock, leg and knee). Installation method Pass through the strap from one side to another side (as below photo) Push and test the strap before use. -
Page 31: Instrument Tray/ Foot Board
14 Instrument Tray/ Foot Board Only for MET-6600 beds. The detachable instrument tray can install in the end of bed. By different purpose, it can use as instrument tray/ writing table. It can be foot board to prevent patient slip away during tilt position. Installation method Pass insert the tray to socket in the foot sides Reversal the tray on stopper. -
Page 32: Vertical Oxygen Tank Holder/ Mobile Infusion Pole
16 Vertical Oxygen Tank Holder/ Mobile Infusion Pole Only for MET-6600 beds. According to operation demand, the patient needs oxygen or injection offer during transport, there is additional device to offer this service. Please insert the parts into socket in any coroner (as arrow) ⚫... - Page 33 Compartment details: Telescopic X-ray film holder (390 x 465 mm size) with grid line and handle Location sticker on both sides Cassette and film stopper in the end of track Operation method Please unlock locker 2 and install film on telescopic tray. Please unlock locker 1 to release track system.
-
Page 34: Cleaning And Disinfection
18 Cleaning and disinfection 18.1 Safety Instructions for Cleaning and Disinfection of the Bed Preparation for cleaning: ❖ Drive the bed on a place where the cleaning process will be performed and then brake the bed. ❖ Position the mattress platform to its highest positions and also position the back rest and thigh rest parts so the back side of those parts are accessible for cleaning. - Page 35 Second, the steel paint part: Wipe with a dry cloth or a cloth dampened with water. Wipe with a neutral detergent (PH6-8). Use 95% alcohol to wipe. Disable bleach, organic solvents (pine perfume, toluene, acetone, etc.), chemical substances wipe. Do not use a melon cloth or an abrasive cloth to scrub.
-
Page 36: Regular Maintenance
19 Regular maintenance First, every three months should be implemented: 1. Check the anchor rail group fixing bolts for looseness? Does it fall off? 2. Check the tamper brake latch for wear? Is there a crack? 3. Check if the anchor bolt of the rocker arm is loose or not. 4. -
Page 37: Storage And Inspection
20 Storage and inspection When the bed will not be used for long period of time, follow the instruction as below: Lower the back and knee section base to the horizontal position. Set the bed height to its lowest positions. Don’t place anything on the bed other than mattress. -
Page 38: Trouble Shooting
22 Trouble shooting 1. Not all problems are mechanical defaults, so you should read through the following information before request repair service from local dealers. If your problem is not list or you are still unable to resolve the issue, stop to use stretcher and contact with us or local dealers. -
Page 39: Preventative Maintenance
23 Preventative Maintenance Preventative Maintenance CHECKLIST All fasteners secure Date Date Date Date Side rails move and latch properly Engage brake pedal and push on the stretcher to ensure all casters lock securely Steer function working properly All casters secure and swivel properly Body restraints working properly I.V. -
Page 40: Warranty And Service
Warranty and Service Medical Master will only be held responsibility for the safety and reliability that are regularly serviced, maintained and used in accordance with the safety guidelines. This product is covered by a 24-month warranty from the date of purchase (not including battery). The warranty covers all material and manufacturing related failure and errors.
Need help?
Do you have a question about the MET-6600 Series and is the answer not in the manual?
Questions and answers