Table of Contents
Advertisement
Available languages
Available languages
Quick Links
Advertisement
Chapters
Table of Contents

Related Manuals for Medion MD 15000


Summary of Contents for Medion MD 15000
- Page 1 Bedienungsanleitung Manual de instrucciones Notice d‘utilisation Istruzioni per l‘uso Gebruiksaanwijzing User manual Retro-Mikrowelle Four à micro-ondes rétro Retromagnetron Microondas retro Forno a microonde in stile vintage Retro microwave MEDION MD 15000...
-
Page 3: Table Of Contents
Inhaltsverzeichnis Informationen zu dieser Bedienungs anleitung ..........4 1.1. Zeichenerklärung ..................4 Bestimmungsgemäßer Gebrauch ..............5 Sicherheitshinweise ..................5 3.1. Mikrowelle aufstellen und anschließen ............6 3.2. Brandgefahren vermeiden ................. 8 3.3. Besondere Sicherheitshinweise im Umgang mit Mikrowellen ....... 9 3.4. Sicherheitshinweise zum Erhitzen von Flüssig keiten ........10 Geräteübersicht .................... -
Page 4: Informationen Zu Dieser Bedienungs Anleitung
1. Informationen zu VORSICHT! dieser Bedienungs- Gefahr durch heiße Oberflä- anleitung chen! Dieses Symbol gibt Ihnen nütz- Vielen Dank, dass Sie sich für unser liche Zusatzinformationen zum Produkt entschieden haben. Wir Zusammenbau oder zum Be- wünschen Ihnen viel Freude mit trieb. -
Page 5: Bestimmungsgemäßer Gebrauch
2. Bestimmungsgemäßer 3. Sicherheitshinweise Gebrauch WICHTIGE SICHERHEITSAN- Die Mikrowelle darf nur zum Erwärmen von WEISUNGEN – SORGFÄLTIG dafür geeigneten Lebensmitteln in geeigne- LESEN UND FÜR DEN WEITE- ten Garbehältern und Geschirr verwendet REN GEBRAUCH AUFBEWAH- werden. Dieses Gerät ist dazu bestimmt, im Privat- REN! haushalt und ähnlichen Haushaltsanwen- ... -
Page 6: Mikrowelle Aufstellen Und Anschließen
Schließen Sie die Mikrowelle 3.1. Mikrowelle aufstellen und anschließen nur an eine ordnungsge- mäß installierte, geerdete WARNUNG! und elektrisch abgesicherte Gefahr durch elektri- Steckdose an. Die Netzspan- schen Schlag! nung muss den technischen Es besteht die Gefahr ei- Daten des Gerätes entspre- nes elektrischen Schlags chen. - Page 7 Entfernen Sie keine Abde- Sie in diesem Fall sofort das Netzkabel am Stecker aus ckungen im Innenraum der der Schutzkontaktsteckdose. Mikrowelle oder die Innen- Nehmen Sie die Mikrowelle folie des Sichtfensters, da nicht mehr in Betrieb, be- sonst Mikrowellenstrahlung vor sie von einer dafür aus- austreten kann.
-
Page 8: Brandgefahren Vermeiden
Ziehen Sie den Netzstecker WARNUNG! aus der Steckdose, Brandgefahr! – wenn Sie das Gerät reini- Es besteht Brandgefahr gen oder warten, durch unsachgemäßen – wenn Sie das Gerät auf- Umgang mit dem Gerät oder abbauen, Verdecken oder verstopfen –... -
Page 9: Besondere Sicherheitshinweise Im Umgang Mit Mikrowellen
3.3. Besondere Sicherheits- letzungen, Entzündungen hinweise im Umgang mit oder Feuer führen. Mikrowellen Bereiten Sie mit dem Gerät keine alkoholhaltigen Spei- WARNUNG! Erhitzen Sie sen zu. keine Speisen oder Flüssig- Nutzen Sie das Gerät nicht keiten in fest verschlossenen zum Frittieren oder Öl erhit- Behältern! Diese können im zen. -
Page 10: Sicherheitshinweise Zum Erhitzen Von Flüssig Keiten
Ritzen Sie Lebensmittel mit genanntem Siedeverzug geschlossener Haut, wie z. B. kommen, d. h., dass die Tomaten, Würstchen, Auber- Flüssigkeit bereits Siede- ginen oder ähnliche vor dem temperatur hat, ohne dass Garen an, um ein Platzen zu die beim Kochen typischen vermeiden. -
Page 11: Geräteübersicht
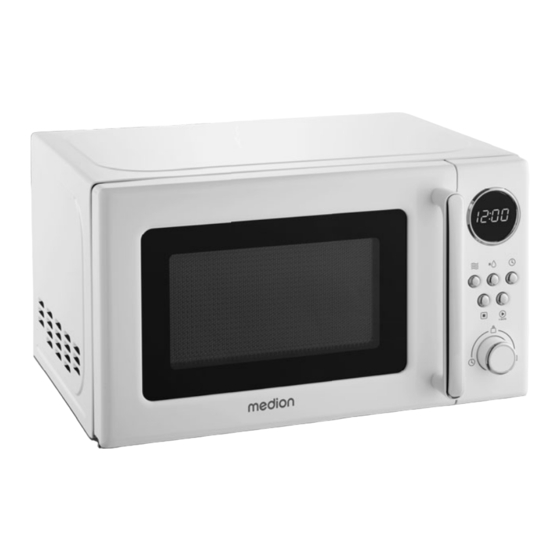
4. Geräteübersicht Menu Abb. 1 – Frontansicht bei geöffneter Tür 1. Mica-Abdeckung des Magnetrons (NICHT ENTFERNEN!) 2. Netzkabel mit Netzstecker (auf der Rück- seite, nicht dargestellt) 3. Anzeigefeld 4. Bedienfeld 5. Glas-Drehteller 6. Rollenring 7. Antriebswelle 8. Garraum 9. Türverriegelung 10. -
Page 12: Lieferumfang
5. Lieferumfang 6. Kochen und Garen mit der Mikrowelle GEFAHR! Verletzungsgefahr! HINWEIS! Möglicher Sachschaden! Es besteht Erstickungsgefahr durch Verschlu- cken oder Einatmen von Kleinteilen oder Die Verwendung von ungeeigneten Materia- Folien. lien kann zur Beschädigung des Geräts oder Alle verwendeten Verpackungsmateriali- des Materials selbst führen. -
Page 13: Größe Und Form Von Mikrowellengeeigneten Gefäßen
Decken Sie die Speisen während des 6.2. Mikrowellentaugliche Koch- oder Garvorgangs mit einer mikro- Materialien wellengeeigneten Abdeckung ab. Durch Abdecken werden Spritzer vermieden, Verwenden Sie in der Mikrowelle folgende außerdem wird das Essen gleichmäßiger Utensilien: gegart. • Bräunungsgeschirr Speisen wie Hähnchenteile und Ham- •... -
Page 14: Vor Dem Ersten Gebrauch
Stellen Sie die Mikrowelle auf eine ebene, 7. Vor dem ersten Ge- stabile Fläche, die das Eigengewicht des brauch Geräts samt dem Höchstgewicht der da- rin zubereiteten Nahrungsmittelmenge 7.1. Gerät aufstellen tragen kann. Betreiben Sie das Gerät ausschließlich in Innenräumen. -
Page 15: Glas-Drehteller Einsetzen
7.3. Glas-Drehteller 7.5. Tastensperre einstellen einsetzen Drücken und halten Sie die Taste Stopp (15) fü r ca. 3 Sekunden, um die Tas- tensperre einzuschalten. Ein Signalton wird ausgegeben und im An- zeigefeld (3) wird angezeigt. Die Tasten des Produkts haben nun keine Funktion. -
Page 16: Einstellungen Vornehmen
Alternativ können Sie die Taste Mikro- Betreiben Sie das Gerät niemals ohne Glas-Drehteller und nicht ohne Lebens- welle (16) einmal oder mehrmals mittel im Garraum. drücken, um eine Energiestufe gemäß Bewegen Sie Gerät nicht während des folgender Tabelle auszuwählen: Betriebs. -
Page 17: Schnellstart
8.2. Schnellstart Gartabelle/Beispiele Wenn Sie die Taste Start (13) drü cken, Gar- Gar- Gericht ohne vorher eine Leistungsstufe einzustellen, stufe wicht zeit wird das Garprogramm auf der höchsten Energiestufe (800 Watt) gestartet. Bei Auto- 500 g 18:00 Hackbraten matikprogrammen und beim Auftaupro- garen gramm nach Gewicht ist diese Funktion nicht verfügbar. -
Page 18: Programm Unterbrechen
Wählen Sie nun das gewü nschte Gewicht. 8.5. Programm unterbrechen Drehen Sie dafü r den Drehregler (14), bis Um die Speisen z. B. nach der Hälfte der Gar- die gewü nschte Portionsgröße angezeigt zeit umzudrehen oder zu verrühren, ist es wird. -
Page 19: Auftauen Nach Zeit
Drehen Sie den Drehregler (14), um das Öffnen Sie ggf. nach etwa der Hälfte der Gewicht des Garguts einzustellen. abgelaufenen Zeit die Garraumtür (11). Drehen Sie das Gargut auf die andere Sei- Drü cken Sie die Taste Start (13), um te bzw. -
Page 20: Anzeigefeld
Beispiel: 10. Tipps zum Energie- Sie möchten Lebensmittel mit einem Auftau- sparen programm auftauen und anschließend das Garprogramm P50 starten. Wählen Sie die kürzeste angegebene Gar- Stellen Sie das Auftauprogramm wie im zeit und verlängern Sie sie bei Bedarf. Kapitel „9. -
Page 21: Längerer Nicht Gebrauch Und Transport
Reinigen Sie das Gerät nicht mit einem 12. Längerer Nicht- Dampfreiniger. gebrauch und Reinigen Sie die Außenflächen mit einem Transport feuchten Tuch. Vermeiden Sie, dass Was- ser in die Belüftungsöffnungen eindringt. Wenn Sie die Mikrowelle über längere ... -
Page 22: Technische Daten
15. EU-Konformitäts- bol gekennzeichneten Elektro- bzw. information Elektronikgeräte dürfen nicht im normalen Hausmüll entsorgt wer- Hiermit erklärt die MEDION AG, den, sondern sind vom Endnutzer dass das Produkt mit den folgen- am Ende ihrer Lebenserwartung den Anforderungen der Europäi- einer vom unsortierten Siedlungs- schen Union übereinstimmt:... - Page 23 mit einer Gesamtverkaufsfläche von dung der Altgeräte zur Verfügung. mindestens 800 Quadratmetern, Die Adressen können Sie von Ihrer die mehrmals im Kalenderjahr oder Kommunalverwaltung erhalten. dauerhaft Elektro- und Elektronik- Verfügt das Altgerät über Daten- geräte anbieten und auf dem Markt speicher, sollten vor der Rückgabe bereitstellen, sind verpflichtet, bei alle Daten extern gesichert und von...
-
Page 24: Serviceinformationen
Sa.: 10:00 - 18:00 • In unserer Service-Community treffen Sie Serviceadresse auf andere Benutzer sowie unsere Mitar- beiter und können dort Ihre Erfahrungen MEDION Service Center austauschen und Ihr Wissen weitergeben. Franz-Fritsch-Str. 11 Sie finden unsere Service-Community 4600 Wels unter community.medion.com. - Page 25 Diese und viele wei- tere Bedienungsanlei- tungen stehen Ihnen über das Serviceportal www.medionservice.com zum Download zur Verfü- gung. Aus Gründen der Nachhal- tigkeit verzichten wir auf gedruckte Garantiebedin- gungen, Sie finden unsere Garantiebedingungen ebenfalls in unserem Ser- viceportal. Sie können auch den nebenstehenden QR-Code scannen und die Bedie- nungsanleitung über das...
- Page 26 Prodott o in Cina...
- Page 27 Sommaire Informations concernant la présente notice d’utilisation ........ 28 1.1. Explication des symboles ................. 28 Utilisation conforme ..................29 Consignes de sécurité ...................29 3.1. Installer et raccorder le four à micro-ondes ..........30 3.2. Éviter tout risque d’incendie ..............32 3.3. Consignes de sécurité spéciales concernant l’utilisation des fours à mi- cro-ondes ....................
-
Page 28: Informations Concernant La Présente Notice D'utilisation
1. Informations concer- Ce symbole vous donne des nant la présente no- informations complémentaires utiles pour l’assemblage ou le tice d’utilisation fonctionnement de l’appareil. Tenez compte des remarques Nous vous remercions d’avoir choisi contenues dans la notice d’uti- notre produit. Nous vous souhaitons lisation ! une bonne utilisation. -
Page 29: Utilisation Conforme
2. Utilisation conforme 3. Consignes de sécurité Le four à micro-ondes doit servir uniquement CONSIGNES DE SÉCURITÉ IM- à réchauffer des aliments adaptés dans des PORTANTES – À LIRE ATTENTI- récipients et de la vaisselle appropriés. Cet appareil est destiné à un usage domes- VEMENT ET À... -
Page 30: Installer Et Raccorder Le Four À Micro-Ondes
Branchez le four à mi- 3.1. Installer et raccorder le four à micro-ondes cro-ondes uniquement sur une prise de courant AVERTISSEMENT ! réglementaire et protégée Risque d’électrocu- électriquement. La tension tion ! secteur doit correspondre à Il existe un risque de celle indiquée dans les ca- choc électrique dû... - Page 31 sont endommagés. Débran- tez le SAV. Ne retirez pas les caches chez alors immédiatement le cordon d’alimentation de dans le four à micro-ondes la prise de courant de sécu- ni le film intérieur de la vitre : rité en tirant au niveau de la risque de fuite de rayons mi- fiche d’alimentation, jamais cro-ondes.
-
Page 32: Éviter Tout Risque D'incendie
Débranchez la fiche d’ali- AVERTISSEMENT ! mentation de la prise de Risque d’incendie ! courant Toute manipulation in- – lors du nettoyage ou de correcte de l’appareil l’entretien de l’appareil, présente un risque d’in- – lors du montage ou du dé- cendie montage de l’appareil, ... -
Page 33: Consignes De Sécurité Spéciales Concernant L'utilisation Des Fours À Micro-Ondes
3.3. Consignes de sécurité vêtements, coussins chauf- spéciales concernant fants, pantoufles, éponges, l’utilisation des fours à chiffons humides ou autres micro-ondes objets similaires). Cela pour- rait provoquer des blessures, AVERTISSEMENT ! Ne faites une inflammation ou même pas chauffer d’aliments ni de un incendie. -
Page 34: Consignes De Sécurité Lors Du Réchauffement De Liquides
3.4. Consignes de sécurité été sortis du micro-ondes. lors du réchauff ement de Ne réchauffez des œufs au liquides four à micro-ondes unique- ment dans de la vaisselle ATTENTION ! spécialement conçue à cet Risque de blessure ! effet. Il existe un risque de blessure ... - Page 35 Pour faire chauffer un li- quide dans l’appareil, placez un bâtonnet en verre ou en céramique dans le récipient pour éviter une ébullition tardive du liquide. Après avoir fait chauffer le liquide, attendez quelques instants, tapotez avec précaution le récipient et remuez le li- quide avant de le sortir du four à...
-
Page 36: Vue D'ensemble De L'appareil
4. Vue d’ensemble de l’appareil Menu Fig. 1 – Vue de face avec la porte ouverte 1. Cache Mica du magnétron (NE PAS EN- LEVER !) 2. Cordon d’alimentation avec fiche d’ali- mentation (au dos, non représenté) 3. Champ d’affichage 4. Panneau de commande 5. -
Page 37: Contenu De La Livraison
Avant toute utilisation, vérifiez que le four à micro-ondes n’est pas endommagé. En cas de dommage constaté, adressez-vous au SAV. Le produit que vous avez acheté comprend : • Four à micro-ondes • Plateau tournant en verre • Anneau à roulettes •... -
Page 38: Taille Et Forme Des Récipients Adaptés Aux Micro-Ondes
Pour disposer correctement les aliments 6.2. Matériaux adaptés aux à cuire, placez les morceaux les plus épais micro-ondes sur le bord extérieur du récipient de cuisson. Utilisez les ustensiles suivants dans le four à Respectez le temps de cuisson exact. micro-ondes : ... -
Page 39: Avant La Première Utilisation
7. Avant la première uti- ter le poids de l’appareil à vide ainsi que le poids maximal de la quantité d’ali- lisation ments préparés. Utilisez l’appareil exclusivement en inté- 7.1. Installation de l’appareil rieur. Ne posez pas le four à micro-ondes : –... -
Page 40: Installation Du Plateau Tournant En Verre
Tournez le bouton rotatif (14) pour régler 7.3. Installation du plateau les minutes souhaitées. tournant en verre Appuyez ensuite à nouveau sur la touche Minuterie/horloge (12). L’heure est maintenant réglée. 7.5. Régler le verrouillage des touches Appuyez sur la touche Stop (15) pen- dant 3 secondes environ pour activer le verrouillage des touches. -
Page 41: Procéder Aux Réglages
AVIS ! Dommage matériel possible ! Lors du fonctionnement, de l’eau de conden- sation peut se former sur les parois inté- Toute manipulation incorrecte peut endom- rieures et la porte du four à micro-ondes. Ceci mager l’appareil est normal pendant la cuisson et ne constitue ... -
Page 42: Démarrage Rapide
Pendant le cycle de cuisson, vous pouvez appuyer sur la touche (13) pour aug- menter le temps de cuisson de respecti- vement 30 secondes. Le temps de cuisson maximal est de 95 minutes. 8.3. Tableau de cuisson Tableau de cuisson/exemples 4 x Décongeler, faire fondre du... -
Page 43: Programme Automatique
Le poids/la quantité s’affiche dans le champ Tableau de cuisson/exemples d’affichage (3). Les quantités peuvent être réglées selon le tableau suivant : Pro- Affi- Puis- Poids gramme chage sance A-1 Ré- 200 g chauffer 400 g 800 W P100 150 g 05:00 Cuire des 600 g pommes de A-2 Lé- 300 g... -
Page 44: Interruption D'un Programme
Appuyez sur la touche Décongélation 8.5. Interruption d’un pro- (17) pour activer le mode Décongé- gramme lation en fonction du poids. Dans le champ d'affichage (3) apparaît dEF1. Pour retourner ou remuer les aliments à la Tournez le bouton rotatif (14) pour régler moitié... -
Page 45: Utiliser Plusieurs Programmes
Vous trouverez le temps de décongélation Appuyez sur la touche Démarrage approximatif nécessaire pour différentes (13) pour démarrer le programme. quantités en poids dans la liste suivante : Lorsque la décongélation est terminée, un signal sonore retentit. Poids des ali- Temps ... -
Page 46: Réglage De La Minuterie
Appuyez pendant le programme en cours 11. Nett oyage et entretien sur la touche Minuterie/horloge (12). L’heure actuelle s’affiche pendant DANGER ! env. 3 secondes dans le champ d'affi- Risque d’électrocution ! chage (3). Il existe un risque de choc électrique dû aux 9.5. -
Page 47: Non-Utilisation Prolongée Et Transport
dans de l’eau chaude additionnée d’un 13. Solutions en cas de savon doux ou au lave-vaisselle. pannes Retirez l’arbre d’entraînement (7) et l’an- neau à roulettes (6). Essuyez l’arbre d’en- Pro- Cause traînement (7) et l’anneau à roulettes (6) Solution blème possible... -
Page 48: Caractéristiques Techniques
élargi du fa- bricant et, en France, à des la conformité UE consignes de tri. L’entreprise MEDION AG déclare par la présente que le produit est conforme aux exigences sui- vantes de l’Union européenne : • Directive relative à la compatibilité élec- tromagnétique 2014/30/UE,... -
Page 49: Informations Relatives Au Service Après-Vente
Pour de plus amples renseigne- 19h00 ments, adressez-vous à l’entreprise de collecte des déchets locale ou à Adresse du service après-vente votre municipalité. MEDION/LENOVO Service Center 17. Informations relatives Ifangstrasse 6 au service après-vente 8952 Schlieren Suisse Si votre appareil ne fonctionne pas de la ma- nière dont vous le souhaitez, veuillez d’abord... -
Page 50: Mentions Légales
électronique ou sous toute autre forme est interdite sans l’autorisation préalable écrite du fabricant. L’entreprise suivante possède les droits d’au- teur : MEDION AG Am Zehnthof 77 45307 Essen Allemagne Veuillez noter que l’adresse ci-dessus n’est pas celle du service des retours. Contactez... - Page 51 Inhoudsopgave Informatie over deze gebruiksaanwijzing ............52 1.1. Betekenis van de symbolen ..............52 Gebruiksdoel ....................53 Veiligheidsvoorschriften ................53 3.1. Magnetron opstellen en aansluiten ............54 3.2. Brandgevaren vermijden ................. 56 3.3. Speciale veiligheidsvoorschriften voor het gebruik van magnetrons ..57 3.4.
-
Page 52: Informatie Over Deze Gebruiksaanwijzing
1. Informatie over deze VOORZICHTIG! gebruiksaanwijzing Gevaar door hete oppervlak- ken! Hartelijk dank dat u voor ons pro- duct hebt gekozen. Wij wensen u Bij dit symbool wordt nuttige veel plezier met het apparaat. extra informatie over de mon- tage of het gebruik gegeven. Lees de veiligheidsvoorschriften en de vol- ledige gebruiksaanwijzing aandachtig door Neem de instructies in de ge-... -
Page 53: Gebruiksdoel
2. Gebruiksdoel 3. Veiligheidsvoorschrif- De magnetron mag uitsluitend worden gebruikt voor het verwarmen van daarvoor BELANGRIJKE VEILIGHEIDS- geschikte levensmiddelen in daarvoor ge- schikte verpakkingen en serviesgoed. VOORSCHRIFTEN – LEES DEZE Dit apparaat is bedoeld voor gebruik in par- AANDACHTIG DOOR EN BE- ticuliere huishoudens en vergelijkbare huis- houdelijke toepassingen, bijvoorbeeld WAAR ZE VOOR LATER GEBRUIK! -
Page 54: Magnetron Opstellen En Aansluiten
Kinderen jonger dan 8 jaar Neem bij transportschade moeten uit de buurt van het onmiddellijk contact op met apparaat en het netsnoer het Service Center. Sluit de magnetron alleen worden gehouden. aan op een volgens de voor- 3.1. - Page 55 Verwijder geen afdekkingen afdekkingen, aan de oven- deur, deurafdichtingen of in de binnenruimte van de aan de deurvergrendeling. magnetron en verwijder de Trek in dit geval onmiddellijk folie aan de binnenzijde van het netsnoer aan de stekker het kijkvenster niet, omdat uit het stopcontact.
-
Page 56: Brandgevaren Vermijden
WAARSCHUWING! controleren door een profes- sioneel reparatiebedrijf. Brandgevaar! Trek in de volgende gevallen Er bestaat gevaar voor de stekker uit het stopcon- brand door onjuist ge- tact: bruik van het apparaat – als u het apparaat reinigt Dek de openingen van het of onderhoudt;... -
Page 57: Speciale Veiligheidsvoorschriften Voor Het Gebruik Van Magnetrons
Bereid met het apparaat 3.3. Speciale veiligheids- voorschriften voor het geen alcoholhoudende gebruik van magnetrons etenswaren. Gebruik het apparaat niet WAARSCHUWING! Verhit om te frituren of olie te ver- geen etenswaren of vloei- hitten. stoffen in goed gesloten ... -
Page 58: Veiligheidsvoorschriften Voor Het Verwarmen Van Vloeistoffen
Maak vóór het garen in- WAARSCHUWING! Bij het kepingen in voedsel met verwarmen van vloeistoffen een gesloten huid, zoals to- in de magnetron kan zoge- maten, worstjes, aubergines naamde kookvertraging op- en dergelijke om te voorko- treden. Dat wil zeggen dat men dat ze barsten. -
Page 59: Overzicht Van Het Apparaat
4. Overzicht van het ap- paraat Menu Afb. 1 – Vooraanzicht met deur open 1. Mica-afdekking van de magnetron (NIET VERWIJDEREN!) 2. Netsnoer met stekker (aan de achter- kant, niet weergegeven) 3. Display 4. Bedieningspaneel 5. Glazen draaiplateau 6. Draairing 7. -
Page 60: Inhoud Van De Levering
De magnetron moet vóór elk gebruik op beschadigingen worden gecontroleerd. Neem bij beschadigingen contact op met onze klantenservice. Het door u gekochte pakket moet het vol- gende bevatten: • Magnetron • Glazen draaiplateau • Draairing Menu • Aandrijfas • Beknopte gebruiksaanwijzing Afb. -
Page 61: Afmetingen En Vorm Van Servies Dat Geschikt Is Voor Gebruik In De Magne- Tron
Neem de exacte bereidingstijd in acht. 6.2. Materialen die geschikt Kies de kortst aangegeven bereidingstijd zijn voor de magnetron en verleng deze zo nodig. Dek de gerechten tijdens het koken of Gebruik in de magnetron het volgende keu- kengerei: garen af met een voor de magnetron geschikte afdekking. -
Page 62: Vóór Het Eerste Gebruik
7. Vóór het eerste ge- LET OP! bruik Mogelijke materiële schade! Er bestaat gevaar voor schade aan het appa- 7.1. Apparaat plaatsen raat door een verkeerde opstelling Plaats de magnetron op een vlakke, sta- biele ondergrond die het eigen gewicht van het apparaat plus het maximale ge- wicht van de hoeveelheid daarin te berei- den voedingsmiddelen kan dragen. -
Page 63: Glazen Draaiplateau Plaatsen
Draai aan de draaiknop (14) om de ge- komt en maak de oppervlakken na afloop goed droog. wenste minuten in te stellen. Reinig het glazen draaiplateau en de Druk vervolgens weer op de toets timer/ draairing in warm water met een beetje klok (12). -
Page 64: Instellingen Vastleggen
dan met een zachte doek af. LET OP! Druk een keer op de toets magnetron Mogelijke materiële schade! (16) en draai aan de draaiknop (14) Het apparaat kan door onjuist gebruik be- om het vermogen in te stellen. schadigd raken ... -
Page 65: Snelstart
8.2. Snelstart Bereidingstabel/voorbeelden Als u op de toets start (13) drukt zonder eerst het vermogen in te stellen, wordt de bereiding gestart met het hoogst mogelij- Gerecht ke vermogen (800 watt). Bij automatische programma’s en bij het ontdooiprogramma op basis van gewicht is deze functie niet be- schikbaar. -
Page 66: Programma Onderbreken
Kies nu het gewenste gewicht. Draai 8.5. Programma onderbre- hiervoor aan de draaiknop (14) tot de gewenste portiegrootte wordt weerge- geven. Om de gerechten bijvoorbeeld halverwege Het gewicht / de hoeveelheid wordt op het de bereidingstijd te kunnen omdraaien of display (3) weergegeven. -
Page 67: Ontdooien Op Basis Van Tijd
Druk op de toets ontdooien Gewicht van het (17) Tijd om het ontdooien op basis van gewicht gerecht te activeren. Op het display (3) verschijnt dEF1. 1000 g 50:20 minuten Draai aan de draaiknop (14) om het ge- 1500 g 75:40 minuten wicht van het gerecht in te stellen. -
Page 68: Meerdere Programma's Gebruiken
Draai aan de draaiknop (14) om de ge- 9.3. Meerdere programma’s wenste periode in te stellen. gebruiken De maximaal instelbare tijdsduur is 95 minu- ten. Het product kan meerdere programma’s na Bevestig de invoer met de toets start elkaar uitvoeren. -
Page 69: Langdurig Niet-Gebruik En Transport
(8) bij sterke verontreiniging schoon met 12. Langdurig niet-ge- een vochtige doek en een mild schoon- bruik en transport maakmiddel. Gebruik geen reinigingssprays, schuur- Trek als u de magnetron langere tijd niet middelen of bijtende reinigingsmiddelen. gebruikt, de stekker uit het stopcontact ... -
Page 70: Technische Gegevens
Volgens richtlijn 2012/19/EU moet Hierbij verklaart MEDION AG dat het apparaat aan het einde van de het product in overeenstemming levensduur volgens de voorschrif- is met de volgende eisen van de ten worden afgevoerd. -
Page 71: Service-Informatie
Het copyright berust bij de firma: België & Luxemburg MEDION AG Am Zehnthof 77 Openingstijden Klantenservice 45307 Essen klantenservice (België) Duitsland ... - Page 73 Índice Información acerca de este manual de instrucciones ........74 1.1. Explicación de los símbolos ..............74 Uso conforme a lo previsto ................75 Indicaciones de seguridad ................75 3.1. Instalación y conexión del microondas ............76 3.2. Evitar el riesgo de incendio ..............78 3.3.
-
Page 74: Información Acerca De Este Manual De Instrucciones
1. Información acerca ¡ATENCIÓN! de este manual de ins- Peligro por superficies calien- trucciones tes. Este símbolo le ofrece infor- Muchas gracias por haber elegido mación adicional útil sobre el nuestro producto. Le deseamos que montaje o el funcionamiento. disfrute con este aparato. Antes de la puesta en servicio, lea atenta- Respete las indicaciones del mente las indicaciones de seguridad y todo... -
Page 75: Uso Conforme A Lo Previsto
2. Uso conforme a lo pre- 3. Indicaciones de segu- visto ridad El microondas solo debe utilizarse para calen- ¡INDICACIONES DE SEGURI- tar comida apta para ello en vajilla y recipien- DAD IMPORTANTES: LÉALAS tes apropiados. Este aparato está diseñado para uso domésti- DETENIDAMENTE Y GUÁRDE- co y otras aplicaciones similares a la domésti- LAS PARA SU FUTURO USO! -
Page 76: Instalación Y Conexión Del Microondas
Conecte el microondas solo 3.1. Instalación y conexión del microondas a una toma de corriente debidamente instalada, co- ¡ADVERTENCIA! nectada a tierra y protegida ¡Peligro de descarga eléctricamente. La tensión eléctrica! de alimentación debe co- Existe peligro de descar- rresponderse con los datos ga eléctrica a causa de técnicos del aparato. - Page 77 En estos casos, desenchufe puede escaparse la radiación inmediatamente el cable de microondas. Utilice exclusivamente ac- de alimentación de la toma de corriente con puesta tie- cesorios y recambios sumi- rra tirando de la clavija. No nistrados o autorizados por vuelva a poner en marcha nosotros.
-
Page 78: Evitar El Riesgo De Incendio
Desenchufe el aparato de ¡ADVERTENCIA! la toma de corriente en los ¡Peligro de incendio! siguientes casos: Peligro de incendio por – cuando limpie o realice el un uso inadecuado del mantenimiento del apa- aparato. rato; No cubra ni obstruya ningún –... -
Page 79: Indicaciones Especiales De Seguridad Para El Uso Del Microondas
No prepare con el aparato En algunos casos, los ali- alimentos que contengan mentos preparados en el alcohol. microondas se calientan No utilice el aparato para irregularmente. Antes de la ingesta, compruebe la tem- freír ni para calentar aceite. peratura de los alimentos ca- ... -
Page 80: Indicaciones De Seguridad Para El Calentamiento De Líquidos
Al abrir la puerta del espa- de golpe, por lo que se ha de cio de cocción sale vapor proceder con sumo cuidado caliente. Mantenga cierta al manejar el recipiente. No utilice recipientes estre- distancia. Durante el proceso de coc- chos y altos. -
Page 81: Vista General Del Aparato
4. Vista general del apa- rato Menu Fig. 1 – Vista frontal con la puerta abierta 1. Cubierta de mica del magnetrón (¡NO RETIRAR!) 2. Cable de alimentación con clavija de en- chufe (en la parte posterior; no aparece en la imagen) 3. -
Page 82: Volumen De Suministro
Antes de cada uso debe comprobarse si el microondas presenta daños. Diríjase a nuestro servicio de asistencia técnica en caso de daños. Con el paquete que ha adquirido recibirá lo siguiente: • Microondas • Plato giratorio de cristal • Aro giratorio Menu •... -
Page 83: Tamaño Y Forma De Los Recipientes Adecuados Para El Microondas
Tenga en cuenta el tiempo de cocción • platos y vasos de cartón (solo para calen- exacto. tar brevemente) Elija el tiempo de cocción más breve y • servilletas de papel (solo para cubrir ali- prolónguelo después si es necesario. mentos y absorber grasa) ... -
Page 84: Primera Limpieza Del Aparato
El microondas está diseñado como apa- 7.2. Primera limpieza del rato de ubicación independiente. No aparato ponga el microondas en funcionamiento dentro de un mueble empotrado ni en un Tire de la manilla para abrir la puerta del armario. -
Page 85: Ajuste De La Hora
7.4. Ajuste de la hora 8. Uso del microondas Cuando se utilice el producto por primera ¡PELIGRO! vez o si se corta la alimentación de corriente, en el panel de visualización (3) aparecerá ¡Peligro de lesiones! «0:00» y se deberá ajustar la hora (en formato Existe peligro de sufrir lesiones por descarga de 24 horas). -
Page 86: Realización De Ajustes
Tire de la manilla para abrir la puerta del espacio de cocción (11). Coloque los alimentos en un recipiente apto para microondas en el centro del plato giratorio de cristal. Cierre la puerta del espacio de cocción, que debe encajar de forma audible. 8.1. -
Page 87: Inicio Rápido
8.2. Inicio rápido Tabla de cocción/ejemplos Si pulsa la tecla Inicio (13) sin ajustar pre- viamente un nivel de potencia, se iniciará el programa de cocción con el nivel máximo de Plato energía (800 W). Esta función no está dispo- nible con los programas automáticos y con el programa de descongelación según el peso. -
Page 88: Interrupción Del Programa
Seleccione un programa automático en- Pulse entonces la tecla Inicio (13) para tre A-1 y A-8. iniciar el programa. En el panel de visualización (3) parpadeará el Si la comida no ha quedado bien hecha, cocí- símbolo correspondiente. nela un par de minutos más en el programa ... -
Page 89: Descongelación Según El Peso
9.1. Descongelación según el En la siguiente lista encontrará los tiempos de descongelación aproximados necesarios peso para distintos pesos: El programa de descongelación se puede Peso del Hora ajustar en función del peso del alimento. alimento Se puede ajustar un peso de entre 100 g y 2000 g. -
Page 90: Uso De Varios Programas
9.5. Ajuste del temporizador Pulse la tecla Inicio (13) para iniciar el programa. El aparato puede emitir un aviso acústico una Cuando finaliza el proceso de descongela- vez transcurrido un periodo de tiempo defi- ción, suena una señal acústica. nido. -
Page 91: Periodo Prolongado Sin Uso Y Transporte
Por tanto, limpie periódicamente el mi- tro del microondas vertiendo una taza de croondas y elimine todos los restos de agua con el zumo y la piel de un limón comida. en un recipiente profundo apto para mi- Apague el microondas y desconecte el croondas y calentándola en el microon- das durante 5 minutos. -
Page 92: Datos Técnicos
UE ción no se pacio de espacio de inicia. cocción cocción (11). Por la presente, MEDION AG de- (11) no clara que el producto es confor- está ce- me con las siguientes normas eu- rrada. ropeas: • Directiva 2014/30/UE sobre compatibili- ... -
Page 93: Informaciones De Asistencia Técnica
Dirección de asistencia técnica doméstica normal. De acuerdo con la Directiva 2012/19/ MEDION Service Center UE, al final de su vida útil el aparato ENAME, S.A debe llevarse a un punto de recogi- Parque Industrial de Coimbrões, LOTE da de residuos adecuado. -
Page 94: Aviso Legal
Queda prohibida la reproducción mecánica, electrónica o de cualquier otro tipo sin la au- torización por escrito del fabricante. El copyright pertenece a la empresa: MEDION AG Am Zehnthof 77 45307 Essen Alemania Tenga en cuenta que la dirección indicada arriba no es una dirección para devoluciones. - Page 96 1. Informazioni relative Questo simbolo fornisce infor- a queste istruzioni per mazioni supplementari utili per l’assemblaggio o per il funzio- l’uso namento. Osservare le indicazioni conte- Grazie per aver scelto il nostro pro- nute nelle istruzioni per l’uso! dotto. Ci auguriamo che ne sia sod- disfatto.
- Page 97 2. Utilizzo conforme 3. Indicazioni di sicurez- Il forno a microonde deve essere utilizzato soltanto per scaldare alimenti idonei all’in- IMPORTANTI ISTRUZIONI DI terno di recipienti di cottura e stoviglie ade- guati. SICUREZZA: LEGGERLE ATTEN- L’apparecchio è destinato all’utilizzo domesti- TAMENTE E CONSERVARLE PER co o in ambienti simili, come ad esempio OGNI FUTURA CONSULTAZIONE!
- Page 98 Collegare il forno a micro- 3.1. Posizionamento e col- legamento del forno a onde esclusivamente a una microonde presa installata, messa a ter- ra e protetta a regola d’arte. AVVERTENZA! La tensione di rete deve cor- Pericolo di scossa elet- rispondere a quella indicata trica! nei dati tecnici dell’apparec-...
- Page 99 Non rimuovere i rivestimenti caso, staccare immediata- mente il cavo di alimentazio- del vano del forno a micro- ne dalla presa elettrica con onde o la pellicola interna messa a terra. Non mettere della finestrella per evitare in funzione il forno a micro- che fuoriescano radiazioni a onde finché...
- Page 100 Scollegare la spina dalla pre- AVVERTENZA! sa di corrente: Pericolo d’incendio! – quando l’apparecchio vie- Pericolo d’incendio in ne sottoposto a pulizia o caso di utilizzo improprio manutenzione, dell’apparecchio. – quando si monta o smon- Non coprire né ostruire le ta l’apparecchio, aperture dell’apparecchio.
- Page 101 3.3. Indicazioni di sicurezza infiammazioni o incendi. specifi che per i forni a Non utilizzare l’apparecchio microonde per preparare pietanze con- tenenti alcool. AVVERTENZA! Non riscal- Non utilizzare l’apparecchio dare pietanze o liquidi in per friggere o scaldare olio. contenitori sigillati! Questi ...
- Page 102 AVVERTENZA! I liquidi all’interno di stoviglie appo- sitamente concepite per il riscaldati nel forno a micro- forno a microonde. onde possono presentare Prima di cuocere alimenti una cosiddetta ebollizione ritardata, ossia possono rag- con la buccia, come pomo- giungere la temperatura di dori, salsicce, melanzane o ebollizione senza che si for-...
- Page 103 4. Panoramica dell’ap- parecchio Menu Fig. 1 – Vista frontale con sportello aperto 1. Piastra di mica del magnetron (NON RI- MUOVERLA!) 2. Cavo di alimentazione con spina (sul lato posteriore, non raffigurato) 3. Display 4. Pannello di controllo 5. Piatto girevole in vetro 6.
- Page 104 Verificare l’integrità della confezione e co- municare al nostro servizio di assistenza l’eventuale incompletezza della fornitura entro 14 giorni dall’acquisto. Prima di ogni utilizzo, verificare la presen- za di eventuali danni al forno a microon- de. In caso di danni, rivolgersi al nostro servizio di assistenza.
- Page 105 Utilizzare stoviglie idonee al forno a 6.2. Materiali idonei al forno microonde. Quando si acquistano le a microonde stoviglie, assicurarsi che presentino l’in- dicazione di idoneità all’uso in forno a Utilizzare nel forno a microonde i seguenti microonde. utensili: •...
- Page 106 7. Prima del primo AVVISO! utilizzo Possibili danni materiali! Un posizionamento scorretto può causare 7.1. Posizionamento dell’ap- danni all’apparecchio. Posizionare il forno a microonde su una parecchio superficie piana e stabile in grado di so- stenere il peso dell’apparecchio insieme al peso massimo degli alimenti in esso contenuti.
- Page 107 Lavare il piatto girevole in vetro e l’anello Ruotare la manopola di regolazione (14) girevole in acqua calda con una piccola per impostare l’ora. Quindi premere di nuovo il pulsante ti- quantità di detersivo per stoviglie, quindi asciugare accuratamente i componenti.
- Page 108 In presenza di danni non mettere in fun- zione il forno a microonde e contattare il Durante il funzionamento dell’apparecchio servizio di assistenza. si può riscontrare la formazione di conden- sa sulle pareti interne del vano di cottura e AVVISO! sullo sportello.
- Page 109 Il tempo di cottura massimo è di 95 mi- nuti. 8.3. Tabella dei tempi di cot- tura Tabella dei tempi di cottura/esempi Livel- Peso Tem- Pietanza lo di po di cot- cot- Scongelamen- tura tura to, prepara- zione di burro 100 g 0:30 Ammorbidire...
- Page 110 Pro- Tabella dei tempi di cottura/esempi Peso Display Potenza gramma Livel- Peso Tem- Pietanza A-1 Riscal- 200 g lo di po di damento 400 g 800 W cot- cot- 600 g tura tura A-2 Ver- 200 g dura P100 300 ml 2:30 Riscaldamen- 300 g 800 W to di latte 600 ml 4:30 400 g...
- Page 111 Il tempo residuo rimane visualizzato sul di- le pietanze per garantire uno scongela- splay (3). mento uniforme. Dopo avere richiuso lo sportello (11), Richiudere quindi lo sportello (11) e pre- mere nuovamente il pulsante di avvio premere il pulsante di avvio (13) per riprendere il programma selezionato.
- Page 112 Richiudere quindi lo sportello (11) e pre- Esempio: mere nuovamente il pulsante di avvio Si desidera scongelare una pietanza con il (13) per riprendere il programma. programma di scongelamento, quindi avvia- re il programma di cottura P50. Se al termine del tempo impostato gli ...
- Page 113 10. Consigli per il rispar- umido. Evitare l’ingresso di acqua nei fori di aerazione. mio di energia Pulire lo sportello con la finestrella (11) e il meccanismo di chiusura dello sportello Scegliere il tempo di cottura più breve (9) utilizzando un detergente delicato.
- Page 114 15. Informazioni sulla collegandovi un altro ap- conformità UE parecchio. MEDION AG dichiara che il pro- Chiudere lo dotto è conforme ai seguenti re- Il ciclo di Lo spor- quisiti dell’Unione europea: cottura tello (11) sportello (11).
- Page 115 0848 - 33 33 32 bili in Francia. Lun.-ven.: 9.00-19.00 APPARECCHIO Indirizzo del servizio di assistenza Tutti i prodotti usati contrassegnati MEDION/LENOVO Service Center con il simbolo a lato non devono Ifangstrasse 6 essere smaltiti insieme ai rifiuti do- mestici. 8952 Schlieren...
- Page 116 È vietata la riproduzione in forma meccanica, elettronica e in qualsiasi altra forma senza l’autorizzazione scritta da parte del produt- tore. Il copyright appartiene all’azienda: MEDION AG Am Zehnthof 77 45307 Essen Germania L’indirizzo riportato sopra non è quello a cui spedire la merce resa.
- Page 117 Contents Information about this user manual ............. 118 1.1. Explanation of symbols ................118 Proper use ....................119 Safety instructions ..................119 3.1. Setting up and connecting the microwave ..........120 3.2. Avoiding risk of fire ................. 122 3.3. Safety instructions relating specifically to the use of microwaves ..... 123 3.4.
-
Page 118: Information About This User Manual
1. Information about this This symbol provides useful user manual additional information for assembling or operating the appliance. Thank you for choosing our product. We hope you enjoy using this appli- Follow the instructions in the ance. user manual! Please read the safety instructions and the user manual carefully before using the appli- Symbol for alternating current ance for the first time. -
Page 119: Proper Use
2. Proper use 3. Safety instructions The microwave may only be used for heating IMPORTANT SAFETY INSTRUC- up suitable food in suitable cooking contain- TIONS – READ CAREFULLY ers and dishes. This appliance is designed for use in private AND KEEP FOR FUTURE REF- households and similar household applica- ERENCE! tions, such as... -
Page 120: Setting Up And Connecting The Microwave
The socket must be freely 3.1. Sett ing up and connect- ing the microwave accessible so that you can unplug the microwave from WARNING! the mains quickly if neces- Risk of electric shock! sary. There is a risk of electric WARNING! shock due to live parts. - Page 121 place to prevent the escape ance come into contact with of microwave radiation. water or other liquids. Keep Do not, under any circum- the appliance, the mains cable and the mains plug stances, make any unauthor- away from wash basins, ised modifications to the sinks or similar.
-
Page 122: Avoiding Risk Of Fire
The appliance may only be 3.2. Avoiding risk of fi re used for heating up suitable WARNING! food in suitable containers Risk of explosion! and dishes. Mixtures of water and Do not dry combustible oil can ignite or even ex- objects in the appliance (no plode. -
Page 123: Safety Instructions Relating Specifically To The Use Of Microwaves
3.3. Safety instructions re- before cooking in order to lating specifi cally to the prevent it from bursting. use of microwaves Hot steam will escape when you open cooking contain- WARNING! Do not heat up ers (e.g. popcorn bags, food food or liquids in sealed or storage containers). - Page 124 moving the liquid from the microwave, can then cause a sudden reaction, causing boiling liquid to spurt out, which is why caution is re- quired when handling the container. Do not use tall, narrow con- tainers. Place a glass rod or ceramic rod in the container when heating liquids in order to prevent delayed boiling.
-
Page 125: Appliance Overview
4. Appliance overview Menu Fig. 1 – Front view with door open 1. Magnetron mica waveguide cover (DO NOT REMOVE!) 2. Mains cable with plug (on the back, not shown) 3. Display field 4. Control panel 5. Glass turntable 6. Roller ring 7. -
Page 126: Package Contents
5. Package contents 6. Cooking in the micro- wave DANGER! Risk of injury! NOTICE! Possible material damage! There is a risk of choking and suffocation due to swallowing or inhaling small parts or The use of unsuitable materials can cause plastic wrap. -
Page 127: Size And Shape Of Microwave-Safe Containers
Cover food during cooking or heating 7. Before using the appli- with a microwave-safe cover. Covering ance for the fi rst time the food helps avoid splashes; further- more, the food is more evenly cooked. 7.1. Sett ing up the appliance ... -
Page 128: Cleaning The Appliance For The First Time
7.3. Inserting the glass turn- NOTICE! table Possible material damage! There is a risk of damage to the appliance if installed incorrectly. Place the microwave on a level, stable surface which is able to carry the weight of the appliance as well as the maximum weight of the food which will be cooked in it. -
Page 129: Setting The Button Lock
Do not move the appliance when it is in 7.5. Sett ing the butt on lock use. Press and hold the stop button (15) Prepare the food: for approximately 3 seconds to switch on Poultry, pork, minced meat and all types the button lock. -
Page 130: Quick Start
8.2. Quick start If you press the start button (13) without previously setting the power level, the cook- ing programme will start at the maximum level (800 watts). This function is, however, not available for the automatic programmes and defrosting by weight programme. ... -
Page 131: Automatic Programme
The corresponding symbol flashes on the Cooking table/examples display field (3). Food Press the start button (13) to confirm the selection. Now select the desired weight. To do this, turn the control knob (14) until the de- sired portion size is displayed. The weight/amount is shown on the display field (3). -
Page 132: Interrupting A Programme
If the desired food is not fully cooked 9. Defrosting pro- through, cook it again for a few minutes gramme more with the cooking programme. 8.5. Interrupting a pro- gramme If possible, turn the food to the other side af- ter half the time has elapsed to optimise de- If you want to turn or stir the food, for in- frosting (see “8.5. -
Page 133: Using Multiple Programmes
The longest defrosting time is 95 minutes. 9.3. Using multiple pro- The following list details the approximate de- grammes frosting times required for various weights: The product can carry out multiple pro- Food weight Time grammes consecutively. Any two sequences can be programmed to run automatically. 100 g 4:44 minutes ... -
Page 134: Energy-Saving Tips
into the ventilation openings. Confirm your entry with the start Clean the microwave door with viewing button (13). window (11) and the door lock (9) with a 10. Energy-saving tips mild soap solution. Take great care not to damage these parts. -
Page 135: Troubleshooting
Service Cen- formity not work. tive. tre. MEDION AG hereby declares that the product conforms to the fol- lowing requirements of the Euro- pean Union: • EMC Directive 2014/30/EU • Low Voltage Directive 2014/35/EU • Ecodesign Directive 2009/125/EC •... -
Page 136: Disposal
Sat – Sun: 10.00 – 16.00 and must be sorted by material type Service address in France. MEDION Electronics Ltd. APPLIANCE 120 Faraday Park, Faraday Road, Old appliances that carry the sym- Dorcan bol illustrated may not be disposed of in ordinary household waste. -
Page 137: Legal Notice
Mechanical, electronic and any other forms of reproduction are prohibited without the written permission of the manufacturer. Copyright is owned by the company: MEDION AG Am Zehnthof 77 45307 Essen Germany Please note that you cannot use the address above for returns. - Page 138 Prodott o in Cina...
Need help?
Do you have a question about the MD 15000 and is the answer not in the manual?
Questions and answers