Table of Contents
Advertisement
Available languages
Available languages
Quick Links
Technical Support and E-Warranty Certificate www.vevor.com/support
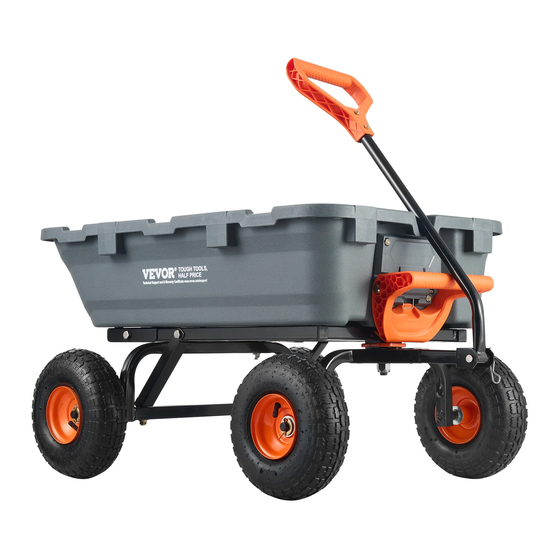
PLASTIC DUMP GARDEN CARTS
USER MANUAL
We continue to be committed to provide you tools with competitive price.
"Save Half","Half Price" or any other similar expressions used by us only represents an
estimate of savings you might benefit from buying certain tools with us compared to the major
top brands and does not necessarily mean to cover all categories of tools offered by us. You
are kindly reminded to verify carefully when you are placing an order with us if you are
actually saving half in comparison with the top major brands.
Advertisement
Table of Contents

Related Manuals for VEVOR TC4723


Summary of Contents for VEVOR TC4723
- Page 1 Technical Support and E-Warranty Certificate www.vevor.com/support PLASTIC DUMP GARDEN CARTS USER MANUAL We continue to be committed to provide you tools with competitive price. "Save Half","Half Price" or any other similar expressions used by us only represents an estimate of savings you might benefit from buying certain tools with us compared to the major top brands and does not necessarily mean to cover all categories of tools offered by us.
- Page 3 This is the original instruction,please read all manual instructions carefully before operating. VEVOR reserves a clear interpretation of our user manual. The appearance of the product shall be subject to the product you received. Please forgive us that we won't inform you again if there...
-
Page 4: Safety Precautions
Safety precautions WARNING: Read this instructions before using this product. Failure to do so can result in serious injury. the basic precautions should always be followed,including the following: 1. The plastic dump garden carts may not be used or stored in hazardous areas. It is not allowed to use the appliance in hazardous locations. -
Page 5: Product List
Product List Tray(x1) Locking frame (x1) (x1) Bottom Frame (x1) Flat Front Steering frame (x1) Supporting angle iron (x1) Rear support Frame (x1) Supporting angle iron (x1) - Page 6 Wheel (x4) Stretch netting (x1) Handle (x1) Board (x1) Gasket (x5) M16 (x1) M8x20 (x5) M10x45 (x4) M10x50 (x2) M12x75 (x2) Cotter pin (x4) Hexagon wrench (x2)
-
Page 7: Product Description
Product Description 1.Remove the screws (x4) from the locking frame. 2.Assemble the locking frame onto the tray with screws. Assemble the flat onto the tray with screws (x5). - Page 8 Assemble the bottom frame onto the flat with screws (x2). 1. Place the plane of the board facing down on the axis of the Bottom Frame. 2. Place the front steering frame on the axis of the bottom frame. 3. Place the Gasket on the shaft of the bottom frame. Lock the shaft with a nut.
- Page 9 Attach the rear support frame to the bottom frame with screws (x2). Attach the supporting angle iron to the bottom frame and rear support frame with screws (x4).
- Page 10 1. Attach the tires to the axle with the air holes facing outward. 2. Put on the spacer (x4). 3. Insert the cotter pin (x4) and bend. Turn the plastic dump garden carts upside down.
- Page 11 1. Detach the pin from the front steering frame. 2. Hold the handle in place with a pin through the Front Steering frame. 3. Secure the PIN with the Cotter Pin. The assembly is complete. Press the handle to tip the Tray.
- Page 12 Body volume 10.6”/270mm Product parameters 2020*805*650mm Product dimensions 79.5*31.7*25.6in 960*570*270mm Body volume 37.8*22.4*10.6in Maximum weight capacity 1200 lbs Net weight 26kg Wheel 13*4.00-6...
- Page 14 Address: Baoshanqu Shuangchenglu 803long 11hao 1602A-1609shi Shanghai Imported to AUS: SIHAO PTY LTD,1 ROKEVA STREETEASTWOOD NSW 2122 Australia Imported to USA: Sanven Technology Ltd., Suite 250,9166 Anaheim Place,Rancho Cucamonga,CA 91730 Pooledas Group Ltd Unit 5 Albert Edward House, The Pavilions Preston, United Kingdom SHUNSHUN GmbH Römeräcker 9 Z2021, 76351...
- Page 16 Technical Support and E-Warranty Certificate www.vevor.com/support...
- Page 17 Técnico Soporte y certificado de garantía electrónica www.vevor.com/support CARROS DE JARDÍN CON VOLCADO DE PLÁSTICO MANUAL DE USUARIO We continue to be committed to provide you tools with competitive price. "Save Half","Half Price" or any other similar expressions used by us only represents an estimate of savings you might benefit from buying certain tools with us compared to the major top brands and does not necessarily mean to cover all categories of tools offered by us.
- Page 19 This is the original instruction,please read all manual instructions carefully before operating. VEVOR reserves a clear interpretation of our user manual. The appearance of the product shall be subject to the product you received. Please forgive us that we won't inform you again if there...
-
Page 20: Precauciones De Seguridad
Precauciones de seguridad ADVERTENCIA: Lea estas instrucciones antes de usar este producto. De lo contrario, se pueden producir lesiones graves. Siempre se deben seguir las precauciones básicas , incluidas las siguientes: 7. Los carros de jardín basureros de plástico _ _ No se puede utilizar ni almacenar en zonas peligrosas. -
Page 21: Lista De Productos
GUARDA ESTAS INSTRUCCIONES Lista de productos Bandeja (x1) Marco de bloqueo (x1) ( x1 ) Marco inferior ( x1 ) Departamento Marco de dirección delantera (x1) Ángulo de soporte (x1) - Page 22 Marco de soporte trasero (x1) Ángulo de soporte (x1) Rueda ( x4 ) Red elástica (x1) Manejar (x1) Tablero (x1) Junta (x5) M16 (x1) M8x20 (x5) M10x45 (x4) M10x50 (x2) M12x75 (x2)
-
Page 23: Descripción Del Producto
pasador de chaveta (x4) Llave hexagonal (x2) Descripción del Producto 1. Retire los tornillos (x4) del marco de bloqueo. 2. Monte el marco de bloqueo en la bandeja con tornillos. - Page 24 Ensamble el plano en la bandeja con tornillos (x5) . Ensamble el marco inferior en el plano con tornillos (x2) .
- Page 25 5. Coloque el plano del tablero hacia abajo sobre el eje del marco inferior. 6. Coloque el marco de dirección delantero en el eje del marco inferior. 7. Coloque la junta en el eje del marco inferior. Bloquee el eje con una tuerca. Tenga en cuenta que no se puede bloquear y que se requiere un espacio para girar el marco de dirección delantero.
- Page 26 Fije el marco de soporte trasero al marco inferior con tornillos ( x2) . Fije el ángulo de soporte al marco inferior y al marco de soporte trasero con tornillos . (x4) .
- Page 27 4. Coloque los neumáticos al eje con los orificios de ventilación hacia afuera. 5. Coloque el espaciador (x4). 6. Inserte la chaveta (x4) y dóblela. Voltee los carros de plástico del jardín al revés .
- Page 28 4. Separe el pasador del marco de dirección delantero . 5. Sostenga la manija en su lugar con un pasador a través del marco de dirección delantera. 6. Asegure el PIN con la chaveta . El montaje está completo.
- Page 29 Presione el asa para inclinar la bandeja. Volumen corporal 10.6”/270mm parametros del producto 2020*805*650mm Dimensiones del producto 79,5*31,7*25,6 pulgadas 960*570*270mm Volumen corporal 37,8*22,4*10,6 pulgadas Capacidad máxima de peso 1200 libras Peso neto 26kg...
- Page 30 Rueda 13*4.00-6...
- Page 31 Dirección: Baoshanqu Shuangchenglu 803long 11hao 1602A-1609shi Shanghai Importado a AUS: SIHAO PTY LTD , 1 ROKEVA STREETEASTWOOD NSW 2122 Australia Importado a EE. UU.: Sanven Technology Ltd. , Suite 250 , 9166 Anaheim Place , Rancho Cucamonga , CA 91730 Pooledas Group Ltd Unit 5 Albert Edward House, The Pavilions Preston, United Kingdom...
- Page 33 Técnico Certificado de soporte y garantía electrónica www.vevor.com/support...
- Page 34 Tecnico Supporto e certificato di garanzia elettronica www.vevor.com/support CARRELLI DA GIARDINO IN PLASTICA MANUALE D'USO We continue to be committed to provide you tools with competitive price. "Save Half","Half Price" or any other similar expressions used by us only represents an estimate of savings you might benefit from buying certain tools with us compared to the major top brands and does not necessarily mean to cover all categories of tools offered by us.
- Page 36 This is the original instruction,please read all manual instructions carefully before operating. VEVOR reserves a clear interpretation of our user manual. The appearance of the product shall be subject to the product you received. Please forgive us that we won't inform you again if there...
-
Page 37: Misure Di Sicurezza
Misure di sicurezza AVVERTIMENTO: Leggere queste istruzioni prima di utilizzare questo prodotto. In caso contrario si potrebbero causare lesioni gravi. È necessario seguire sempre le precauzioni di base , incluse le seguenti: 13. I carri da giardino con discarica di plastica _ non può essere utilizzato o conservato in aree pericolose. - Page 38 danneggerebbe i carrelli da giardino con scarico in plastica. CONSERVA QUESTE ISTRUZIONI Elenco prodotti Vassoio(x1) Telaio di bloccaggio (x1) ( x1 ) Telaio inferiore ( x1 ) Piatto Telaio dello sterzo anteriore (x1) Angolare di supporto (x1)
- Page 39 Telaio di supporto posteriore (x1) Angolare di supporto (x1) Ruota ( x4 ) Rete elastica (x1) Maniglia (x1) Tabellone (x1) Guarnizione (x5) M16 (x1) M8x20 (x5) M10x45 (x4) M10x50 (x2) M12x75 (x2)
-
Page 40: Descrizione Del Prodotto
Coppiglia (x4) Chiave esagonale (x2) Descrizione del prodotto 1. Rimuovere le viti (x4) dal telaio di bloccaggio. 2. Assemblare il telaio di bloccaggio sul vassoio con le viti. - Page 41 Montare il piatto sul vassoio con le viti ( x5) . Montare il telaio inferiore sul piatto con le viti ( x2) .
- Page 42 9. Posiziona il piano della tavola rivolto verso il basso sull'asse del telaio inferiore. 10. Posizionare il telaio dello sterzo anteriore sull'asse del telaio inferiore. 11. Posizionare la guarnizione sull'albero del telaio inferiore. Bloccare l'albero con un dado. Tieni presente che non può essere bloccato ed è necessario uno spazio per ruotare il telaio dello sterzo anteriore.
- Page 43 Fissare il telaio di supporto posteriore al telaio inferiore con le viti ( x2) . Fissare l' angolare di supporto al telaio inferiore e al telaio di supporto posteriore con le viti (x4) .
- Page 44 7. Fissare gli pneumatici all'asse con i fori per l'aria rivolti verso l'esterno. 8. Mettere il distanziatore (x4). 9. Inserire la coppiglia (x4) e piegarla. Capovolgi i carrelli da giardino con discarica di plastica .
- Page 45 7. Staccare il perno dal telaio dello sterzo anteriore . 8. Tenere la maniglia in posizione con un perno attraverso il telaio dello sterzo anteriore. 9. Fissare il PIN con la coppiglia . L'assemblaggio è completo.
- Page 46 Premere la maniglia per inclinare il vassoio. Volume corporeo 10.6”/270mm Parametri del prodotto 2020*805*650 mm Dimensioni del prodotto 79,5*31,7*25,6 pollici 960*570*270 mm Volume corporeo 37,8*22,4*10,6 pollici Capacità di peso massima 1200 libbre Peso netto 26kg...
- Page 47 Ruota 13*4.00-6...
- Page 48 Indirizzo: Baoshanqu Shuangchenglu 803long 11hao 1602A-1609shi Shanghai Importato negli Stati Uniti: SIHAO PTY LTD , 1 ROKEVA STREETEASTWOOD NSW 2122 Australia Importato negli Stati Uniti: Sanven Technology Ltd. , Suite 250 , 9166 Anaheim Place , Rancho Cucamonga , CA 91730 Pooledas Group Ltd Unit 5 Albert Edward House, The Pavilions Preston, United Kingdom...
- Page 50 Tecnico Supporto e certificato di garanzia elettronica www.vevor.com/support...
-
Page 51: Instrukcja Obsługi
Techniczny Certyfikat wsparcia i e-gwarancji www.vevor.com/support PLASTIKOWE WÓZKI OGRODOWE NA ŚMIECI INSTRUKCJA OBSŁUGI We continue to be committed to provide you tools with competitive price. "Save Half","Half Price" or any other similar expressions used by us only represents an estimate of savings you might benefit from buying certain tools with us compared to the major top brands and does not necessarily mean to cover all categories of tools offered by us. - Page 53 This is the original instruction,please read all manual instructions carefully before operating. VEVOR reserves a clear interpretation of our user manual. The appearance of the product shall be subject to the product you received. Please forgive us that we won't inform you again if there...
-
Page 54: Środki Ostrożności
Środki ostrożności OSTRZEŻENIE: Przeczytaj tę instrukcję przed użyciem tego produktu. Niezastosowanie się do tego może spowodować poważne obrażenia. należy zawsze przestrzegać podstawowych środków ostrożności , w tym: 19. Plastikowe wózki ogrodowe na śmieci _ _ _ _ nie wolno używać ani przechowywać... - Page 55 uszkodzenie plastikowych wózków ogrodowych. ZACHOWAJ TE INSTRUKCJE Lista produktów Taca (x1) Rama blokująca (x1) ( x1 ) Dolna rama ( x1 ) Płaski Przednia rama kierownicy (x1) Kątownik nośny (x1)
- Page 56 Tylna rama nośna (x1) Kątownik nośny (x1) Koło ( x4 ) Rozciągliwa siatka (x1) Uchwyt (x1) Plansza (x1) Uszczelka (x5) M16 (x1) M8x20 (x5) M10x45 (x4) M10x50 (x2) M12x75 (x2)
-
Page 57: Opis Produktu
Zawleczka (x4) Klucz sześciokątny (x2) Opis produktu 1. Wykręć śruby (x4) z ramy blokującej. 2. Zamontuj ramkę blokującą na tacy za pomocą śrub. - Page 58 Zamontuj płaskownik na płycie za pomocą śrub (x5) . Zamontuj ramę dolną na płaskiej listwie za pomocą śrub (x2) .
- Page 59 13. Umieść płaszczyznę deski skierowaną w dół na osi ramy dolnej. 14. Umieścić przednią ramę sterową na osi ramy dolnej. 15. Umieść uszczelkę na wale dolnej ramy. Zablokuj wał nakrętką. Należy pamiętać, że nie można go zablokować, a do obracania przedniej ramy kierownicy wymagana jest szczelina.
- Page 60 Przymocuj ramkę wspornika tylnego ucha do ramy dolnej za pomocą śrub ( x2 ) . Przymocuj kątownik nośny do dolnej ramy i tylnej ramy nośnej za pomocą...
- Page 61 śrub (x4) . 10. Zamocuj opony na osi otworami wentylacyjnymi skierowanymi na zewnątrz. 11. Załóż przekładkę (x4). 12. Włóż zawleczkę (x4) i zagnij.
- Page 62 Odwróć plastikowe wózki ogrodowe na śmieci do góry nogami . 10. Odłącz sworzeń od przedniej ramy kierownicy . 11. Przytrzymaj uchwyt na miejscu za pomocą sworznia przechodzącego przez przednią ramę kierownicy. 12. Zabezpiecz PIN za pomocą zawleczki . Montaż jest kompletny.
- Page 63 Naciśnij uchwyt, aby przechylić tacę. Objętość ciała 10.6”/270mm Parametry produktu...
- Page 64 2020*805*650mm Wymiary produktu 79,5*31,7*25,6 cala 960*570*270mm Objętość ciała 37,8*22,4*10,6 cala Maksymalna nośność 1200 funtów Waga netto 26 kg Koło 13*4,00-6...
- Page 65 Adres: Baoshanqu Shuangchenglu 803long 11hao 1602A-1609shi Szanghaj Import do AUS: SIHAO PTY LTD , 1 ROKEVA STREETEASTWOOD NSW 2122 Australia Import do USA: Sanven Technology Ltd. , Suite 250 , 9166 Anaheim Place , Rancho Cucamonga , CA 91730...
- Page 66 Pooledas Group Ltd Unit 5 Albert Edward House, The Pavilions Preston, United Kingdom SHUNSHUN GmbH Römeräcker 9 Z2021, 76351 Linkenheim-Hochstetten, Germany Wyprodukowano w Chinach...
- Page 68 Techniczny Certyfikat wsparcia i e-gwarancji www.vevor.com/support...
- Page 69 Technisch Support- und E-Garantie-Zertifikat www.vevor.com/support GARTENKARREN AUS KUNSTSTOFF BENUTZERHANDBUCH We continue to be committed to provide you tools with competitive price. "Save Half","Half Price" or any other similar expressions used by us only represents an estimate of savings you might benefit from buying certain tools with us compared to the major top brands and does not necessarily mean to cover all categories of tools offered by us.
- Page 71 This is the original instruction,please read all manual instructions carefully before operating. VEVOR reserves a clear interpretation of our user manual. The appearance of the product shall be subject to the product you received. Please forgive us that we won't inform you again if there...
- Page 72 Sicherheitsvorkehrungen WARNUNG: Lesen Sie diese Anweisungen, bevor Sie dieses Produkt verwenden. Andernfalls kann es zu schweren Verletzungen kommen. Die grundlegenden Vorsichtsmaßnahmen sollten immer befolgt werden , einschließlich der folgenden: 25. Die Plastikmüll - Gartenwagen _ _ _ _ _ dürfen nicht in explosionsgefährdeten Bereichen verwendet oder gelagert werden.
- Page 73 Gewicht, da dies zu Schäden am Kunststoff-Gartenwagen führt. ANLEITUNG AUFBEWAHREN Produktliste _ Tablett (x1) Verriegelungsrahmen (x1) ( x 1) Unterer Rahmen ( x 1) Wohnung Vorderer Lenkrahmen (x1) Stützwinkeleisen (x1)
- Page 74 Hinterer Stützrahmen (x1) Stützwinkeleisen (x1) Rad ( x 4) Stretchnetz (x1) Handhaben (x1) Brett (x1) Dichtung (x5) M16 (x1) M8x20 (x5) M10x45 (x4) M10x50 (x2) M12x75 (x2)
- Page 75 Splint (x4) Sechskantschlüssel (x2) Produktbeschreibung 1. Entfernen Sie die Schrauben (x4) vom Verriegelungsrahmen. 2. Befestigen Sie den Verriegelungsrahmen mit Schrauben am Tablett.
- Page 76 Montieren Sie die flache Platte mit Schrauben (x5) auf dem Tablett . Montieren Sie den unteren Rahmen mit Schrauben (x2) auf der Fläche .
- Page 77 17. Legen Sie die Ebene der Platine mit der Vorderseite nach unten auf die Achse des unteren Rahmens. 18. Sie den vorderen Lenkrahmen auf der Achse des unteren Rahmens. 19. Platzieren Sie die Dichtung auf der Welle des unteren Rahmens. Sichern Sie die Welle mit einer Mutter.
- Page 78 Befestigen Sie den hinteren Stützrahmen mit Schrauben ( x2) am unteren Rahmen . Befestigen Sie den Stützwinkel mit Schrauben am unteren Rahmen und am...
- Page 79 hinteren Stützrahmen (x4) . 13. Befestigen Sie die Reifen mit den Luftlöchern nach außen an der Achse. 14. Setzen Sie den Abstandshalter (x4) auf. 15. Stecken Sie den Splint (x4) ein und biegen Sie ihn. Drehen Sie die Kunststoff - Müll - Gartenwagen um .
- Page 80 13. Sie den Stift vom vorderen Ablenkungsrahmen . 14. Halten Sie den Griff mit einem Stift durch den vorderen Lenkrahmen fest. 15. Sichern Sie die PIN mit dem Splint . Die Montage ist abgeschlossen. Drücken Sie auf den Griff, um das Tablett zu kippen.
- Page 81 Körpervolumen 10.6”/270mm Produktparameter 2020*805*650mm Produktabmessungen 79,5 * 31,7 * 25,6 Zoll 960*570*270mm Körpervolumen 37,8 * 22,4 * 10,6 Zoll Maximale Gewichtskapazität 1200 Pfund Nettogewicht 26kg 13*4,00-6...
- Page 83 Adresse: Baoshanqu Shuangchenglu 803long 11hao 1602A-1609shi Shanghai Importiert nach AUS: SIHAO PTY LTD , 1 ROKEVA STREETEASTWOOD NSW 2122 Australien Importiert nach USA: Sanven Technology Ltd. , Suite 250 , 9166 Anaheim Place , Rancho Cucamonga , CA 91730 Pooledas Group Ltd Unit 5 Albert Edward House, The Pavilions Preston, United Kingdom SHUNSHUN GmbH...
- Page 85 Technisch Support- und E-Garantiezertifikat www.vevor.com/support...
-
Page 86: Manuel De L'utilisateur
Technique Assistance et certificat de garantie électronique www.vevor.com/support CHARIOTS DE JARDIN À BENNE BASCULANTE EN PLASTIQUE MANUEL DE L'UTILISATEUR... - Page 87 We continue to be committed to provide you tools with competitive price. "Save Half","Half Price" or any other similar expressions used by us only represents an estimate of savings you might benefit from buying certain tools with us compared to the major top brands and does not necessarily mean to cover all categories of tools offered by us.
- Page 89 This is the original instruction,please read all manual instructions carefully before operating. VEVOR reserves a clear interpretation of our user manual. The appearance of the product shall be subject to the product you received. Please forgive us that we won't inform you again if there...
-
Page 90: Précautions De Sécurité
Précautions de sécurité AVERTISSEMENT: Lisez ces instructions avant d'utiliser ce produit. Ne pas le faire peut entraîner des blessures graves. les précautions de base doivent toujours être suivies , notamment les suivantes : 31. Les chariots de jardin à benne en plastique _ ne peut pas être utilisé ou stocké dans des zones dangereuses. - Page 91 poids indiqué dans le manuel. Ne chargez pas plus que le poids indiqué, car cela endommagerait les chariots de jardin à benne basculante en plastique. CONSERVEZ CES INSTRUCTIONS Liste de produits Plateau (x1) Cadre de verrouillage (x1) ( x1 ) Cadre inférieur ( x1 ) Plat Cadre de direction avant (x1)
- Page 92 Cadre de support arrière (x1) Cornière de support (x1) Roue ( x4 ) Filet extensible (x1) Poignée (x1) Planche (x1) Joint (x5) M16 (x1) M8x20 (x5) M10x45 (x4) M10x50 (x2) M12x75 (x2)
-
Page 93: Description Du Produit
goupille (x4) Clé hexagonale (x2) Description du produit 1. Retirez les vis (x4) du cadre de verrouillage. 2. Assemblez le cadre de verrouillage sur le plateau avec des vis. - Page 94 Assemblez le plat sur le plateau avec des vis (x5) . Assemblez le cadre inférieur sur le plat avec des vis (x2) .
- Page 95 21. Placez le plan de la planche face vers le bas sur l'axe du cadre inférieur. 22. Placez le cadre de direction avant sur l'axe du cadre inférieur. 23. Placez le joint sur l'arbre du cadre inférieur. Bloquez l'arbre avec un écrou. Notez qu'il ne peut pas être verrouillé et qu'un espace est nécessaire pour faire pivoter le cadre de direction avant.
- Page 96 Fixez le cadre de support arrière au cadre inférieur à l' aide de vis ( x2) . Fixez la cornière de support au cadre inférieur et au cadre de support arrière à l'aide de vis . (x4) .
- Page 97 16. Fixez les pneus à l'essieu avec les trous d'aération tournés vers l'extérieur. 17. Mettez l'entretoise (x4). 18. Insérez la goupille fendue (x4) et pliez. Retournez les chariots de jardin à benne basculante en plastique .
- Page 98 16. Détachez la goupille du cadre de direction avant . 17. Maintenez la poignée en place avec une épingle à travers le cadre de direction avant. 18. Fixez le code PIN avec la goupille fendue . L'assemblage est terminé.
- Page 99 Appuyez sur la poignée pour faire basculer le plateau. Volume corporel 10.6”/270mm Paramètres du produit 2020*805*650mm Dimensions du produit 79,5*31,7*25,6 pouces 960*570*270mm Volume corporel 37,8*22,4*10,6 pouces Capacité de poids maximale 1200 livres Poids net 26 kg...
- Page 100 Roue 13*4.00-6...
- Page 101 Adresse : Baoshanqu Shuangchenglu 803long 11hao 1602A-1609shi Shanghai Importé en Australie : SIHAO PTY LTD , 1 ROKEVA STREETESTWOOD NSW 2122 Australie Importé aux États-Unis : Sanven Technology Ltd. , Suite 250 , 9166 Anaheim Place , Rancho Cucamonga , CA 91730 Pooledas Group Ltd Unit 5 Albert Edward House, The Pavilions Preston, United Kingdom...
- Page 103 Technique Assistance et certificat de garantie électronique www.vevor.com/support...
- Page 104 Technisch Ondersteuning en e-garantiecertificaat www.vevor.com/support KUNSTSTOF DUMPTUINKARREN HANDLEIDING We continue to be committed to provide you tools with competitive price. "Save Half","Half Price" or any other similar expressions used by us only represents an estimate of savings you might benefit from buying certain tools with us compared to the major top brands and does not necessarily mean to cover all categories of tools offered by us.
- Page 106 This is the original instruction,please read all manual instructions carefully before operating. VEVOR reserves a clear interpretation of our user manual. The appearance of the product shall be subject to the product you received. Please forgive us that we won't inform you again if there...
- Page 107 Veiligheidsmaatregelen WAARSCHUWING: Lees deze instructies voordat u dit product gebruikt. Als u dit niet doet, kan dit leiden tot ernstig letsel. de basisvoorzorgsmaatregelen moeten altijd worden gevolgd , waaronder de volgende: 37. De plastic dump tuinc kunsten _ _ _ _ mag niet worden gebruikt of opgeslagen in gevaarlijke gebieden.
- Page 108 handleiding. Laad niet meer dan het aangegeven gewicht, omdat dit de Plastic Dump Garden Carts zal beschadigen. BEWAAR DEZE INSTRUCTIES Product lijst Lade (x1) Vergrendelingsframe (x1) ( x1 ) Onderste frame ( x1 ) Vlak Stuurframe voor (x1) Ondersteunend hoekijzer (x1)
- Page 109 Achtersteunframe (x1) Ondersteunend hoekijzer (x1) Wiel ( x 4) Reknet (x1) Hendel (x1) Bord (x1) Pakking (x5) M16 (x1) M8x20 (x5) M10x45 (x4) M10x50 (x2) M12x75 (x2)
- Page 110 Splitpen (x4) Inbussleutel (x2) Productomschrijving 1. Verwijder de schroeven (x4) uit het vergrendelframe. 2. Monteer het vergrendelframe met schroeven op de lade.
- Page 111 Monteer het plat op de lade met schroeven (x5) . Monteer het onderframe op de vlakke ondergrond met schroeven ( x2) .
- Page 112 25. Plaats het vlak van het bord naar beneden gericht op de as van het onderframe. 26. Plaats het voorste stuurframe op de as van het onderframe. 27. Plaats de pakking op de as van het onderframe. Borg de as met een moer. Houd er rekening mee dat het niet kan worden vergrendeld en dat er een opening nodig is om het voorste stuurframe te draaien.
- Page 113 Bevestig het achtersteunframe aan het onderframe met schroeven ( x2 ) . Bevestig het steunhoekijzer met schroeven aan het onderframe en het achtersteunframe _ _ (x4) .
- Page 114 19. Bevestig de banden op de as met de luchtgaten naar buiten gericht. 20. Plaats het afstandsstuk (x4). 21. Plaats de splitpen (x4) en buig. Draai de plastic dump - tuinkaarten ondersteboven . _ _...
- Page 115 19. Maak de pen los van het voorste stuurframe . 20. Houd de hendel op zijn plaats met een pen door het voorste stuurframe. 21. Zet de pincode vast met de splitpen . De montage is voltooid. Druk op de hendel om de lade te kantelen.
- Page 116 Lichaamsvolume 10.6”/270mm Productparameters 2020*805*650mm Productafmetingen 79,5*31,7*25,6 inch 960*570*270mm Lichaamsvolume 37,8*22,4*10,6 inch Maximale gewichtscapaciteit 1200 pond Netto gewicht 26 kg Wiel 13*4.00-6...
- Page 118 Adres: Baoshanqu Shuangchenglu 803long 11hao 1602A-1609shi Shanghai Geïmporteerd naar AUS: SIHAO PTY LTD , 1 ROKEVA STREETEASTWOOD NSW 2122 Australië Geïmporteerd naar de VS: Sanven Technology Ltd. , Suite 250 , 9166 Anaheim Place , Rancho Cucamonga , CA 91730 Pooledas Group Ltd Unit 5 Albert Edward House, The Pavilions Preston, United Kingdom...
- Page 120 Technisch Ondersteuning en e-garantiecertificaat www.vevor.com/support...
- Page 121 Teknisk Support och e-garanticertifikat www.vevor.com/support TRÄDGÅRDSVAGNAR I PLAST ANVÄNDARMANUAL We continue to be committed to provide you tools with competitive price. "Save Half","Half Price" or any other similar expressions used by us only represents an estimate of savings you might benefit from buying certain tools with us compared to the major top brands and does not necessarily mean to cover all categories of tools offered by us.
- Page 123 This is the original instruction,please read all manual instructions carefully before operating. VEVOR reserves a clear interpretation of our user manual. The appearance of the product shall be subject to the product you received. Please forgive us that we won't inform you again if there...
- Page 124 Säkerhetsåtgärder VARNING: Läs dessa instruktioner innan du använder denna produkt. Underlåtenhet att göra det kan resultera i allvarliga skador. de grundläggande försiktighetsåtgärderna bör alltid följas, inklusive följande: 43. Den plastiska dump trädgårdskonsten _ _ _ _ _ får inte användas eller förvaras i farliga områden.
- Page 125 SPARA DESSA INSTRUKTIONER Produktlista _ Bricka (x1) Låsram (x1) ( x 1) Bottenram ( x 1) Platt Styrram fram (x1) Stödande vinkeljärn (x1)
- Page 126 Bakre stödram (x1) Stödande vinkeljärn (x1) Hjul ( x 4) Stretchnät (x1) Hantera (x1) Bräda (x1) Packning (x5) M16 (x1) M8x20 (x5) M10x45 (x4) M10x50 (x2) M12x75 (x2)
- Page 127 Saxnål (x4) Sexkantnyckel (x2) Produktbeskrivning 1. Ta bort skruvarna (x4) från låsramen. 2. Montera låsramen på brickan med skruvar.
- Page 128 Montera plattan på brickan med skruvar (x5) . Montera den nedre ramen på planen med skruvar (x2 ) .
- Page 129 29. Placera brädets plan nedåt på axeln på den nedre ramen. 30. Placera den främre styrramen på bottenramens axel. 31. Placera packningen på axeln på bottenramen. Lås axeln med en mutter. Observera att den inte kan låsas och att det krävs ett mellanrum för att rotera den främre styrramen.
- Page 130 Fäst bakstödsramen på den nedre ramen med skruvar ( x2 ) . Fäst stödvinkeljärnet på den nedre ramen och bakstödsramen med skruvar _ _ _ (x4) .
- Page 131 22. Fäst däcken på axeln med lufthålen vända utåt. 23. Sätt på distansen (x4). 24. Sätt i saxsprinten (x4) och böj. Vänd upp och ner på plastd ump trädgårdskonsten . _...
- Page 132 22. Lossa stiftet från den främre styrramen . 23. Håll handtaget på plats med en stift genom den främre styrramen. 24. Säkra PIN-koden med saxnålen . Monteringen är klar. Tryck på handtaget för att tippa brickan.
- Page 133 Kroppsvolym 10.6”/270mm Produktparametrar 2020*805*650mm Produktens mått 79,5*31,7*25,6tum 960*570*270 mm Kroppsvolym 37,8*22,4*10,6tum Maximal viktkapacitet 1200 lbs Nettovikt 26 kg Hjul 13*4.00-6...
- Page 135 Shuangchenglu 803long 11hao 1602A-1609shi Shanghai Importerad till AUS: SIHAO PTY LTD 1 ROKEVA STREETEASTWOOD NSW 2122 Australien Importerad till USA : Sanven Technology Ltd. Pooledas Group Ltd Unit 5 Albert Edward House, The Pavilions Preston, United Kingdom SHUNSHUN GmbH Römeräcker 9 Z2021, 76351 Linkenheim-Hochstetten, Germany Tillverkad i Kina...
- Page 137 Teknisk Support och e-garanticertifikat www.vevor.com/support...
Need help?
Do you have a question about the TC4723 and is the answer not in the manual?
Questions and answers