Advertisement
Gebrauchsanleitung | Instruction leafl et | Instruction d'utilisation
Instrucciones de empleo | Istruzioni per l'uso | Gebruiksaanwijzing
Instrucciones de empleo | Istruzioni per l'uso | Gebruiksaanwijzing
Руководство по эксплуатации | Instrukcja użytkowania | Bruksanvisning | Käyttöohje
Электри ческая пилка с вытяжкой для сбора пыли
4030-SX2
Elektrische Feile mit Absaugung
Electric fi le with suction function
Lime électrique avec aspiration
Lima elettrica completa di aspiratore
Lima eléctrica con aspiración
Elektrische vijl met afzuiging
Pilnik elektryczny z odsysaniem pyłu
Elektrisk fi l med uppsugning
Sähkökäyttöinen kynsiviila ja imuri
Bruksanvisning
130 C
DE
EN
FR
IT
ES
NL
RU
PL
SE
FI
Advertisement
Table of Contents

Related Manuals for ProMed 4030-SX2


Summary of Contents for ProMed 4030-SX2
- Page 1 Gebrauchsanleitung | Instruction leafl et | Instruction d’utilisation Instrucciones de empleo | Istruzioni per l’uso | Gebruiksaanwijzing Instrucciones de empleo | Istruzioni per l’uso | Gebruiksaanwijzing Руководство по эксплуатации | Instrukcja użytkowania | Bruksanvisning | Käyttöohje Bruksanvisning 4030-SX2 Elektrische Feile mit Absaugung Electric fi le with suction function Lime électrique avec aspiration Lima elettrica completa di aspiratore Lima eléctrica con aspiración Elektrische vijl met afzuiging Электри ческая пилка с вытяжкой для сбора пыли Pilnik elektryczny z odsysaniem pyłu Elektrisk fi l med uppsugning Sähkökäyttöinen kynsiviila ja imuri 130 C...
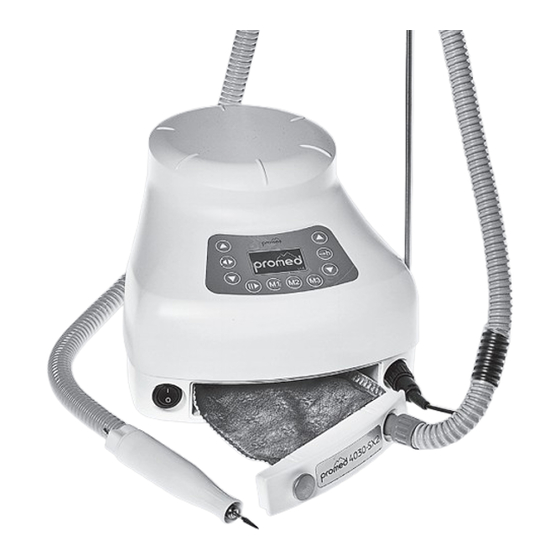
- Page 2 eSCrPItIon anD PeratIon Pantone 877 C - silber N. Reduce speed A. Power switch Pantone Cool Grey 9 C - runde Kreise + Logo O. Start / stop / standby B. Handle to remove the filter chamber RAL 9016 - Verkehrsweiß P. Memory buttons C. Microswitch Stanzkontur Q. Reduce suction capacity D. Handpiece...
-
Page 3: Description Of The Unit
Counter-clockwise rotation – Active operation Foot switch or foot pedal is connected IInformation messages The handpiece is blocked or overloaded. Overheat: The air temperature in the suction turbine housing is higher than 80° C. The device is switched to the standby mode on the microswitch. It is necessary to replace the dust bag. Please keep this user manual in a safe place! eSCrIPtIon oF the UnIt Please read the user manual thoroughly before using the appliance for the first time. Thank you very much for choosing the Promed 4030-SX2 manicure / pedicure device. This device may be used both by qualified specialists and by private people after they have read these instructions for use. This device is suitable for use in the areas of manicure, nail design (nail art) and pedicure (e.g.: removal of thickened skin and callus, cuticle care, nail care, treatment of thickened nails etc.) as well as for medical and cosmetic foot and nail care. The unit is also suitable for use in the area of nail techniques and nail design as well as the handling of all materials used in this area such as gel and acrylic. We, the manufacturer are not liable for any injury or damage to people or property which results from ignorance to observe these instructions. We wish you a lot of enjoyment with your new Promed 4030-SX2 unit. We would like to familiarize you with the unit in the following sections. Please read the user manual thoroughly before using the unit for the... -
Page 4: Device Information
• The device Promed 4030-SX2 is suitable with the appropriate abrasives ideal for manicure and pedicure, as well as for the medical cosmetic foot and nail care • The Promed 4030-SX2 unit uses a high performance motor. The electronic speed control is used to smoothly set the speed of the grinding head. The unit can rotate clockwise or counterclockwise (switchable). -
Page 5: Safety Instructions
aFety InStrUCtIonS Please pay attention to the following before first time operation: Never place the unit in direct contact with fire, gas, oxygen or hot objects such as hot plates. Please observe the following during operation: A. The handpiece may only be connected to the unit included in the delivery contents. B. Grinding heads to be used: • Standardized dental size: ø 2.332 – 2.350 mm (0.091 - 0.093 inches), shaft length 28 - 36 mm. • Only use centered grinding heads with a rounded shaft end. • The use of rusted or bent grinding heads is not permitted. C. Use the speed controller carefully. D. Appliance power supply: 100 VAC or 240 VAC. E. Switch the unit off before you change the grinding head, and on Standby. F. Take every precaution possible to ensure that the unit does not fall down or get damaged in any other way. G. If problems do arise with the handpiece, take it immediately to get it repaired. H. Do not lubricate or wash the handpiece. I. Place the test grinding head in the chuck when storing the handpiece. J. For indoor use only. K. Scrupulous supervision is required when the device is being used in the vicinity of children. L. Always make sure that the filter chamber remains clean. This helps to prevent entering the dust or foreign particles in the suction turbine and contaminate or even damage. M. Ensure that the device is not operated under the following conditions: • If no dust bag has been inserted • If a dust bag has been inserted incorrectly •... - Page 6 aFety InStrUCtIonS • This device can be used by children from the age of 8 years and by persons with reduced physical, sensory or mental abilities or lack of experience and knowledge if they are supervised by persons responsible for their safety or if they were instructed in detail on how to use this device so that they understand the risks associated with the device. • Never let children play with the packaging material; there is a risk of suffocation. • An electrical appliance is not a toy. Children do not recognize the risks that could develop when using electrical appliances. Therefore, operate and store the unit out of the reach of children. • Do not place or use the unit on hot surfaces or near naked gas flames to ensure that the casing does not melt. • Never let the unit come into contact with water. Use a moist cloth to clean the unit. Do not use solvents. • If liquid has entered the device, switch it off immediately and remove the power plug from the socket. In this case, please contact an authorised dealer before you continue to use the device. • Do not suck in any liquids! • Never carry or pull the unit by the power cord. Use the plug to pull the power cord out of the wall socket. Do not pull on the power cord itself. • Do not pull the power cord over sharp edges, wedge it in between objects, hang it down or position or hang it over hot objects (e.g., hot plates) or naked flames. Protect the power cord from heat or oil. • Only use extension cords when you have satisfied yourself beforehand that they are not defect or damaged. • If the power cable of the appliance gets damaged, have it replaced by an expert immediately. • Should the power cord of the device is damaged once, let it replaced by a professional with a new one. • Do not store the unit near a wash basin or bath tub as there is the danger that the unit may fall or be pulled into the wash basin or the bath tub. • Children must not clean or maintain the device without supervision. • To avoid all risks of injury, blockage or damage to the unit, make sure that the unit does not come into contact with clothing, cords, shoelaces, bristles, wires, threads, hairs etc. when in operation. • Exposure to nail and skin dust may result in health risks. Wearing eye/mouth protection and gloves is recommended for reasons of hygiene and safety.
-
Page 7: C Ommissioning The Device
(E). Once the abrasive body begins to rotate, the mechanism is locked automatically. Remove and never run an abrasive with force! Abrasives with 2,332 mm to 2,350 mm (0.091 - 0.093 inches) shank diameter fit precisely with the abrasives with ceramic bond, without you having used excessive force. Use only abrasives with a head diameter of max. 12 mm. Ensure that the large-sized dimensioned abrasives with the maximum of 10.000 rpm may be operated. At higher revolutions, the run becomes irregular and damage the chuck and (strong vibration in the hand piece) miller cutter. To remove an abrasive, please switch off the motor by switching off the device either with the power switch (A) or with the standby button (O) or switching it to the standby mode with the microswitch on the handpiece (C). Now, remove the abrasive by simply pulling it straight out. E. When you switch on the device, the Promed logo is first shown on the display (J) for several seconds. Then, the display changes and the settings used last are displayed. F. Controlling the direction of rotation and speed regulation: 1. Selecting the direction of rotation: The preset direction of rotation is clockwise. On the display, this is indicated by the filled right arrow. By pressing the clockwise/counter-clockwise button (M), the direction of rotation can be changed to counter- clockwise. By pressing the clockwise/counter-clockwise button again (M), you can return to clockwise rotation. Attention: The direction of rotation should not be changed while the device is in operation. Changing the direction of... - Page 8 PeratInG the UnIt Select the desired speed by pressing the membrane keyboard. To increase the speed, press the button (L) and to reduce the speed, press the button (N). The value set is then shown as a two-digit value on the display (J). Speeds of up to 10,000 rpm are displayed with a decimal place , whereas speeds of 10,000 rpm and higher are shown without a decimal place The speed regulation can be set as follows and is shown accordingly on the display: From the initial speed of 4,000 rpm to the 10,000 rpm in steps of 500. From the speed range between 10,000 rpm and 30,000 rpm in steps of 1,000. When the buttons are pressed down continuously, the display scrolls rapidly through the different speed levels. Please note: Differences in the running noises between clockwise and anti-clockwise direction are normal and caused by the grinding-in of the carbon brushes or by the running-in of the ball bearings. Please note: Before using the device for the first time, it is absolutely necessary to run the handpiece for approx. 30 minutes at approx. 8,000 rpm. This is necessary to ensure that the carbon brushes are ground in. For cooling, the run along the suction is essential! G. Standby function 1. On the device: The button (O) offers a “Pause - standby function”. The values set are maintained for the duration of the pause. During this process, the speed and direction of rotation selected last are shown with an additional pause symbol. When this button is pressed again, the device continues to run with the previous settings.
- Page 9 PeratInG the UnIt Please note: If the suction function is defective, the device must no longer be used! J. Thermal cutoff of the suction turbine If the suction turbine is not cooled adequately and the air temperature in the suction turbine housing exceeds 80° C, the suction turbine and the handpiece are switched off. On the display, the error message “OVERHEAT” is shown: • After the temperature in the suction turbine housing has dropped by approx. 10 - 15° C, this reading disappears. The device is then in the standby mode. Possible reasons for an overheating of the suction turbine - Blockage in the suction hose or in the handpiece - Overfilled filter bag - Insufficient air circulation at the rear of the device - Grinding dust in the area of the turbine due to a burst dust bag or by using the device without a dust bag. Attention: If the reasons mentioned above can be ruled out, we recommend you to immediately send your device back for servicing! K. Saving speed values / memory function A speed chosen by pressing the button (L) or (N), can be saved by pressing any memory button (P) for at least 3 seconds. For example, on M1, a low speed for large milling cutters, on M2, an average speed for medium-sized milling cutters, and on M3, a higher speed for small milling cutters. The chosen suction capacity and the milling cutter’s direction of rotation are also saved. The memory setting chosen is shown in the middle of the display (J). The following memory values have already been factory-set: (8,000 rpm; suction capacity 4 bars = 30 %) (15,000 rpm; suction capacity 8 bars = 60 %) (20,000 rpm; suction capacity 11 bars = 85 %) These settings can be changed as described above. Saving a chosen speed is confirmed by the display “Save”:...
- Page 10 If the suction capacity drops noticeably, but at the latest if the filter is filled by 2/3, the filter should be replaced! This is the only way to ensure full suction capacity and prevent the suction turbine from overheating due to an insufficient supply of air! Attention: Only use original dust bags! Attention: The filter bag is intended for single use only (disposable product) and must not be emptied or used several times! Attention: If a filter bag is torn during operation and if there is a lot of grinding dust in the filter chamber , under no circumstances should you continue to use the device, since otherwise the suction turbine may be damaged . In this case, immediately send the device back for servicing! Attention: If the filter is too full, there is a risk of the filter bursting! This may result in grinding dust entering the turbine and destroying it. Attention: Every day before starting work, check the condition of the filter bag (fit and filling level). Replace the filter bag according to the instructions above if necessary. Replacing the filter in good time extends the service life of the suction turbine. Attention: Commercial anti-odour cartridges (vacuum cleaner accessories) can be inserted through the dust bag opening and prevent unpleasant odours to a large extent. Attention: Never transport the device with a filled dust bag! The same applies if you store the device, do not use it for a longer period of time or want to send it in for servicing. M. Control system for recommended dust bag replacement • The Promed 4030-SX2 is equipped with a dust bag control system: It indicates the remaining operating time with the dust bag used and can be adjusted individually by the user based on personal experience. • The remaining operating time with the dust bag used can be requested at all times by pressing the button (R) and then appears briefly on the display: In the dust bag symbol, the current turbine temperature in the suction chamber is displayed. • If the operating time for a dust bag has expired, necessary replacement of the dust bag is indicated by means of a warning message on the display. The symbol is shown until the dust bag has been replaced. • After the dust bag has been replaced, the control system must be “reset”. To do this, press the button (R) for approx. 4 seconds. The “resetting” process is confirmed by a signal sound.
- Page 11 • Release the button (R) for a moment and press it again. Then, the range for setting the operating hours (10 h – 20 h) appears on the display: • The operating hours can be increased by pressing the button (L) or reduced by pressing the button (N). Pressing the buttons and keeping them pressed, the display will enter the fast-forward mode. • As soon as you have set the desired operating hours and do not make any further settings, the “standard reading” is shown again on the display. The operating hours set are saved automatically. O. Foot switch or continually adjustable pedal (options): Available accessories include a foot switch (ON/OFF), or a continually adjustable pedal. They are connected to the device via the “foot switch” socket (P) at the rear of the device. • 1. Foot button (ON/OFF): Let the device activated with a simple foot switch, i.e. the adjusted set values for speed and suction are released by pressing the foot button. The removal of foot from the button leads to stopping the hand piece and suction turbine. • 2. A continuously variable pedal (rocker pedal): The speed can be controlled very smoothly and delicately with the pedal. The settings are adjusted with the buttons (E) and (F) here as “pre-selection” and maximum position. The regulating possibility by foot is thus limited to a set speed in the Display. Taking your foot off the pedal stops both the motor and the suction. Please note: The function of the microswitch on the handpiece is not affected when the foot pedal is operated. Using the microswitch, you can switch the device to the standby mode at all times. Note: Only Promed foot pedals can be used.
-
Page 12: Maintenance Tips
Thermal cutoff of the suction turbine If the suction turbine is not cooled adequately and the air temperature in the suction turbine housing exceeds 80° C, the suction turbine and the handpiece are switched off. Control system for recommended dust bag replacement: This dust bag control system indicates the remaining operating time with the dust bag used and can be adjusted individually by the user based on personal experience. aIntenanCe tIPS To ensure that the safety, reliability and performance of the unit are not adversely affected, enhancements, readjustments, alterations or repairs are not permitted aside from those performed by Promed authorized persons. A. Keep the inner parts of the handpiece (Collet chuck/quick lock chuck) as free as possible from dust and grinding residue. B. Remove dirt from the outer surface of the handpiece with a cloth moistened with alcohol. Prevent moisture from entering the unit. C. Only use grinding heads with a dental standard size (ø 2.332 – 2.350 mm (0.091 - 0.093 inches), shaft length 28 - 36 mm) and avoid using rusted or damaged grinding heads. Their false usage may lead to excessive wear and tear in the ball bearings. Adhere to the safe speed and the safety measures stipulated by the manufacturer. - Page 13 aIntenanCe tIPS D. Do not expose the handpiece to strong knocks as this may damage the ball bearings. If the handpiece should fall down, check whether the grinding head is bent. Pay closer attention to noise and/or heat generation. Send the handpiece immediately in for repair should it be damaged. E. Before cleaning the unit, make sure that it is turned off and disconnected from the electricity. F. Do not use any aggressive substances such as scouring agents or other detergents as they may corrode the surface. G. Never immerse the device in a liquid and keep it away from liquids containing solvent or acetone. Attention: To clean the device, do not use disinfectant spray! Moisture may enter and result in damage (bearing damage in the handpiece, damage to the electronics in the control unit). Attention: The device, the handpiece and the handpiece motor may only be disinfected by means of wipe disinfection. LeanInG the CoLLet When inserting the shaft of a filing bit into the chuck, dust stuck to the bit may become detached and fall in- to the chuck. If dust accumulates there at certain intervals, preventing the bit shaft from being inserted to the intended depth so that the chuck cannot grip the bit properly, you should clean the chuck as follows: The unit is supplied with a special spiral drill with grip to make cleaning easy. C arefully insert the drill into the chuck and turn it in a clockwise direction, holding the hand unit with the front end pointing downwards. This will detach any dust trapped inside. Repeat this process several times.
- Page 14 nStrUCtIonS on hoW to CLean the hanDPIeCe 3. Clean the area around the air Flow channels with a dry brush (fig. 4 - 6). 4. Then wipe the entire motor assembly, the motor casing and the hose kit clean with a cleaning cloth suit able for this purpose (Fig. 8 / 9). 5. When assembling the handpiece, make sure that the position of the plug contacts is correct! Please insert and put together these plug contacts carefully to prevent the individual pins from being damaged (Fig. 10 / 11). Observing the guide rails (Fig. 12), you can slide on the motor casing with little effort until it engages. erVICe Your customers will definitely be expecting you to deliver a professional result. This is only possible with an appliance that is neither defect nor damaged. Therefore, take advantage of our service and have your appliance regularly examined by our specialists. Send in your appliance to Customer Service every 12 months at the latest. We can give you an estimate of the cost (total cost: 19.00 €...
-
Page 15: Warranty
• This warranty is only valid and enforceable in the country in which it was purchased by the original buyer, provided that it was Promed’s intention that the product should be offered for sale in this country. This warranty is also enforceable in any country within the European Economic Area in which Promed has an authorised importer or sales partner. Depending on each country, specific and differing warranties and guarantees may be applicable owing to the particular applicable legislation. These legal provisions are neither excluded nor limited by these warranty conditions. To the extent permissible under national law, the warranty period shall not be extended, renewed or otherwise affected by any subsequent resale, repair or replacement of the product. • The provisions of the UN Convention on Contracts for the International Sale of Goods shall not apply. • Our warranty conditions do not affect the seller’s legal warranty obligation. • To the fullest extent possible under the applicable mandatory legislation, these warranty conditions constitute your sole and exclusive legal remedy and shall apply in place of any other express or implied warranty conditions. Promed is not liable for any unusual, incidental, punitive or consequential damages including, but not limited to loss of profits, loss of use, loss of revenue, costs of replacement equipment or facilities, third party insurance claims, and damage to property which are the result of the purchase or use of the product or occur owing to a breach of warranty, a breach of contract, negligence, product defects or any other legal or statutory circumstances, even though Promed was aware of the possibility of such damages. Promed is not liable for any delay in warranty claims. • Promed cannot be held liable for any possible translation errors. • The following information is vital for problem-free processing: 1. Original sales slip/receipt or dealer´s stamp with the date of purchase 2. Defect detected 3. Unit name / type / serial / lot number... - Page 16 4030-SX2 Promed GmbH Lindenweg 11 D-82490 Farchant Tel: +49 (0)8821/9621-0 130 C 130 C Fax: +49 (0)8821/9621-21 130 C info @ promed.de www.promed.de...
Need help?
Do you have a question about the 4030-SX2 and is the answer not in the manual?
Questions and answers