
Related Manuals for Fagor IF-800S


Summary of Contents for Fagor IF-800S
-
Page 1: Cooking Hob
99641781_A_ML.qxp 23/01/2007 11:37 Page 1 GUIDE TO INSTALLATION AND USE INSTALLATIE- EN GEBRUIKSHANDLEIDING Cooking Hob Kogebord... - Page 2 99641781_A_ML.qxp 23/01/2007 11:37 Page 2 As part of our commitment to constantly improving our products, we reserve the right to make changes to them based on technological advances to their technical, functional and/or aes- thetic properties. Attention B B e e f f o o r r e e i i n n s s t t a a l l l l i i n n g g a a n n d d u u s s i i n n g g y y o o u u r r a a p p p p l l i i a a n n c c e e , , p p l l e e a a s s e e c c a a r r e e f f u u l l l l y y r r e e a a d d t t h h i i s s G G u u i i d d e e t t o o...
-
Page 3: Table Of Contents
2 / USING YOUR APPLIANCE Description of the top _________________________________________________ • Cookware for induction _______________________________________________ • • Which cooking zone should you use based on your cookware? _____________ Description of control panel ___________________________________________ • Powering on ________________________________________________________ • Stop _______________________________________________________________ •... -
Page 4: Safety Guidelines
F F o o r r A A u u s s t t r r a a l l i i a a o o n n l l y y : : - Young children should be supervised to ensure that they do not play with the appliance. -
Page 5: Proper Positioning
Glue the foam seal underneath your appliance by following the outline of the worktop upon which your appliance will rest. This will allow you to achieve an airtight seal with the worktop. Attach the clips to the hob ( ( depending on the model) - Page 6 This safety can be activated, for example, ABOVE A CUPBOARD OR DRAWER UNIT when the hob is installed over an oven that is not sufficiently insulated. If this occurs, a The positioning must allow a fresh air intake series of small lines appear in the control and air outlet.
-
Page 7: Installing Your Appliance
N N L L 1 1 L L 2 2 IT IS IMPERATIVE that you mount the protec- For a 400 V 2N triphase hook-up, if your hob tive flue with a cable clip. malfunctions, check that the neutral conduc-... -
Page 8: Description Of The Top
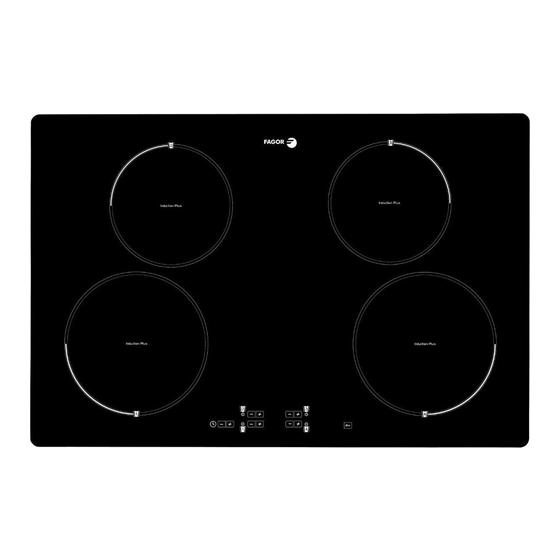
11:37 Page 8 2 2 / USING YOUR APPLIANCE • • DESCRIPTION OF THE TOP IFH-4R 1 1 8 8 c c m m c c m m 50 W - 2800 W 31 1 50 W - 00 W... -
Page 9: Cookware For Induction
1 1 8 8 ..2 2 4 4 c c m m 2 2 3 3 c c m m 1 1 2 2 ... . 2 2 6 6 c c m m Inductor 2 2 8 8 c c m m 1 1 2 2 . -
Page 10: Powering On
0 0 and a to maximum power "P" by pressing the " " but- b b e e e e p p sounds. Press any button to stop the ton. beep. - To change the timer settings, press the - or + buttons on the timer. -
Page 11: Using The "Child Safety Device
(e.g. to guard your settings). For safety reasons, the "off" touch control is always active and allows you to shut off a hea- ting zone, even if it is locked. • • How do you lock the hob? Keep the lock button pressed until the LED above lights up and a “BIP”... -
Page 12: Safety During Operation
"A A u u t t o o - - S S t t o o p p s s y y s s t t e e m m " safety function which automaticallty cuts off the power to the cooking zone, after a predefined •"Small Items"... -
Page 13: Daily Care Of Your Appliance
• • T T Y Y P P E E O O F F S S T T A A I I N N S S / / S S P P O O T T S S U U S S E E W W H H A A T T T T O O D D O O Light. -
Page 14: Special Messages, Difficulties
Working normally. turned off. Warning In the event that there is a break, crack or opening--even minor--in the vitroceramic glass, immediately disconnect your appliance to avoid the risk of electric shock. Contact the After-Sales Service Department. -
Page 15: Cooking Chart
C C O O O O K K / / B B R R O O W W N N C C O O O O K K / / S S I I M M M M E E R R... - Page 16 11:38 Page 16 Wij streven immer naar verbetering van onze produkten en behouden ons dan ook het recht voor de technische, functionele en esthetische kenmerken van onze produkten te wijzigen om deze aan de nieuwste technische evolutie aan te passen.
- Page 17 Instellen van schakelklok ______________________________________________ • Gebruik “kinderbeveiliging” ____________________________________________ • Beveiliging _________________________________________________________ • 3 / PERIODIEK ONDERHOUD VAN HET APPARAAT Behoud van het apparaat ______________________________________________ • Onderhoud van het apparaat __________________________________________ • 4 / SPECIALE MEDEDELINGEN, INCIDENTEN Bij de inwerkingstelling _______________________________________________ •...
- Page 18 . Uw kookplaat is voorzien van een kinderbevei- liging voor vergrendeling van de functies tij- dens het koken of wanneer de plaat niet aan staat (zie hoofdstuk: gebruik van de kin- RESPECT VAN HET MILIEU • •...
- Page 19 6 6 , , 4 4 Het apparaat dient zo te worden geplaatst dat het stopcontact toegankelijk blijft. De afstand tussen de rand van het apparaat en de muur (of wand) erachter of ernaast moet minimaal 4 cm bedragen (zone A).
- Page 20 Er verschijnen dan kleine streepjes kant te voorzien. op het display. In dit geval raden wij u aan de ventilatie van de kookplaat te vergroten 4 cm mini door een opening aan de zijkant van het meubel te maken (8cm x 5cm).,en/of u kunt...
- Page 21 Blauw N N L L 1 1 L L 2 2 Indien bij een aansluiting van 400 V 2N drie- fasig, de kookplaat niet functioneert, contro- leer dan of de nulleider goed is aangesloten. De montage van de buisbescherming dient VERPLICHT met een kabelklem te worden uit- gevoerd.
- Page 22 99641781_A_ML.qxp 23/01/2007 11:38 Page 22 2 2 / / GEBRUIK VAN HET APPARAAT • • BESCHRIJVING VAN DE BOVENZIJDE IFH-4R 1 1 8 8 c c m m c c m m 50 W - 2800 W 50 W -...
- Page 23 1 1 6 6 c c m m 1 1 0 0 ..1 1 8 8 c c m m 1 1 8 8 c c m m 1 1 2 2 ..2 2 2 2 c c m m 2 2 1 1 c c m m 1 1 8 8 .
- Page 24 0 0 weer en hoort u een 0 0 wordt weergegeven. p p i i e e p p t t o o o o n n . - Druk op de toets “+ + ” of “...
- Page 25 Wanneer u op de toetsen van het v v e e r r m m o o g g e e n n of van de s s c c h h a a k k e e l l k k l l o o k k van de ingeschakelde zones drukt, gaat de led van de vergrendeling aan.
- Page 26 “ “ A A u u t t o o - - S S t t o o p p s s y y s s t t e e e e m m ” ” die...
- Page 27 G G E E B B R R U U I I K K R R E E I I N N I I G G I I N N G G S S M M E E T T H H O O D D E E Lichte vlekken.
- Page 28 Let op In geval van breuken, barsten of spleten, zelfs licht, van de vitrokeramische plaat, dient u onmiddellijk de stekker uit het stopcontact te halen om een elektrische schok te vermijden. Neem contact op met de Servicedienst.
- Page 29 • • K K O O O O K K T T A A B B E E L L P P E E R R G G E E R R E E C C H H T T...
- Page 30 99641781_A_ML.qxp 23/01/2007 11:38 Page 30...
- Page 31 99641781_A_ML.qxp 23/01/2007 11:38 Page 31...
- Page 32 99641781_A_ML.qxp 23/01/2007 11:38 Page 32 9 9 9 9 6 6 4 4 1 1 7 7 8 8 1 1 12/06...
Need help?
Do you have a question about the IF-800S and is the answer not in the manual?
Questions and answers