Table of Contents
Advertisement
Available languages
Available languages
Quick Links
SAFETY INSTRUCTIONS
Download the complete instruction manual
http://docs.hotpoint.eu or call the phone number
shown on the warranty booklet.
These instructions are valid if the country symbol
appears on the appliance. If the symbol doesn't appear
on the appliance, it is necessary to refer to the technical
instructions which will provide the necessary instructions
concerning modi cation of the appliance to the
conditions of use of the country.
CAUTION: The use of the gas cooking appliance
results in the production of heat, moisture and products
of combustion in the room in which it is installed. Ensure
that the kitchen is well ventilated especially when the
appliance is in use: keep natural ventilation holes open
or install a mechanical ventilation device (mechanical
extractor hood). Prolonged intensive use of the
appliance may call for additional ventilation, such as
opening a window, or more e ective ventilation, for
example increasing the level of mechanical ventilation
(if possible).
Failure to follow the information in this manual exactly
may cause a re or explosion, resulting in property
damage or personal injury.
Before using the appliance, read these safety
instructions. Keep them nearby for future reference.
These instructions and the appliance itself provide
important safety warnings, to be observed at all times.
The manufacturer declines any liability for failure to
observe these safety instructions, for inappropriate
use of the appliance or incorrect setting of controls.
WARNING: If the hob surface is cracked, don't use
the appliance – risk of electrical shock.
WARNING: Danger of re: Do not store items on the
cooking surfaces.
CAUTION: The cooking process has to be supervised. A
short cooking process has to be supervised continuously.
WARNING: Unattended cooking on a hob with fat or
oil can be dangerous – risk of re. NEVER try to
extinguish a re with water, but switch o the appliance
and then cover ame e.g. with a lid or a re blanket.
Do not use the hob as a work surface or support.
Keep clothes or other ammable materials away from
the appliance, until all the components have cooled
down completely – risk of re.
Very young children (0-3 years) should be kept away
from the appliance. Young children (3-8 years) should
be kept away from the appliance unless continuously
supervised. Children from 8 years old and above and
persons with reduced physical, sensory or mental
capabilities or lack of experience and knowledge can
use this appliance only if they are supervised or have
been given instructions on safe use and understand
the hazards involved. Children must not play with the
appliance. Cleaning and user maintenance must not be
carried out by children without supervision.
IMPORTANT TO BE READ AND OBSERVED
CAUTION: In case of hotplate glass breakage: shut
immediately o all burners and any electrical heating
element and isolate the appliance from the power
supply; do not touch the appliance surface; do not use
the appliance.
The glass lid can break in if it is heated up. Turn o all
the burners and the electric plates before closing the
lid. Do not shout down lid when burner alight.
WARNING: The appliance and its accessible parts
become hot during use. Care should be taken to avoid
touching heating elements. Children less than 8 years of
age must be kept away unless continuously supervised.
PERMITTED USE
CAUTION: the appliance is not intended to be
operated by means of an external switching device,
such as a timer, or separate remote controlled system.
This appliance is intended to be used in household
and similar applications such as: sta kitchen areas in
shops, o ces and other working environments; farm
houses; by clients in hotels, motels, bed & breakfast and
other residential environments.
No other use is permitted (e.g. heating rooms).
This appliance is not for professional use. Do not use
the appliance outdoors.
Use pots and pans with bottoms the same width as
that of the burners or slightly larger (see speci c table).
Make sure pots on the grates do not protrude beyond
the edge of the hob.
Improper use of the grids can result in damage to
the hob: do not position the grids upside down or slide
them across the hob.
Do not let the burner ame extend beyond the edge of the pan.
If the hob surface is in glass material, do not use the cast iron griddles, ollar
stones, terracotta pots and pans.
Do not use: heat di users such as metal mesh, or any other types; two burners
simultaneously for one receptacle (e.g. Fish kettle).
Should particular local conditions of the delivered gas make the ignition of
burner di cult, it is advisable to repeat the operation with the knob turned to
small ame setting.
In case of installation of a hood above the cooktop, please refer to the hood
instructions for the correct distance.
The protective rubber feet on the grids represent a choking hazard for young
children. After removing the grids, please ensure that all the feet are correctly
tted.
INSTALLATION
The appliance must be handled and installed by two
or more persons - risk of injury. Use protective gloves to
unpack and install - risk of cuts.
The electrical and gas connections must comply
with local regulation.
Installation, including water supply (if any) and
electrical connections, and repairs must be carried out
by a quali ed technician. Do not repair or replace any
part of the appliance unless speci cally stated in the
user manual. Keep children away from the installation
site. After unpacking the appliance, make sure that it
has not been damaged during transport. In the event
of problems, contact the dealer or your nearest After-
sales Service. Once installed, packaging waste (plastic,
EN
Advertisement
Table of Contents

Subscribe to Our Youtube Channel
Related Manuals for Hotpoint HAGS 61F/WH


Summary of Contents for Hotpoint HAGS 61F/WH
- Page 1 IMPORTANT TO BE READ AND OBSERVED Download the complete instruction manual CAUTION: In case of hotplate glass breakage: shut http://docs.hotpoint.eu or call the phone number immediately o all burners and any electrical heating shown on the warranty booklet. element and isolate the appliance from the power supply;...
- Page 2 styrofoam parts etc.) must be stored out of reach of WARNING: This appliance is not connected to a children - risk of su ocation. The appliance must be combustion products evacuation device. It must be disconnected from the power supply before any installed and connected in accordance with current installation operation - risk of electrical shock.
- Page 3 or by a multi-pole switch installed upstream of the socket in accordance with the wiring rules and the appliance must be earthed in conformity with national electrical safety standards. The power cable must be long enough to connect the appliance, once tted in its housing, to the main power supply.
- Page 4 BURNER AND NOZZLE SPECIFICATIONS CATEGORY II2H3+ Type of gas used Type of burner Injector Rated thermal Rated Reduced heat Gas pressure marking ow rate consumption capacity mbar min. rat. max. Rapid (R) 128 B 3,00 286 l/h 0,70 NATURAL GAS Semi-rapid (SR) 97 A 1,65...
- Page 5 INSTALLATION CLASS 3 TECHNICAL INFORMATION FOR THE INSTALLER • Use protective gloves for handling, preparing and installing the product. • This product can be embedded in a worktop 20 ÷ 40 mm thick with standard installation. For ush installation 30 ÷ 48 mm. •...
-
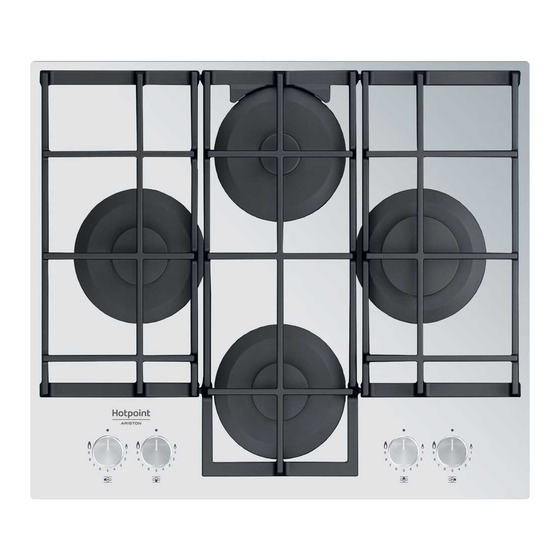
Page 6: Product Description
PRODUCT DESCRIPTION Symbols 1. Removable panstand grids 2. Semi-rapid burner Shaded circle Tap closed 3. Auxiliary burner Maximum opening/delivery Large ame and electric ignition 4. Rapid burner Minimum opening 5. Semi-rapid burner Small ame or reduced delivery 6. Semi-rapid burner control knob 7. -
Page 7: Maintenance And Cleaning
REPLACING THE INJECTORS see the injector table in the Safety instructions ADJUSTING MINIMUM GAS SETTING OF TAPS This operation must be performed by a quali ed technician. This operation must be performed by a quali ed technician. • Remove grids (A). The adjustment must be performed with the tap in a minimum gas setting •... -
Page 8: Troubleshooting
To receive assistance, call the number shown on the warranty booklet or • your telephone number. follow the website’s instructions on www.hotpoint.eu. If any repairs are required, please contact an authorized after-sales service When contacting our Client After sales service, always specify: (to guarantee that original spare parts will be used and repairs carried out •... -
Page 9: Norme Di Sicurezza
IMPORTANTE: DA LEGGERE E OSSERVARE Scaricare il manuale d’uso completo da http://docs. di un adulto, tenere l’apparecchio fuori dalla portata dei hotpoint.eu oppure telefonare al numero riportato bambini di età inferiore a 8 anni. I bambini di età sul libretto di garanzia. -
Page 10: Installazione
INSTALLAZIONE locale solo la bombola in uso, posizionandola in modo Per evitare il rischio di lesioni personali, le operazioni che non sia esposta a fonti di calore esterne (forni, di movimentazione e installazione dell’apparecchio camini, stufe, ecc. ) che possano innalzare la temperatura devono essere eseguite da almeno due persone. -
Page 11: Pulizia E Manutenzione
PULIZIA E MANUTENZIONE collegamento, controllare che il tubo in metallo AVVERTENZA: Per evitare rischi di folgorazione, essibile non entri a contatto con parti mobili e non sia prima di qualsiasi intervento di manutenzione compresso. Usare solo tubi e guarnizioni conformi alle accertarsi che l’apparecchio sia spento e scollegato norme nazionali vigenti. - Page 12 CATEGORIA II2H3+ SPECIFICHE DI BRUCIATORI E UGELLI Tipo di gas utilizzato Tipo di bruciatore Iniettore Portata termica Consumo Potenza Pressione del gas nominale nominale termica ridotta mbar min. nom. max. Rapido (R) 128 B 3,00 286 l/h 0,70 GAS NATURALE Semirapido (SR) 97 A 1,65...
- Page 13 INSTALLAZIONE CLASSE 3 INFORMAZIONI TECNICHE PER L’INSTALLATORE • Utilizzare guanti protettivi per maneggiare, preparare e installare il prodotto. • Questo prodotto può essere incassato in un top dello spessore di 20 ÷ 40 mm con installazione standard. Con installazione a lo 30 ÷ 48 mm. •...
-
Page 14: Descrizione Del Prodotto
DESCRIZIONE DEL PRODOTTO Symboli 1. Griglie amovibili 2. Bruciatore Semirapido Pallino pieno Rubinetto chiuso 3. Bruciatore Ausiliario Massima apertura/erogazione Fiamma grande 4. Bruciatore Semirapido e accensione elettrica 5. Bruciatore Rapido Minima apertura Fiamma piccola o erogazione ridotta 6. Manopola comando bruciatore Semirapido 7. -
Page 15: Cura E Pulizia
SOSTITUZIONE DEGLI INIETTORI (per il tipo vedere tabella ugelli nelle REGOLAZIONE DEL MINIMO DEI BRUCIATORI Norme di Sicurezza) Questa operazione deve essere eseguita da un tecnico quali cato. Questa operazione deve essere eseguita da un tecnico quali cato. La regolazione deve essere eseguita con il rubinetto nella posizione di •... -
Page 16: Risoluzione Dei Problemi
Per ricevere un’assistenza più completa, registrare il prodotto su • il numero di serie (è il numero che si trova dopo la parola SN sulla hotpoint.eu/register. targhetta matricola posta sotto l’apparecchio). Il numero di serie è indicato anche nella documentazione;... - Page 17 OHUTUSJUHISED OLULINE! LUGEGE LÄBI JA JÄRGIGE HOOLIKALT! Laadige alla täielik juhend veebisaidilt http://docs. välja ning isoleerige seade elektritoitest; ärge hotpoint.eu või helistage garantiivoldikus toodud puudutage seadme pinda; ärge kasutage seadet. telefoninumbril. Klaasist kaas võib puruneda, kui see kuumaks läheb. Lülitage kõik põletid ja elektriplaadid enne kaane Juhised kehtivad riigis, mille sümbol on näha...
- Page 18 kahjustaks toitejuhet - tulekahju või elektrilöögi oht. Kasutage gaasiühenduse jaoks ainult painduvat või Aktiveerige seade alles siis, kui paigaldamine on lõpetatud. jäika metalltoru. HOIATUS! Seadme muudatused ja paigaldusmeetod Ühendus jäiga toruga (vask või teras). Ühendus on olulised seadme ohutul ja korrektsel kasutamisel gaasisüsteemiga tuleb luua nii, et seadmele ei kõigis muudes riikides.
-
Page 19: Puhastamine Ja Hooldus
PUHASTAMINE JA HOOLDUS HOIATUS! Enne hooldustööde tegemist veenduge, et seade on välja lülitatud ja toitevõrgust lahti ühendatud; ärge kunagi kasutage aurpuhastusseadmeid, sest nendega tekib elektrilöögioht. Ärge kasutage abrasiivseid ega söövitavaid tooteid, klooripõhiseid puhastusvahendeid ega traatnuustikuid. Elektrilise süüteseadme kahjustamise vältimiseks ärge kasutage seda ajal, kui põletid ei asu oma kohal. PAKKEMATERJALIDE ÄRAVISKAMINE Pakkematerjal on 100% ringlussevõetav ja märgistatud ringlussevõtusümboliga Pakendi osad tuleb ära visata vastutustundlikult ja täies vastavuses kohalike... - Page 20 KATEGOORIA II2H3B/P PÕLETI JA DÜÜSI ANDMED Kasutatava gaasi Põleti tüüp Düüsi tähis Nominaalne Nominaalne Vähendatud Gaasirõhk tüüp termiline tarbimus soojusvõimsus mbar vooluhulk min. rat. max. Kiirpõleti (R) 128 B 3,00 286 l/h 0,70 MAAGAAS Poolkiire (SR) 97 A 1,65 157 l/h 0,40 (Metaan) Täiendav (AUX)
- Page 21 PAIGALDAMINE KLASS 3 PAIGALDAJALE MÕELDUD TEHNILINE TEAVE • Kandke toote käsitsemisel, ettevalmistamisel ja paigaldamisel kaitsekindaid. • Antud toodet saab integreerida 20 kuni 40 mm paksu tööpinna sisse, standardse paigaldusega. Masti paigaldamiseks 30 ÷ 48 mm. • Kui pliidiplaadi all ei ole ahju, sisestage eraldustahvel, mille pindala on vähemalt võrdne tööpinda tehtud avausega. Selline eraldustahvel peab olema paigaldatud maksimaalselt 150 mm tööpinna ülemise pinna alla, kuid mitte mingil juhul pliidi põhjale lähemale kui 20 mm.
-
Page 22: Toote Kirjeldus
TOOTE KIRJELDUS Sümbolid 1. Eemaldatavad toidunõu alusrestid 2. Poolkiire põleti Tume ring Kraan suletud 3. Täiendav põletiga Maksimaalne ava/ Maksimaalne leek etteanne ja elektrisüüde 4. Kiirpõleti Minimaalne ava või 5. Poolkiire põleti Minimaalne leek vähendatud etteanne 6. Poolkiire põleti juhtnupp 7. - Page 23 DÜÜSIDE VAHETAMINE vt Ohutusjuhend düüside tabelit KRAANIDE MINIMAALSE GAASISEADISTUSE REGULEERIMINE Seda toimingut võivad teostada ainult kvali tseeritud tehnikud. Seda toimingut võivad teostada ainult kvali tseeritud tehnikud. • Eemaldage võred (A). Reguleerimise ajal peab kraan olema minimaalses gaasiseadistuse asendis • Võtke välja põletid (B). (väike leek) .
- Page 24 Minimaalne gaasiseadistus on õige (vt asjakohast jaotist). MÜÜGIJÄRGNE TEENINDUS Parema tugiteenuse saamiseks registreerige oma seade aadressil • seerianumber (number, mis järgneb seadme all oleval andmesildil www.hotpoint.eu/register. tähisele SN). Seerianumber on toodud ka dokumentatsioonis; ENNE MÜÜGIJÄRGSESSE TEENINDUSSE HELISTAMIST: Proovige probleemi ise VEAOTSINGU JUHENDIS olevate näpunäidete Mod.
-
Page 25: Saugos Instrukcijos
SAUGOS INSTRUKCIJOS PERSKAITYKITE IR LAIKYKITĖS Išsamias naudotojo instrukcijas galite atsisiųsti iš žaisti su prietaisu. Neprižiūrimi vaikai neturėtų valyti ir svetainės http://docs.hotpoint.eu arba skambinkite prižiūrėti prietaiso. telefonu, kuris nurodytas garantijos knygelėje. ĮSPĖJIMAS. Jei sudužtų įkaitusios kaitvietės stiklas: nedelsdami išjunkite visus degiklius, elektrinius kaitinimo Šios instrukcijos taikomos, jei ant prietaiso yra šalies... - Page 26 techninės priežiūros centrą. Įrengus prietaisą, pakuotes Atkreipkite ypatingą dėmesį į reikalavimus, susijusius su medžiagas (plastiką, polistireno dalis ir pan.) būtina laikyti vėdinimu. vaikams nepasiekiamoje vietoje – kyla uždusimo pavojus. Jei prietaisas jungiamas prie suskystintų dujų, Prieš vykdant bet kokius įrengimo darbus, prietaisą būtina reguliavimo varžtas turi būti užveržtas kuo tvirčiau.
-
Page 27: Valymas Ir Priežiūra
Maitinimo laidas turi būti pakankamai ilgas, kad įstačius į korpusą, jo ilgio pakaktų norint įjungti į elektros lizdą. Netempkite prietaiso maitinimo laido. Nenaudokite ilginamųjų laidų, tinklo lizdo skirstytuvų ir adapterių. Prietaisą įrengus, jo elektros komponentai turi būti nepasiekiami naudotojui. Prietaiso nenaudokite, jei jūsų kūnas yra drėgnas arba esate basi. - Page 28 KATEGORIJOS II2H3B/P DEGIKLIO IR ANTGALIO TECHNINIAI DUOMENYS Tipas Duju Tipo Degikliui Purkštuko Nominali Nominali Sumažinta Duju slegis Naudojamas Šildymo Galia Vartojimas Šilumos Galia mbar maži. nomin. didži. Greitas (R) 128 B 3,00 286 l/h 0,70 GAMTINES DUJOS Pusinio greičio (SR) 97 A 1,65 157 l/h...
- Page 29 ĮRENGIMAS 3 KLASĖ TECHNINĖ INFORMACIJA MONTUOTOJUI • Naudokite apsaugines pirštines gaminio tvarkymui, paruošimui ir montavimui. • Šį gaminį galima įrengti 20–40 mm storio stalviršyje, su standartine instaliacija. Dėl nuleidimo įrenginį 30 ÷ 48 mm. • Jei po virykle orkaitės nėra, įkiškite skiriamąją plokštę, kurios paviršiaus plotas būtų bent jau toks pat, kaip ir darbinio paviršiaus angos plotas. Ši plokštė plokštė...
-
Page 30: Valdymo Skydelis
VALDYMO SKYDELIS Simboliai 1. Nuimamos grotelės puodams ir keptuvėms 2. Pusinio greičio degiklis Uždarytas čiaupas Pritemdytas apskritimas 3. Papildomas degiklis Maksimaliai atidaryta/tiekimas Didžiausia liepsna ir Elektrinis uždegiklis 4. Greitas degiklis Minimaliai atidaryta arba 5. Pusinio greičio degiklis Mažiausia liepsna tiekimas ribojamas 6. -
Page 31: Priežiūra Ir Valymas
PURKŠTUKŲ PAKEITIMAS (žr. Saugos instrukcijų esančią purkštukų KAIP SUREGULIUOTI ČIAUPŲ MINIMALŲ DUJŲ TIEKIMO NUSTATYMĄ lentelę) Šį darbą turi atlikti kvali kuotas technikas. Šį darbą turi atlikti kvali kuotas technikas. Reguliuoti reikia čiaupui esant nustatytam minimalaus dujų tiekimo • Nuimkite groteles (A). nustatymo padėtyje (maža liepsna) . -
Page 32: Trikčių Šalinimas
Kad galėtumėte tinkamai pasinaudoti pagalba, užregistruokite gaminį • serijos numeris (numeris nurodomas po žodžio SN techninių duomenų svetainėje www.hotpoint.eu/register. plokštelėje). Serijos numeris taip pat yra nurodytas dokumentacijoje; PRIEŠ KREIPDAMIESI Į TECHNINĖS PRIEŽIŪROS CENTRĄ: Vadovaudamiesi skyriaus TRIKČIŲ ŠALINIMAS patarimais pamėginkite Mod. -
Page 33: Drošības Norādījumi
NOTEIKTI JĀIZLASA UN JĀIEVĒRO Lejupielādējiet pilno instrukciju rokasgrāmatu vietnē Stikla vāks var saplīst, ja tas ir sakarsis. Pirms vāka http://docs.hotpoint.eu vai piezvaniet uz tālru a aizvēršanas izslēdziet visus deg us un elektriskās numuru, kas norādīts garantijas bukletā. sildvirsmas. Neaizveriet vāku, kad ir iedegts deglis. - Page 34 BRĪDINĀJUMS! Ierīces modi cēšana un montāžas BRĪDINĀJUMS! Šī darbība jāveic kvali cētam metode ir ārkārtīgi būtiska, lai droši un pareizi izmantotu tehniskajam speciālistam. šo ierīci visās papildus valstīs. Gāzes savienojumam izmantojiet tikai elastīgu vai Izmantojiet instrukcijā norādītajam gāzes spiedienam neelastīgu metāla š ūteni. piemērotus spiediena regulatorus.
- Page 35 Ja padeves kabelis ir bojāts, tas jāaizvieto ar identisku, nomai a jāveic ražotājam, tā servisa a entam vai līdzīgas kvali kācijas personai, lai izvairītos no bīstamības – strāvas trieciena riska. TĪRĪŠANA UN APKOPE BRĪDINĀJUMS! Pirms apkopes darbību veikšanas pārliecinieties, vai ierīce ir izslēgta un atvienota no strāvas padeves;...
- Page 36 KATEGORIJA II2H3B/P DEG A UN SPRAUSLAS SPECIFIKĀCIJAS Izmantotās gāzes Deg a veids Inžektora Siltuma Aprē inātais Samazinātas Gāzes spiediens veids mar ējums plūsmas patēri š kapacitātes mbar nominālais siltums ātrums min. rat. max. Intensitātes (R) 128 B 3,00 286 l/h 0,70 DABASGĀZE Vidējas intensitātes (SR)
- Page 37 UZSTĀDĪŠANA 3 KLASE TEHNISKA INFORMĀCIJA PLĪTS VIRSMAS UZSTĀDĪTĀJAM • Apkopjot, sagatavojot un uzstādot izstrādājumu, lietojiet aizsargcimdus. • Šo ierīci var iebūvēt virtuves darbvirsmā, kas ir 20–40 mm bieza, ar standarta instalāciju. Flush uzstādīšanai 30 ÷ 48 mm. • Ja zem šīs plīts virsmas nav cepeškrāsns, ievietojiet starppaneli, kura virsma ir vismaz tikpat liela, kā darbvirsmas atvērums. Šis panelis jānovieto ne zemāk par 150 mm no augšējās darbvirsmas , taču ne tuvāk par 20 mm no šīs plīts virsmas apakšējās virsmas.
-
Page 38: Izstrādājuma Apraksts
IZSTRĀDĀJUMA APRAKSTS Simboli 1. No emami pannu novietošanas rež i 2. Vidējas intensitātes deglis Melns aplis Aizvērts krāns 3. Papildu deglis Maksimālais atvērums/padeve Maksimālā liesma 4. Intensīvs deglis un Elektriskā aizdedze 5. Vidējas intensitātes deglis Minimāls atvērums vai Minimālā liesma samazināta padeve 6. -
Page 39: Apkope Un Tīrīšana
SPRAUSLU NOMAI A skatiet Drošības norādījumos minēto sprauslu KRĀNU MINIMĀLĀS PLŪSMAS IESTATĪŠANA tabulu Šo darbu drīkst veikt tikai kvali cēts tehni is. Šo darbu drīkst veikt tikai kvali cēts tehni is. Šo regulēšanu veicot, krānam ir jābūt pagrieztam minimālas gāzes plūsmas •... -
Page 40: Problēmu Risināšana
Lai sa emtu pilnvērtīgu palīdzību, lūdzu, re istrējiet savu ierīci vietnē • sērijas numurs (skaitlis pēc vārda SN uz tehnisko datu plāksnes zem www.hotpoint.eu/register. ierīces). Sērijas numurs ir norādīts arī dokumentācijā; PIRMS SAZINĀTIES AR PĒC-PĀRDOŠANAS APKALPOŠANAS DIENESTU: Mē iniet atrisināt problēmu saviem spēkiem, izmantojot šeit atrodamo PROBLĒMU RISINĀŠANA. -
Page 41: Instruc Iuni Privind Siguran A
Descărca i manualul cu instruc iuni complet de pe in amabile lângă aparat până când nu s-au răcit complet site-ul http://docs.hotpoint.eu sau suna i la numărul toate componentele acestuia - pericol de incendiu. indicat pe certi catul de garan ie. - Page 42 rănire. Folosi i mănu i de protec ie la despachetare i pozi ionată într-un loc ferit de căldura produsă de instalare - risc de tăiere. sursele externe (cuptoare, emineuri, sobe etc. ) care ar Conexiunile electrice i racordurile pentru gaz putea determina cre terea temperaturii buteliei la o trebuie să...
-
Page 43: Eliminarea Ambalajului
este presată. Utiliza i numai evi i garnituri care sunt Nu utiliza i produse abrazive sau corozive, produse conforme cu normele na ionale. pe bază de clor sau bure i de sârmă pentru vase. IMPORTANT: Dacă se utilizează un furtun din o el Pentru a evita deteriorarea dispozitivului de inoxidabil, acesta trebuie instalat astfel încât să... - Page 44 RO MD CATEGORIA II2H3B/P SPECIFICA II PRIVIND ARZĂTORUL I DUZA Tip de gaz utiliza Tip de arzător Marcaj injector Capacitate Consum Capacitate Presiune gaz termică nomina termică redusă mbar nominală min. nom. max. Rapid (R) 128 B 3,00 286 l/h 0,70 GAZE NATURALE Semi-rapid (SR)
- Page 45 INSTALAREA CLASA 3 INFORMA II TEHNICE PENTRU INSTALATOR • Folosi i mănu i de protec ie pentru manevrarea, pregătirea i instalarea produsului. • Acest produs poate încastrat într-un blat de lucru cu o grosime de 20 până la 40 mm, cu instalare standard. Pentru instalare la acela i nivel de 30 ÷ 48 mm. •...
-
Page 46: Descrierea Produsului
DESCRIEREA PRODUSULUI Simboluri 1. Grătare deta abile 2. Arzător Semi-rapid Cerc de culoare Robinet închis 3. Arzător Auxiliar închisă Deschidere maximă/debit maxim Flacără mare 4. Arzător Rapid i aprindere electrică 5. Arzător Semi-rapid Deschidere minimă Flacără mică sau debit redus 6. - Page 47 ÎNLOCUIREA INJECTOARELOR consulta i tabelul de injectoare din REGLAREA POZI IEI DE MINIM A ROBINETELOR Instruc iuni privind siguran a Această opera ie trebuie să e efectuată de un tehnician cali cat. Această opera ie trebuie să e efectuată de un tehnician cali cat. Reglajul trebuie efectuat cu robinetul în pozi ia de minim de gaz ( acără...
- Page 48 Dacă sunt necesare orice fel de repara ii, vă rugăm să contacta i un serviciu garan ie sau urma i instruc iunile de pe site-ul web www.hotpoint.eu. de asisten ă tehnică post-vânzare autorizat (pentru a avea garan ia că se folosesc piese de schimb originale i că...
- Page 49 − −...
- Page 50 ’ ’ ’ . − ’ ’ . ), 50 °C. ’ − − “ “. ’...
- Page 51 ’ ’ ’ ’ ’ ’ ’ . ’ ’ ’ 2000 ’ − ’ ’ 100% “ “. (1*), (2*) ’ . 2012/19/ , (WEEE) 2013 ’...
- Page 52 66/2014, ) 2019 EN 30-2-1. II2H3+ a c. 128 B 3,00 286 / 0,70 a (SR) 97 A 1,65 157 / 0,40 a (AUX) 78 A 1,00 95 / 0,40 85 A 3,00 218 / 0,70 a (SR) 66 A 1,65 120 / 0,40...
- Page 53 • • 20–40 30÷ 48 • . 55 . 20 . 40 R= 8 . 750 R = 8 . 30 . 48 . 55 . 100 «A» « » «A» « » ( ), • ’ ( )* ( )*, (C), EN 549.
- Page 54 ’ ’ • ’ • ’ • • ’ . • • 5–10 • ’ • ’ . ’ NO/KO ’ • • • • • • • – • • (G30/G31) • c o opo ap e Ø...
- Page 55 • ( ). ’ ) . • ( ). • • • (D). • ’ (−); • ’ (+). ’ . MY MENU ’ ’ • ’ • • • ’ • • • • ’ • • ’ • •...
- Page 56 ’ • • • • • • • • • • • • www.hotpoint.eu/register. Mod. XXX XXX Ind.C. XXXX XXXX XXXX Prod.N. 86999XXXXXXX S.N. XXXX XXXX XXXX • • www.hotpoint.eu. ’ • • Type: XXX Mod.: XXX XXXX XXX XXXXX...
Need help?
Do you have a question about the HAGS 61F/WH and is the answer not in the manual?
Questions and answers