FUTABA FASSTest T26SZ Series Short Manual
Digital proportional radio control system
Hide thumbs
Also See for FASSTest T26SZ Series:
- Full manual (248 pages) ,
- How to update firmware (3 pages) ,
- Short manual (40 pages)

Related Manuals for FUTABA FASSTest T26SZ Series


Summary of Contents for FUTABA FASSTest T26SZ Series
- Page 1 SHORT MANUAL SHORT MANUAL https://www.futabausa.com https://www.rc.futaba.co.jp 1M23N40202...
- Page 2 ....................3 ..................3 ................3 ............3 ........3 ........3 ............3 ..................3 ....................4 .......... 4 ....................... 7 ............7 ..................8 ................10 ............. 11 ..........13 ..................... 14 ................... 14 ....................15 ....................15 ..................
- Page 3 French: Cet appareil radio est conforme au CNR d’Industrie Canada. L’utilisation Please contact your Futaba importer in your region of the world to assist de ce dispositif est autorisée seulement aux deux conditions suivantes : you with any questions, problems or service needs. Please recognize that (1) il ne doit pas produire de brouillage, et (2) l’utilisateur du dispositif...
-
Page 4: For Safe Use
Center. as the presence and location of spectators, the wind direction, and Futaba is not responsible for the use of this product by the customer. Company and product names in this manual are trademarks or lines, tall buildings, or communication facilities as there may be radio registered trademarks of the respective company. - Page 5 Do not touch the engine, motor, or ESC during and immedi- Before turning on the transmitter: ately after use. These items may become hot during use. For safety, fly so that the aircraft is visible at all times. When turning off the transmitterʼ s power switch after the Flying behind buildings or other large structures will not only cause you engine ...
- Page 6 If left in such an environment, the plastic may be damaged. Futaba is not responsible for damage sustained by combination with Since the metal parts of the case may corrode, always keep them clean. Join the Academy of Model Aeronautics. instruction manual and catalog.
- Page 7 T26SZ transmitter has adopted the bidirectional communication T26SZ is operated by a 7.4 V/2,000 mAh Lithium-ion polymer battery. system “FASSTest” as the data from the receiver can be checked by the transmitter. FASSTest allows control maximum 26-ch via 2.4 GHz band besides “S-FHSS”...
- Page 8 Antenna Charge/PC Port USB type-C The transmitter can be used as a game controller b y c o n n e c t i n g i t t o a computer with a USB cable. (Some games cannot be used.) Monitor LED SUB Display Front Right Dial (RD)
- Page 9 Stick tension adjustment port Back Right Slider Left Slider Right Slider Left Slider Earphone S.BUS (S.I/F) connector Jack Trainer connector Battery cover Bottom micro SD Slot Battery port The LCD displays shown in this manual may vary from your own, depending upon your model type. LCD displays may also vary as a result of version upgrades or other changes.
- Page 10 As with all radio frequency transmissions, the strongest area of signal transmission is from the sides of the creates this situation, easily move the antenna to correct this situation. If you fly with your transmitter facing the The antenna can be rotated 90 degrees and angles 90 degrees. model at the angle Forcing the antenna further than this can damage it.
- Page 11 Connect the battery Press the OPEN connector part of the battery cover. Remove the battery cover Close the battery cover completely Battery cover Be careful not to pinch the wiring Install the battery into the transmitter This connector connects to the transmitter. LT2F2000B LiPo Battery Battery port Insert the wiring into this space.
- Page 12 This set is not equipped with an AC adapter for charging. Must be purchased Use a commercially available separately. USB Cable USB charger AC adapter USB-A type 5 V-2 A AC adapter USB-A type 5V - 2A Futaba option AC adapter USB Access the charge port by type flipping the rubber cover on the bottom of the transmitter. Charging LED Red: Charging --- : Full Blinking: ...
-
Page 13: Warning Alarm
the surrounding RF conditions. The status of the transmitter is displayed by LED at the upper part of the front of a T26SZ. *If THR stick is high, a WARNING screen will appear. Another warning will appear if a power supply is attached. - Page 14 Tapping the settings buttons for each value on the settings screen will cause value input buttons to appear at the top of the panel. be careful so that you don't scratch the Touch Display with anything hard such as a metal object. Don't push the Touch Display with excessive force Pressing and holding a value will or drop anything on the panel. return it to its default setting.
- Page 15 With the home screen displayed. 2. Press the EXIT button for about 1 second. "Key Icon" is displayed and the keys will be disabled. EXIT Press and hold 1. CAUTION Press the EXIT button for about 1 second, and the display will then become unlocked. T h e ...
- Page 16 You can adjust the length of stick levers, if you like. It is recommended to adjust the length of the sticks in line with your hand size. Lever head A Lever head B 3. Hold the lever head "B" and turn the lever head "A" Securely lock the stick lever by holding lever head A counter-clockwise, the lock will be released.
- Page 17 You can adjust the tension of stick-levers. The rubber cover in the back is removed For helicopters: For airplanes: Adjust the screw [Adjustment of tension] Adjust the on the right. screw on the Adjustment of Throttle Stick (Ratchet System) left. You can choose either airplane ratchet system *In the Mode 1/3, arrangement of a screw is opposite.
-
Page 18: Back Side
e.g. Stick mode 2 → Stick mode 1 Back side Loosen this screw and add Tighten this screw to release spring tension. the spring tension. Loosen the screws for both of them. For helicopters: Adjust the For airplanes: Adjust the screw screw on the left. on the right. System menu ⇒... - Page 19 This transmitter is equipped with 6 digital trims. Each time you press a trim button, the trim position moves one step. If you continue pressing it, the trim position starts to move faster. In addition, when the trim position returns to the center, the tone will change.
- Page 20 (SD:32MB-2GB SDHC:4GB-32GB). When you have a problem of saving or reading data Futaba) into the micro SD card, you can use those after a long period of use, please get a new micro files on your T26SZ transmitter. Equipment for SD card.
- Page 21 -When a micro SD card is installed in the T26SZ CAUTION transmitter, a folder called "Futaba" is created. Folders called "LOG" and "MODEL" are created Be sure to turn off the power to in this folder. The "MODEL" folder stores the the ...
-
Page 22: Installation
(Typical installation) R7208SB The R7208SB has a port switching function. If SB2/4 to SB2/7 ports are also set to S.BUS2, sensors can be connected. LED Indication Status LINK LED No signal reception Red Solid Receiving signals Green Solid Start → 2second S.BUS2 extends S.BUS and supports bidirectional Waiting for link later →... - Page 23 By connecting the receiver to the T26SZ using the receiver setting/update cable (included), can change the following three receiver settings. By installing two receivers in one aircraft, if one The R7208SB is capable of changing its channel receiver becomes unable to communicate, the other allocations as described in the table below.
- Page 24 Turn on the power switch while pressing the U.MENU button on the transmitter. And turn on U.MENU *For safety reasons, receiver settings cannot be made while radio waves are Keep pressing and… being transmitted. *When using the receiver after setting the and on again. 4. ...
- Page 25 Servos other than those listed here can be used as mode and link secondary Updating requires a PC that can connect to the Internet and Futaba CIU-3. Refer to Futaba homepage for update software and Turn on the sub update method. receiver and link *In the case of FASSTest 26CH, it is possible to link with three receivers.
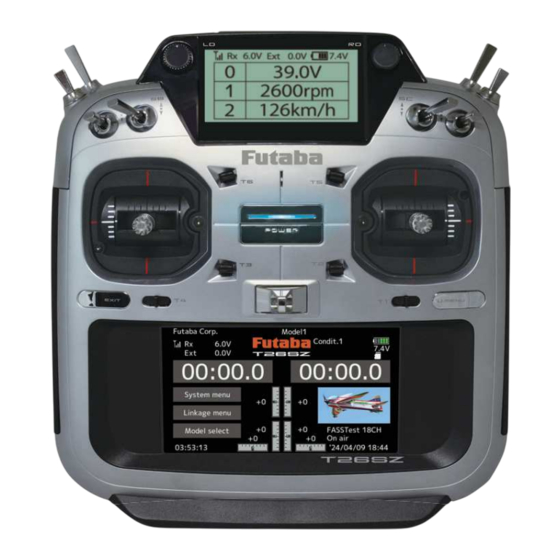
- Page 26 • In FASSTest/T-FHSS AIR mode, • The condition name • When battery is low, the alarm this data displayed. RX voltage that is currently used is will beep. Land your aircraft and Ext voltage display displayed here. immediately. → (Menu) •...
- Page 27 Use your PC. Insert the picture file into the T26SZ once, connect the formatted microSD card to your PC, and save it to the “FUTABA\PICTURE” folder on the microSD card. Insert the microSD card into the T26SZ and turn on the T26SZ.
- Page 28 The sub-display can display timer or telemetry data. (The sub display is not a touch panel. The setting operation is performed on the main display.) Telemetry receiving status Receiver Voltage Extra Voltage Transmitter Voltage Timer 1 Timer 2 How to display telemetry information Adjust the contrast of the LCD screen in the “Display” in the “System menu”...
- Page 29 Each transmitter has an individually assigned, unique ID code. In order to start operation, the receiver must be linked with the ID code of the transmitter to which it is being paired. Once the link is made, the ID code is stored in the receiver and no further linking is necessary unless the receiver is to be used with another transmitter.
-
Page 30: Conventional System
For the sake of safety, this function does not operate the receiver if the model data of the model program settings that does not match the aircraft is used by mistake. Conventional system Model ID Rx 1 Rx 1 Operation Not Operation Rx 2 Rx 2 Operation Operation Rx 3 Rx 3... - Page 31 It is extremely important to range check your models prior to each flying session. This enables you to The T26SZ transmitter incorporates a system that reduces its power output and allows you to perform such a range check. During this mode, the RF power output is reduced so the 1. ...
- Page 32 Can use the trainer system with T26SZ and another Futaba T-FHSS AIR system transmitter without wired connection. The teacher’s transmitter (T26SZ) and the student’s transmitter (another T-FHSS AIR transmitter) form a pair and operate a single aircraft for operational guidance. First, the teacher controls the aircraft, and by operating the master switch, the teacher switches control to the student’s side, and the...
- Page 33 Teacher side 1. Linkage menu → Trainer screen on the teacher side T26SZ. 2. INH → OFF ● [Wired]: Does not use wireless trainer function. (Trainer cable required) ● [Wireless]: Use the wireless trainer function. 3. Wired → Wireless *When using a wireless trainer, it will automatically be set to trainer teacher mode/16CH mode.
- Page 34 The T26SZ transmitter channels are automatically assigned for optimal combination according to the type selected with the Model type function of the Linkage menu. The channel assignment (initial setting) for each model type is shown below. Connect the receiver and servos to match the type used. *The set channels can be checked at the Function screen of the Linkage menu.
- Page 35 1AIL 2AIL 2AIL+1FLAP 2AIL+2FLAP 2AIL+4FLAP 4AIL+2FLAP 4AIL+4FLAP RX The output CH of each Airplane Glider Airplane Glider Airplane Glider Airplane Glider Airplane Glider Airplane Glider Airplane Glider system Aileron Aileron Aileron Aileron Aileron Aileron Aileron Aileron Aileron Aileron Aileron Aileron Aileron Aileron Elevator Elevator Elevator Elevator Elevator Elevator Elevator Elevator Elevator Elevator Elevator Elevator Elevator Elevator Throttle Motor Throttle...
- Page 36 2AIL 2AIL+1FLAP 2AIL+2FLAP 2AIL+4FLAP 4AIL+2FLAP 4AIL+4FLAP RX The output CH of each Airplane Glider Airplane Glider Airplane Glider Airplane Glider Airplane Glider Airplane Glider system Aileron Aileron Aileron Aileron Aileron Aileron Aileron Aileron Aileron Aileron Aileron Aileron AUX4 AUX4 AUX4 AUX4 AUX4 AUX4 Aileron2 Aileron2 Aileron2 Aileron2 Aileron2 Aileron2 Throttle Motor...
- Page 37 2AIL 2AIL+1FLAP 2AIL+2FLAP 2AIL+4FLAP 4AIL+2FLAP 4AIL+4FLAP RX The output CH of each Airplane Glider Airplane Glider Airplane Glider Airplane Glider Airplane Glider Airplane Glider system Aileron Aileron Aileron Aileron Aileron Aileron Aileron Aileron Aileron Aileron Aileron Aileron Rudder2 Rudder2 Rudder2 Rudder2 Rudder2 Rudder2 Aileron2 Aileron2 Aileron2 Aileron2 Aileron2 Aileron2 Throttle Motor Throttle...
- Page 38 The output The output CH of each CH of each H-4/H-4X Swash All other H-4/H-4X Swash All other system system Aileron Aileron Aileron Aileron Elevator Elevator Elevator Elevator Throttle Throttle Throttle Throttle Elevator2 Rudder Rudder Rudder Pitch Pitch Gyro Gyro Gyro Gyro Pitch Pitch Governor Governor Governor Governor Rudder Governor2 Elevator2 Governor2 Gyro2...
- Page 39 This manual is a simplified version. Details of the function are not described. Refer to country distributor WEB for detailed function explanation. https://www.futabausa.com ( https://www.rc.futaba.co.jp) This product uses the following open source software. ■ Google Noto Fonts This Font Software is licensed under the SIL Open Font License, Version 1.1. This license is copied below, and is also available with a FAQ at: http://scripts.sil.org/ ----------------------------------------------------------- SIL OPEN FONT LICENSE Version 1.1 - 26 February 2007...
Need help?
Do you have a question about the FASSTest T26SZ Series and is the answer not in the manual?
Questions and answers