
Related Manuals for KitchenAid KES6403DG


Summary of Contents for KitchenAid KES6403DG
- Page 1 KES6403, KES6503 W11312156C.indb 1 W11312156C.indb 1 8/12/2020 7:43:37 PM 8/12/2020 7:43:37 PM...
-
Page 2: Parts And Features
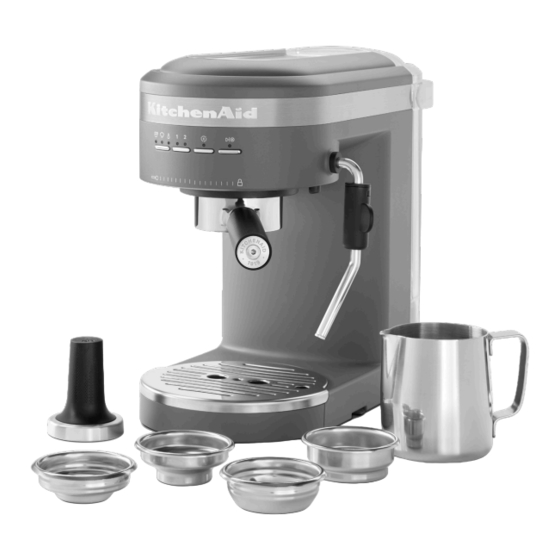
PARTS AND FEATURES Milk Coffee Pitcher Scoop Single wall Single wall Double wall Double wall Tamper 1 shot 2 shot 1 shot 2 shot Water Tank (Capacity: 47 ounces) Portafilter (58 mm) Water Tank Handle Mode Button : Espresso : Steam Water Tank Lid : Hot Water Cup Warmer... -
Page 3: Product Safety
PRODUCT SAFETY IMPORTANT SAFEGUARDS When using electrical appliances, basic safety precautions should always be followed, including the following: 1. Read all instructions. 2. Do not touch hot surfaces. Use handles or knobs. 3. Close supervision is necessary when any appliance is used by or near children. 4. - Page 4 PRODUCT SAFETY 13. Use extreme caution when using hot steam. 14. Do not use appliance for other than intended use. 15. Irritation to skin or eyes can occur if they come into contact with the descaling solution. Avoid skin and eye contact. Rinse off descaling solution with clean water.
-
Page 5: Getting Started
GETTING STARTED First, clean all parts and accessories (See “Care and Cleaning” section). Place the Espresso Machine on a dry, flat, level surface such as a countertop or table. Fill the Water Tank with fresh water Insert the Steam Wand until you hear a (max. -
Page 6: Product Usage
GETTING STARTED To rinse the Group Head, place a container To rinse the Steam Wand, direct the Steam under the Group Head. Toggle the Mode Wand towards the Drip Tray or into a cup. Button to select Espresso. Toggle Dose Then, toggle the Mode Button to select Button to 1 and press button. - Page 7 PRODUCT USAGE Tap the Portafilter to level the ground Position the Portafilter under the Group coffee bed and rest on a flat surface. Head with the handle align to unlock. Use the Tamper to tamp down the ground Raise the Portafilter into the Group Head coffee.
- Page 8 PRODUCT USAGE USING THE STEAM MODE FOR MILK Toggle the Mode Button to select Steam. Fill the Milk pitcher with desired amount of The machine will automatically start cold milk. heating, indicated by the flashing Steam light. The Steam light will go solid when TIP: Fill to bottom of the pour spout.
- Page 9 PRODUCT USAGE USING HOT WATER FEATURE The Steam Wand can also dispense hot water which is great for an americano, tea, hot chocolate, etc. You can also use hot water to pre-heat cups. Press Dose Button to select the volume of Toggle the Mode Button to select Water.
- Page 10 PROGRAMING FUNCTION TIP: To restore all factory settings, Press and Hold “Dose Button” for 3 seconds. Changing the factory default Espresso or Water Volumes may impact the intended performance of the machine. PROGRAMING THE WATER TEMPERATURE AND WATER HARDNESS To change pre-programmed Water To change pre-programmed Water Temperature: Toggle the Mode Button Hardness: Toggle the Mode Button to...
-
Page 11: Care And Cleaning
CARE AND CLEANING For best results, regularly clean the Espresso Machine and accessories. IMPORTANT: Unplug the Espresso Machine before cleaning. Allow the Espresso Machine and accessories to cool down. NOTE: Do not use abrasive cleansers or scouring pads when cleaning the Espresso Machine, parts, or accessories. - Page 12 CARE AND CLEANING DESCALING THE ESPRESSO MACHINE The descaling program enables simple and effective descaling of your Espresso Machine. Descale the Espresso Machine regularly, but a minimum whenever the “Clean ( )” indicator is blinking. The frequency of descaling depends on the hardness of the water in your region. Therefore, it is important to program the Espresso Machine according to the water hardness level of your location.
- Page 13 CARE AND CLEANING Phase 4: Place the container (~ 17 ounces) on the Drip Tray below Group Head. Then, press button. Clean light and button light will blink fast after the fourth and final phase is complete. Empty the container. Press button to complete the Clean cycle.
-
Page 14: Troubleshooting Guide
TROUBLESHOOTING GUIDE WARNING Electrical Shock Hazard Plug into a grounded 3 prong outlet. Do not remove ground prong. Do not use an adapter. Do not use an extension cord. Failure to follow these instructions can result in death, fire, or electrical shock. - Page 15 TROUBLESHOOTING GUIDE Problem Solution Coffee is ground too coarsely. Use slightly finer grind. Coffee tamped too softly. Use slightly firmer tamp between No Crema is being 30-40 lb or 15-20 kg of force. produced Single wall filter basket might have been used with pre-ground coffee.
Need help?
Do you have a question about the KES6403DG and is the answer not in the manual?
Questions and answers