Advertisement
Quick Links
Advertisement

Related Manuals for Sunrise Medical Symmetrikit Tiltrite


Summary of Contents for Sunrise Medical Symmetrikit Tiltrite
- Page 1 TILTRITE Instructions for use RX10450_9 2022-Dec...
- Page 2 IMPORTANT – PLEASE READ THESE INSTRUCTIONS THROUGH CAREFULLY AND RETAIN FOR FUTURE REFERENCE INTENDED USE: MULTI ADJUSTABLE “ALTERNATIVE SEATING” FOR THE MOST COMPLEX NEEDS FOR CLIENTS WITH PROFOUND AND MULTIPLE DISABILITIES THIS CHAIR HAS BEEN DESIGNED TO BE USED IN AREAS SUCH AS NURSING HOMES, CARE HOMES, HOSPITALS AND PRIVATE DWELLINGS.
- Page 3 CONTENTS Safety Guarantee Getting To Know Your Chair Seat depth adjustment Removal of hard shell casing Footplate adjustments Leg rest adjustments Head rest adjustments Back rest adjustments Tilt in space Arm adjustments Fingerform (complex needs) Optional Extras Strap and Harness options Battery Maintenance Looking After Your Chair Frequently Asked Questions...
- Page 4 SAFETY INCORRECT USE OF THIS PRODUCT CAN CAUSE ACCIDENTS • This is an electrical item and should be treated with caution WARNING! • Always ensure that there is nothing to obstruct the free movement of this chair, for example children, pets, or solid objects, e.g. a wall •...
- Page 5 ANY SERIOUS INCIDENT THAT HAS OCCURRED IN RELATION TO THIS CHAIR SHOULD BE REPORTED TO THE MANUFACTURER AND THE COMPETENT AUTHORITY OF THE MEMBER WARNING! STATE IN WHICH THE USER AND/OR PATIENT IS ESTABLISHED. This chair is capable of passive joint movement, it should only be used following therapeutic advice.
- Page 6 GUARANTEE Your new TILTRITE Chair includes a ONE YEAR upholstery and TWO YEAR mechanical parts guarantee, against defective materials and faulty workmanship from the date of purchase. This guarantee is valid for fair wear and tear only and not valid in cases of misuse or uses other than those specified in this instruction manual.
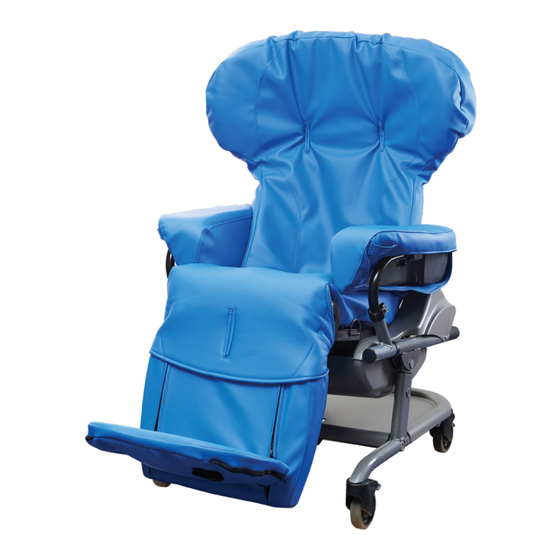
- Page 7 GETTING TO KNOW YOUR CHAIR True tilt in space - chair can be tilted Adjustable back height backwards or forwards without altering with Kyphotic ankle/knee/hip or back angles adjustment Adjustable recline Cutting edge Arms can be independently seat cushion adjusted in height, tilt, and with various swivel and also foldable for pressure...
- Page 8 Seat depth adjustment - Should be set during initial installation of the chair fig.1 fig.2 To set the seat depth, first pull the seat cushion forward as shown in fig.1 to locate the two locking screws at the back of the seat plate fig.2. Loosen the screws using a 4mm Allen key and slide the seat along the guide rails as required and tighten to maintain position.
- Page 9 Footplate height adjustment fig.4 fig.5 Before setting the height of the foot plate (if fitted) it is necessary to open the two zips on the leg rest as indicated by the arrows in fig.4. Inside the zips you will find the adjuster screws fig.5 (one on each side). Loosen with the 4mm Hex key supplied and footplate will slide up or down to the required height.
- Page 10 Leg rest angle CARE SHOULD BE TAKEN THE LEGREST DOES NOT TOUCH THE FLOOR WHEN TILTING FORWARD Powered leg rest The angle of elevation of the leg rest can easily be altered. On the power chair simply push the button on the handset to raise or lower the user’s legs.
- Page 11 Head rest height and angle fig.9 The headrest height and angle is adjusted by loosening the 4 clamp bolts highlighted above in fig.9 once the back shell has been removed as previously described on page 8. Once loose, raise or lower the headrest in the required position, making sure the clamping blocks are at the same height on both sides.
- Page 12 Back rest angle Powered recline angle back elevation can easily be altered on the powered chair simply by pushing the buttons on the handset shown above to alter the User’s recline angle. The green light on the handset will illuminate during operation.
- Page 13 Tilt in space Powered tilt in space The independent angle of tilt in space can easily be altered on the powered chair simply by pushing the buttons on the handset as shown above to alter the User’s tilt angle. The green light on the handset will illuminate during operation.
- Page 14 Arm adjustments calibration markings Width adjustment To adjust the width between the arms, loosen the adjuster screw and move the arm in or out as required. There is a calibration marking on the horizontal post attached to the arm to check against your settings chart.
- Page 15 Swing out arms fig.15 To allow easy access the whole arm can easily be swung out of the way. To move the arm, unscrew the large hand screw fig.15 located towards the lower back of the chair. After a few turns, the arm will start to hinge outwards, tucking down neatly beside the chair frame. Relocating the arm is completed by hinging it firmly back up into place and retightening the hand screw, ensuring that is fully secure before use www.Symmetrikit.com...
- Page 16 Fingerform (complex needs) Your Symmetrikit chair can be fitted with a variety of back designs to suit from the most simple to most complex needs. Fingerform™ (for complex needs) Before making any adjustments, remove back case as shown on page 8. To adjust the height of the armatures, loosen the screws at the back of the armatures labelled A &...
- Page 17 Symmetricare™ Back Rest The Symmetricare back module gives additional support over a conventional chair back. Within the cushion is a version of Finger form technology. To adjust the width or shape of the back simply bend it in to the required position. It will then retain this shape for as long as needed.
- Page 18 Strap & Harness options PLEASE FAMILARISE YOURSELF WITH THESE PRODUCTS ON THE NEXT FOUR PAGES BEFORE USE. IT IS ESSENTIAL THAT CORRECT HARNESS FIXINGS ARE FULLY UNDERSTOOD. Lap strap - standard or padded To fit the standard or padded lap strap first remove the seat cushion and then locate the rear seat 4 Point (BES) lap strap mounting straps.
- Page 19 4 Point lap strap - standard or padded Remove the seat cushion and locate the rear and side seat mountings. Secure the strap with the hook and loop fixings, ensuring the ‘back’ labels are on the rear straps. Refit the seat cushion and pass the strap ends around the sides.
- Page 20 Groin Harness - padded as standard (SA2820/2825) 1 - First remove the seat cushion and fit the rear mounting straps around the lower backrest bar (outside the cover). Now place the main part of the harness on the seat with the long straps to the back. Thread the long straps through the ‘D’...
- Page 21 4 Point chest harness - standard (SA2820/2825) 1 - Remove the back cover. Locate the headrest hinges (the holes for the harness to feed through will be located adjacent to these hinges). 3 - With the client seated, locate the four mounting straps.
- Page 22 Battery Maintenance There is a power switch below the arm pivot on the right hand side of the chair which will need to be turned on to allow operation . It may be necessary to raise the fabric valance to see it. To protect the unit from damage there is also a reset/trip switch fitted.
- Page 23 Looking After Your Chair • Before cleaning the chair, remove the mains cable (if present) from the wall socket. • Dust and dirt can increase the wear and tear on the fabric, we recommend you brush/vacuum your chair regularly. • If the upholstery is exposed to direct sunlight for long periods of time it will likely fade, where possible use blinds/curtains for protection.
- Page 24 TILTRITE Please get in touch with us to find out more... Tel: 01531 635388 SYMMETRIKIT Postural Care, Bromyard Road, Ledbury, Herefordshire HR8 1NS www.Symmetrikit.com sales@Symmetrikit.com The intended lifetime of this product is 5 years As the manufacturer, The Helping Hand Company, As the manufacturer, The Helping Hand Company, declares that the produ ct conforms to the UK declares that this produ ct conforms to the Medical...
Need help?
Do you have a question about the Symmetrikit Tiltrite and is the answer not in the manual?
Questions and answers