Table of Contents
Advertisement
Advertisement
Table of Contents

Related Manuals for Oceasoft Cobalt X Series


Summary of Contents for Oceasoft Cobalt X Series
- Page 1 Cobalt X-series Module Set-up & Use...
- Page 2 Notices and safety Disclaimer and limitation of liability OCEASOFT assumes no responsibility for any loss or claims by third parties which may arise through the use of this product. In particular, users must not use the product in any manner not specifically indicated by OCEASOFT.
- Page 3 CE - Conformity with European regulations This paragraph pertains to 868 MHz Cobalt wireless modules. The OCEASOFT product (Bluetooth component BMD-300, LoRaWAN component CMWX1ZZABZ) is compliant with the essential requirements and other relevant requirements of the following standards and/or normative documents.
- Page 4 CEI 60950-1:2006 + A11:2009 + A1:2010 + A12:2011 + A2:2013 o EN 62479 2010 EU Declaration of Conformity provided in Appendix 3 of this document. Caution: Any changes or modifications not expressly approved by OCEASOFT could void the user's authority to operate the equipment. Bluetooth •...
- Page 5 Fax: +1-609-589-1669 France © 2019 OCEASOFT. All rights reserved. OCEASOFT, the OCEASOFT logo, Cobalt, Cobalt X1, Cobalt X2, and OCEAView are the exclusive property of OCEASOFT. All other brands mentioned are the property of their respective owners. This is a non-contractual document.
-
Page 6: Table Of Contents
4.2 Preparing the mounting kit ..................28 5 Using external sensors ................... 29 5.1 PT100 Smart Sensors™ ....................29 Connecting OCEASOFT Smart Sensors ..............30 Placing Smart Sensors ..................31 5.2 Digital temperature sensors ..................34 Cobalt X-series User Guide... - Page 7 Introduction Connecting a digital sensor .................. 35 Placing the sensor ....................35 5.3 Temperature/humidity Smart Sensors™ ..............37 Placing the sensor ....................37 5.4 Remote wireless sensors ................... 38 Placing the sensor ....................38 6 Cobalt X graphical user interface ..............39 6.1 Before you begin .......................
- Page 8 Introduction 8.2 Alarm buzzer ......................74 Snoozing an alarm ....................74 Acknowledging an alarm ..................76 Alarm delay indicator ................... 78 9 Maintaining your modules ................79 9.1 Replacing batteries ....................79 9.2 Cleaning Instructions ....................80 10 Appendix 1 – Cobalt X battery life ..............81 10.1 Estimated operating lifetime ..................
-
Page 9: Introduction
Introduction 1 Introduction Congratulations and thank you for choosing the OCEASOFT Cobalt X-series wireless data logger. This document presents an overview of the Cobalt X-series data logger, followed by practical instructions to get your module up and running quickly. Detailed configuration instructions... -
Page 10: Cobalt X Solution
Introduction Cobalt X solution OCEASOFT Cobalt X1 and Cobalt X2 are the new generation of wireless, ultra-low-power data loggers that connect to the Cloud. Cobalt X-series data loggers are specially adapted for monitoring and traceability of temperature, humidity, and other critical physical parameters in many sectors, notably life science, pharmaceutical, agri-food. -
Page 11: Process Flow Summary
Introduction • ISO 17025 (COFRAC) calibration, OCEASOFT certified calibration, or NIST traceable calibration upon request Process flow summary The diagram below summarizes the Cobalt X2 process flow: Figure 1 – Cobalt X module communicate with the Cloud via a local receiver... - Page 12 Introduction • Login to OCEAView web application www.oceaview.com is used to • Set up the X1/X2 module and configure authenticate users, configure data logging settings, such as upper and alarm settings, program lower limit values. Push the configuration datalogging, analyze data and to your Cobalt X module.
-
Page 13: Product Overview
LCD display with module name, temperature, signal and battery indicators Status indicator light OCEASOFT Smart Sensor connector for external sensors (2 physical connectors with X2, 1 physical connector with X1) Figure 2 – Cobalt X2 module with two external sensors... -
Page 14: Rear View
Introduction Rear view The battery compartment is located on the back of the device. See section 3.2 Activating the Cobalt X module to insert the provided batteries. The rear view of the device has a slot to attach the module to the plastic holder using the padlock (optional). See Chapter 4 – Installing the Cobalt X module (p. -
Page 15: Bottom View
Introduction Bottom view The Cobalt X series data logger supports any combination of wired or wireless sensors (up to 4 channels with Cobalt X2; up to two sensors with Cobalt X1). Independent connectors are located at the bottom of the device (two physical connectors on Cobalt X2 and one physical connector on Cobalt X1) for connecting single probes and/or dual smart sensors. -
Page 16: Compatible Sensor Types
Introduction Compatible sensor types Cobalt X2 modules support both “classic” external digital temperature sensors, OCEASOFT Smart-Sensors, and OCEASOFT (Emerald) wireless sensor modules: OCEASOFT Emerald wireless sensor Smart Sensor External digital temperature Figure 6 – Example of Cobalt X2 module with two types of external sensors and paired with... - Page 17 +100°C to +350°C (212°F to 662°F) Autoclaves, incubators, and ovens. In compliance with the requirements of the NF EN 15189 standard, OCEASOFT Smart Sensors are calibrated by OCEASOFT’s metrology laboratory, which is accredited to the international ISO/IEC 17025 standard. Calibrated OCEASOFT Smart Sensors combine analog and digital technology and are delivered with calibration parameters in their on-board memory.
- Page 18 Introduction Temperature / humidity sensor Cobalt X modules may be equipped with a dual sensor for tracking relative humidity and temperature simultaneously. Ranges Application -40 to +120°C (-40°F to +257°F) Generally used for tracking storage (resolution 0.0625°C) conditions in medical and agri-food 0% to 99.9% non-condensing environments.
- Page 19 4-20mA, 0-5V or 0-10V. Current is measured and interpreted to provide information for various applications, such as monitoring wind speed, position angles, particle counters, fill-levels, etc. Wireless sensors Cobalt X-series data loggers are compatible with OCEASOFT Bluetooth®-enabled wireless modules. Emerald module Temperature range Application -40°C to +85°C or -200°C to +200°C (w/ext.
-
Page 20: Package Contents
Introduction Package contents 1 Cobalt X wireless module • • Two 3.2V LS17500 batteries (with additional screw for battery cover) 1 mounting kit with magnetic holder, screws • Optional: 5V AC/DC adapter with micro USB cable • • Padlock to lock the module onto its support for security 1 calibration certificate per sensor (if purchased with calibration option) •... -
Page 21: Technical Specifications
868 MHz (EU) or 915 MHz (USA) o Max output 14 dB (EU) or 20 dB (USA) • Bluetooth-Smart 5.0 technology for compatibility with all OCEASOFT Bluetooth®- enabled wireless modules: o Range Up to about 50 meters (160 ft.) in line-of-sight... - Page 22 Technical specifications Monitoring From 1 to 816 minutes (depending on the transfer • Read interval interval configured in OCEAView) Unlimited data storage on OCEACloud; • Data storage 4,000 readings (per channel) stored in internal memory 192 “datalogging events” per channel and 192 Datalogging •...
-
Page 23: Dimensions
Technical specifications Dimensions Module (in mm) Figure 7 – Cobalt X module dimensions Mounting kit (in mm) Figure 8 – Cobalt X mounting kit details Cobalt X-series User Guide Page 23 GUIDE UTILISATEUR... -
Page 24: Power Options
Technical specifications Power options The Cobalt X module can be powered by two replaceable internal batteries (3.6 V) located on the back of your device, or by AC power using the provided 5 Volt DC adapter. Battery Characteristics Lithium thionyl chloride A-size bobbin cell •... -
Page 25: Getting Started
Getting started Getting started Prerequisites • OCEASOFT LoRaWAN-enabled receiver (P/N GSR.REC.#005) installed and setup for Cloud connectivity. • 110 – 240 V AC power source and/or battery installed in module. • Desktop or laptop computer with a supported web browser application (see OCEAView user documentation for details). -
Page 26: Splash Screen
Getting started 5. Replace the battery compartment cover. 6. Replace the screw, being careful not to over-tighten it. 7. Wait during the boot sequence. 8. Once the boot is complete, see OCEAView documentation for more details on how to setup, program, and monitor your Cobalt X module. To power your datalogger using the adapter: 1. -
Page 27: Installing The Cobalt X Module
Long-range wireless connectivity enables Cobalt X modules to be placed nearly anywhere in your building or site. If you are using an OCEASOFT LoRaWAN™ receiver and the signal is not strong enough, a second LoRaWAN-enabled receiver may be required. Please contact OCEASOFT service team for support if you are having issues with connectivity. -
Page 28: Preparing The Mounting Kit
1. Attach the module holder to the desired location using the provided screws, or adhere the magnet on the back of the holder to a metal surface. For best wireless performance, follow OCEASOFT recommendations described in section 4 Installing the Cobalt X module, page 27. -
Page 29: Using External Sensors
PT100 Smart Sensors™ The image below shows a Cobalt X2 module with an external Pt100 sensor, connected via OCEASOFT Smart Sensor interface. Figure 10 – Cobalt X2 wireless module with an OCEASOFT PT100 Smart Sensor Cobalt X-series User Guide Page 29... -
Page 30: Connecting Oceasoft Smart Sensors
Calibrated external Smart Sensors store their own calibration parameters directly, and thus can be placed on any Cobalt X module. Cobalt X modules supporting external sensors use a specially designed OCEASOFT Smart Sensor technology that offers several key advantages with respect to conventional solutions: •... -
Page 31: Placing Smart Sensors
Figure 12. When routing the Pt100 sensor through the same port used by the control sensor, OCEASOFT recommends installing the sensor only after the freezer has reached a thawed state. - Page 32 Using external sensors To negate the possibility of condensation dripping onto electronic components, avoid routing the cable in close proximity to any electrical enclosures. Mount the Pt100 sensor as close to the unit control sensor as possible. When possible, we recommend mounting the sensor within 5 cm (2 inches) of the control sensor.
- Page 33 Pt100 sensors for LN2/cryogenic tanks must be mounted, when applicable, in close proximity to the unit display sensor. To avoid temperature measurement disparities, OCEASOFT recommends mounting the sensor at the same height as the display sensor. As an example, some freezers have an access panel on the back of the unit in which you may route the sensor cable up the back wall.
-
Page 34: Digital Temperature Sensors
Using external sensors Digital temperature sensors External digital sensors do not connect to modules via the OCEAOSFT Smart Sensor solution. Therefore, calibration parameters must be managed using the OCEAView web application so they can be uploaded to the module. Figure 14 – Cobalt X module with external digital sensor Depending on the design of the space to be monitored, you may be able to pass the sensor through an access port or opening. -
Page 35: Connecting A Digital Sensor
Using external sensors Connecting a digital sensor Simply connect the sensor cable on the module as shown here: Insert the keyed sensor plug onto an available port on the bottom of your module Figure 15 – Cobalt X2 module with external digital sensor Placing the sensor 1. - Page 36 Using external sensors 2. Clean the surface for the sensor using alcohol to remove any grease or dirt. 3. Attach one of the plastic cable holders to the sensor, remove the protective strip from the adhesive, and place the holder on the clean spot inside the enclosure. 4.
-
Page 37: Temperature/Humidity Smart Sensors
This option is generally used in various types of storage, medical and traceability applications. This sensor connects via the OCEASOFT Smart Sensor connector, and therefore already contains calibration parameters if the sensor was calibrated by OCEAOSFT. Placing the sensor Mount the Cobalt X module in the desired location using the provided holder. -
Page 38: Remote Wireless Sensors
Remote wireless sensors Equipped with Bluetooth Low Energy connectivity, Cobalt X-series modules can use OCEASOFT Emerald data loggers as remote wireless sensors to monitor and manage equipment in difficult-to-access locations or where wired solutions are impractical. You can use any combination of wired or wireless sensors. -
Page 39: Cobalt X Graphical User Interface
Cobalt X graphical user interface Cobalt X graphical user interface The Cobalt X module offers a highly visible color LCD screen and simple navigation. Thanks to its intuitive touchscreen, you can navigate easily through datalogging pages and menu settings even under harsh conditions or while wearing protective gloves. Before you begin This section describes the gestures used to interact with your Cobalt X module. -
Page 40: Measurement Display & Control Elements
Cobalt X graphical user interface Measurement display & control elements The Cobalt X module features two connectors (2 channels that can support up to 2 sensors each) that can be configured in any combination to monitor up to four physical parameters. The data logger automatically adjusts the display of readings and events based on the number of connected sensors. -
Page 41: Status Bar
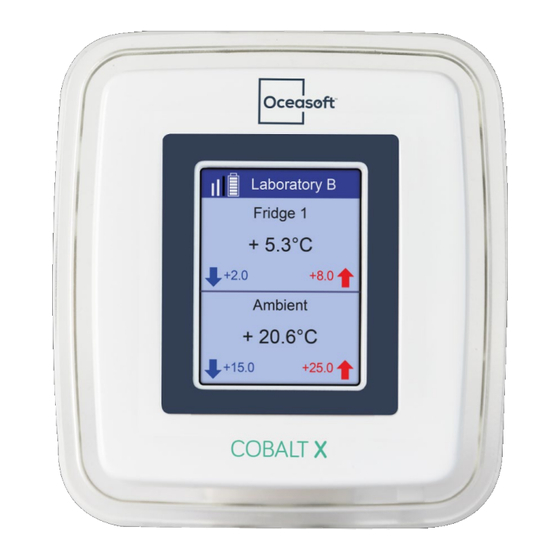
Cobalt X graphical user interface Status bar The Status bar is the small blue band across the top of Cobalt X screen. It shows the module name and has indications for battery life and wireless network status. If several sensors are configured, you may use the navigation button to switch from one sensor to another. -
Page 42: Datalogging
Cobalt X graphical user interface Datalogging The Cobalt X module shows the currently programmed datalogging cycle(s). Data is shown on a single screen or splits into distinct areas when two or more configurations are defined: Figure 20 – One-channel screen Figure 21 –... -
Page 43: On-Demand Reading
Cobalt X graphical user interface On-demand reading Data on the Cobalt X screen is refreshed periodically, so the temperature in the monitored environment may be different than the reading currently displayed on the unit itself. You may check the current reading at any time. To perform an on-demand read 1. -
Page 44: Screen Backlight
Cobalt X graphical user interface Screen backlight When the Cobalt X is running on battery power, the screen backlight is managed to preserve battery life. The backlight turns off after a period of 30 seconds of inactivity following the last user interaction. When the display is turned off, simply touch the Cobalt X screen to turn it back on. -
Page 45: Configuration Menus
Configuration menus Configuration menus The Cobalt X module includes configuration menus for interacting with the device and setting specific parameters. Swiping down from the top of screen or tapping on the screen opens the module configuration menus. Figure 24 – Accessing Cobalt X configuration menus This diagram shows menu organization, as described in the following sections: Cobalt X Configuration menu Settings... -
Page 46: Settings
Configuration menus Settings The Settings menu contains the following options: Figure 26 – Options in the Settings menu Setting Cobalt X Language The Language option allows you to change the display language of your Cobalt X. To change the language: 1. -
Page 47: Modifying Cobalt X Theme
Configuration menus Modifying Cobalt X theme The Cobalt X offers two different color contrast options (black or white background). By default, the module screen uses the black background to reduce eye strain in low light conditions. To change the Cobalt X theme: 1. -
Page 48: Changing The Temperature Unit
Configuration menus Changing the temperature unit Temperature readings can be displayed in degrees Celsius (°C) or Fahrenheit (°F). To change the temperature unit shown on your Cobalt X module: 1. Swipe down from the top of screen or tap the status bar to open the module configuration menus. -
Page 49: Information
Configuration menus Information System information such as firmware version, LoRaWAN wireless frequency, and remaining battery capacity can be found in the Information screen. 1. Swipe down from the top of screen or tap the status bar to open the module configuration menus. -
Page 50: Sensors
Configuration menus Sensors Showing sensors When several sensors are connected to your Cobalt X module, it is possible to display the measurements and parameters of each sensor individually using the Show sensors feature. This mode cycles through all connected sensors and automatically moves to the next sensor page after a predefined time interval (about 4 seconds). -
Page 51: Updating Sensors On Oceaview
Configuration menus Updating sensors on OCEAView When a sensor is physically plugged into a Cobalt X connector, the module automatically recognizes the sensor and sensor type. If the sensor is not present or not up-to-date on OCEAView, you may use the module’s Refresh sensor feature for the system to detect the new sensor and update the configuration in the web application. -
Page 52: Remote Sensors
Pairing an OCEASOFT wireless sensor Pairing the Cobalt X module with a Bluetooth® Emerald modules is simple and guided through the touch screen. This section covers supported OCEASOFT Emerald data loggers (please check with your authorized representative if you need more information). - Page 53 8. Wait until pairing is complete. This may take a few seconds. Once pairing is successful, terminate the operation by pressing OK: 9. Your OCEASOFT wireless sensor is now paired with the Cobalt X module. 10. To pair multiple Bluetooth data loggers, repeat the steps in this section.
- Page 54 If a problem occurs during the pairing procedure, check the instructions in chapter 11 – Appendix 2 - Troubleshooting, page 82 before re-attempting pairing. Please contact the OCEASOFT service team if you need technical assistance. Cobalt X-series User Guide Page 54...
- Page 55 Configuration menus 7.2.3.2 Unpairing an OCEASOFT wireless sensor To unpair your OCEASOFT wireless sensor 1. Swipe down from the top of screen or tap on the screen to open the module configuration menus. 2. Tap on Sensors Remote sensors.
- Page 56 Configuration menus 7.2.3.3 Resetting a remote sensor’s battery counter To reset the sensor battery counter (after removing or replacing batteries), you must use the Reset battery option available in the configuration menu of your Cobalt X module. Only perform this action if you actually install new batteries in your module. To reset the battery counter: 1.
- Page 57 Configuration menus 7. When done, tap on OK: 8. Check the estimated battery life in the Status bar (it should show 100%). Cobalt X-series User Guide Page 57 GUIDE UTILISATEUR...
- Page 58 Configuration menus 7.2.3.4 Swapping sensors The Cobalt X solution allows you to easily swap the sensor(s) connected to your module, such as for recalibration or to replace damaged cables. The process is completely transparent and guarantees the continuity required to ensure traceability of readings while avoiding down-time or monitoring interruptions.
- Page 59 Configuration menus 6. A confirmation screen appears. Tap on OK to continue: 7. Tap to highlight the sensor to be used: 8. Confirm the selection by pressing OK at the bottom of the screen: 9. Wait while the system swaps sensors Cobalt X-series User Guide Page 59 GUIDE UTILISATEUR...
- Page 60 Configuration menus 10. When done, a confirmation message is shown on the Cobalt X module. 11. Tap on OK to return to the system configuration menus. 12. Tap on Back (several times) to return to the datalogging screen. Cobalt X-series User Guide Page 60 GUIDE UTILISATEUR...
-
Page 61: Installation (Advanced Menu)
Configuration menus Installation (Advanced menu) The Cobalt X module includes an Advanced menu that you can use for troubleshooting and to confirm that your module is working properly. Figure 27 – Features of the Advanced menu To limit access to the Cobalt X parameters and prevent unwanted changes, the Advanced menu is protected by a personal access code and reserved for authorized personnel only. -
Page 62: Calibrating The Cobalt X Screen
Configuration menus Calibrating the Cobalt X screen If your Cobalt X module screen does not respond correctly to your touch, the touch screen may require calibration to position touch point coordinates correctly. Proceed as follows to calibrate screen alignment: 1. Swipe down from the top of screen or tap on the screen to open the module configuration menus. -
Page 63: Resetting The Battery Counter
Configuration menus 6. After you have passed through each calibration point sequentially, a white rectangle pops up near the edge of the screen. When calibration is complete, the screen returns to the Advanced menu. Resetting the battery counter It is imperative to replace batteries when the battery indicator is down to one bar, before data logging becomes unreliable. - Page 64 Configuration menus 7. When done, the background of the status bar turns blue: 8. Check the estimated battery life in the Status bar (it should show 100%): 9. Tap on Back to return to the system configuration menus. 10. Tap on Back to return to the datalogging screen. Cobalt X-series User Guide Page 64 GUIDE UTILISATEUR...
-
Page 65: Network Configuration
Cloud but is processed directly by your peripheral network infrastructure (routers, gateways, mobile devices...). This type of installation requires a code provided by OCEASOFT. Cobalt X-series User Guide Page 65 GUIDE UTILISATEUR... - Page 66 7. If you are installing the Cobalt X solution locally (Fog), enter the installation code provided by OCEASOFT allowing you to configure your devices to operate locally. 8. If the code is correct, a confirmation message appears in the status bar: If the code is incorrect, an error message will be shown on the Cobalt X module display.
-
Page 67: Checking Wireless Coverage
To ensure that your Cobalt X-series data loggers are within the wireless coverage range of the OCEASOFT LoRaWAN™ receiver and prepare your environment before deploying your Cobalt X system, you may use the range test feature in the Advanced menu. - Page 68 Make sure the module in question is within wireless range for this operation. Please contact OCEASOFT technical support for specific cases if you have a module that is having difficulty connecting to the LoRaWAN network.
-
Page 69: Checking Communication With The Lorawan Network
Configuration menus Checking communication with the LoRaWAN network After installing your Cobalt X system, you may use the Test command to make sure that your Cobalt X module effectively reaches the LoRaWAN network. The Test command sends a request to the server and waits for a response to determine whether the server is present and responding as expected. - Page 70 If the test fails, it means that the network cannot be reached from either your Cobalt X device or the LoRaWAN-enabled receiver. In that case, make sure the receiver has a working Internet connection and check your installation. Please contact OCEASOFT technical support for specific cases if you have a module that is having difficulty reaching the server.
-
Page 71: Data Synchronization
Configuration menus Data Synchronization The Cobalt X solution allows you to synchronize your Cobalt X module with the server, especially during a data logging session to refresh the data configured in OCEAView. You can also use this option to send the latest mission data on-demand, without waiting for the transfer interval To synchronize your module data: 1. -
Page 72: Alarm Management
Cobalt X is displayed with its default background theme. If you have subscribed to the OCEAlert solution, you will also be notified via SMS or voice call. Contact your sales representative for more information on OCEAlert or visit www.oceasoft.com. Cobalt X-series User Guide Page 72 GUIDE UTILISATEUR... -
Page 73: Using The Led To Check Module Status
Alarm management Using the LED to check module status The color LED on the Cobalt X casing indicates module status and offers different patterns based on status, as described below: General ( = short flash) Module is booting (blinks blue three times, every 200ms) ... -
Page 74: Alarm Buzzer
Alarm management Alarm buzzer When the Cobalt X module is running on external power (using the provided AC adapter), the module’s buzzer is activated to notify users in case of event on the device or at any point during datalogging. Notably, a sound signal is heard when the temperature or humidity is above or below the limits you set in the OCEAView web application. - Page 75 Alarm management The OCEAView web application provides access to measurements and alarms recorded by Cobalt X modules at any time. The alarm sound is stopped automatically when the triggering alarm is acknowledged (for audit trail purposes) in OCEAView. Cobalt X-series User Guide Page 75 GUIDE UTILISATEUR...
-
Page 76: Acknowledging An Alarm
Alarm management Acknowledging an alarm When an alarm condition is present, the Cobalt X module will stay in an alarm state until alarm conditions are no longer met. If a delay was configured, a stopwatch icon is displayed on the data logging screen and will turn into an alarm when the limit is reached. You must acknowledge the alarm and take care of the problem so that further alarms do not continue to occur. - Page 77 Alarm management 3. Then, tap to highlight the desired incident cause and confirm the selection by pressing OK at the bottom of the screen or, tap on Cancel to return to the previous screen without saving the acknowledgment: 4. Once acknowledged, the alarm icon is no longer shown on the Cobalt X module screen: The alarm status is updated in OCEAView web application.
-
Page 78: Alarm Delay Indicator
Alarm management Alarm delay indicator When setting up data logging, you may program a delay before the alarm is triggered. For example, you could set a 5-minute delay for the module to wait 5 minutes before triggering an alarm in case the temperature rises above a programmed limit. In that case, if a reading on your Cobalt X module goes over a programmed limit value, a stopwatch is displayed in the upper left-hand corner to indicate that the module is in a “pre-alarm”... -
Page 79: Maintaining Your Modules
Removing the module cover as described below voids the OCEASOFT water-tightness guarantee. IP30 protection is guaranteed on modules shipped by OCEASOFT. If you open the module yourself, OCEASOFT can no longer guarantee the original IP30 rating. Data in module memory is lost when you remove both batteries. Do not remove both batteries if datalogging is currently running on a module. -
Page 80: Cleaning Instructions
Maintaining your modules Cleaning Instructions You may occasionally need to clean your Cobalt X modules depending on site or environmental conditions. Here are some recommendations and guidelines for cleaning your modules: Clean module using a soft cloth lightly moistened with water, a detergent or •... -
Page 81: 10 Appendix 1 - Cobalt X Battery Life
Ambient temperature: battery capacity is diminished when subject to very cold or • extreme heat conditions. • Wireless communication: wireless communication from the OCEASOFT LoRaWAN- enabled receiver to the Cobalt X module consume battery power. Therefore, the battery life cycle will depend on the connection frequency configured in OCEAVIEW. •... -
Page 82: 11 Appendix 2 - Troubleshooting
To make a wireless sensor visible to your Cobalt module, make sure Bluetooth is enabled on the sensor as described in section 5.4 Remote wireless sensors, page 38, then follow the instructions in section 7.2.3.1 Pairing an OCEASOFT wireless sensor, page 52 to pair both devices. - Page 83 Appendix 2 - Troubleshooting During pairing, the Cobalt X module downloads calibration parameters from the remote sensor. If wireless communication fails during the pairing process, the calibration parameters may be invalid in OCEAView. To fix this issue, use the Settings -> Sensors -> Refresh Sensors function to update sensor calibration parameters.
-
Page 84: 12 Appendix 3 - Eu Declaration Of Conformity
Appendix 3 – EU Declaration of Conformity 12 Appendix 3 – EU Declaration of Conformity Cobalt X-series User Guide Page 84 GUIDE UTILISATEUR... - Page 85 Appendix 3 – EU Declaration of Conformity Cobalt X-series User Guide Page 85 GUIDE UTILISATEUR USER GUIDE...
Need help?
Do you have a question about the Cobalt X Series and is the answer not in the manual?
Questions and answers