Advertisement
Quick Links
Advertisement

Related Manuals for FLYBIRD POWER TOWER STARTER101


Summary of Contents for FLYBIRD POWER TOWER STARTER101
- Page 1 FLYBIRD POWER TOWER STARTER101 USER MANUAL...
-
Page 2: Safety Precautions
Preface Thank you for choosing the versatile FLYBIRD POWER TOWER STARTER101. This equip- ment is designed to help you target and strengthen the major upper body muscles. Wheth- er your goal is a toned physique, increased muscle size and strength, or improved cardio- vascular health, the POWER TOWER can help you achieve your desired results. -
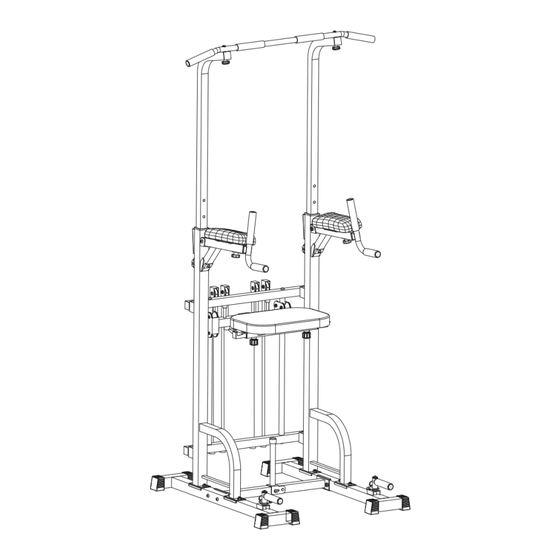
Page 3: Part Identification Chart
Part Identification Chart Part Name Arm Handle Anti-crash frame Base Bracket Middle Cushion Shelf Cushion Telescopic Shelf 2(Left*1 and Right*1) Middle Cushion Arm Cushion Vertical Tube Crossbar Stretch Wheel Frame Pulley Wheel Frame Push-up Handle 2(Left*1 and Right*1) Vertical Tube 2(Left*1 and Right*1)... - Page 4 Telescopic Tube Cord Composite Tube Pull-up Bar M8*68 latch M10 knob M8 Knob M8*12 Screw+M8*22 Flat Washer+M8 Flat Washer M8*16 Screw M16 Knob M10*45 Screws M8*50 Screw+8*16 Flat Washer 5 Screws+4 Flat Washers M8*30 Screw+M8 Nut M12*16 Screw M10*55 Screw+M10 Nut M10*70 Screw M6*16 Screw M10*80 latch...
-
Page 5: Assembly Steps
Assembly Steps Please read this manual carefully before installation. The installation instruction is for reference only. If you have a simpler installation method, please follow your own method. Base Brackets*2 Step 1: Flat Washers*2 Base Connector*1 M10*65 screws*2 M10 Nuts*4 M8*22 Flat Washers*2 Right Push-up Handle*1 10*30 Flat Washers*2... - Page 6 Step 2: Right Vertical Tube*1 Left Vertical Tube*1 M10 Nuts*8 10*30 Flat Washers*8 M10*65 Screws *8 Part Name Amount Vertical Tube 2(Left*1 and Right*1) M10*65 Screw and 10*30 Flat Washer+M10 Nut After installing the base brackets, insert the vertical tubes on the base brackets. Lock the base brackets and vertical tubes with M10*65 screws, 10*30 flat washers, M10 nuts and make sure the main frame is stable.
- Page 7 Step 3: Arm Cushions*2 Arm Handles*2 Arm Handle Shelfs*2 M6*16 Screws*8 M10 Nuts*2 M8 Knobs*2 M10*55 Screws*1 M10*45 Screws*2 M10*55 Screws*1 Part Name Amount M10*55 Screw+M10 Nut M8 Knob M6*16 Screw Arm Handle Shelf Arm Handle Arm Cushion M8 Knob M10*45 Screw 1.
- Page 8 Step 4: M10*70 Screws*2 Pull-up Bar*1 M10 Knobs*2 Telescopic Tubes*2 10*65 Knobs*2 Part Name Amount M10 Knob M10*70 Screw Pull-up Bar M10*65 Knob Telescopic Tube 1. Insert the telescopic tubes into the vertical tubes and lock them with M10*65 knobs. 2.
- Page 9 Step 5: M12*16 screws*4 Stretch wheel frame*1 Pulley wheel frame*1 Composite Tubes*2 M8*50 screws*4 8*16 Flat Washers*4 Tube connector *1 Part Name Amount M12*16 Screw Stretch Wheel Frame Pulley Wheel Frame Composite Tube M8*50 screw+8*16 Flat Washer Tube connector 1. Lock the Tube connector and Vertical tubes with M8*50 screws and 8*16 flat washers; 2.
- Page 10 Step 6: M8 Nuts*4 M8*30 screws*4 Cord*4 Part Name Amount Cord M8*30 screw+M8 Nut roller 1. Align the cord with the stretch wheel frame and install with the rollers. Lock them with M8*30 screws and M8 nuts. Then lock the bottom of the cord. Make sure the main frame is stable.
- Page 11 Step 7: Middle Cushion*1 10*80 latch*1 Middle Cushion Shelf*1 Cushion Telescopic Shelf*2 Middle Cushion Shelf*1 M8*50 screws*1 Part Name Amount Middle Cushion Middle Cushion Shelf Cushion Telescopic Shelf 2(Left*1 and Right*1) M16 Knobs M8*50 screws M8*16 screws 10*80 latch 1. Take the middle cushion shelf (Note: this shelf needs to be inserted into the round hole first before flipping it over) to align the pulley wheel frame and snap it, then lock it with M10*80 latch.
- Page 12 Final Product When you need to do pull-ups, just remove the middle cushion shelf, and then use the cushion telescopic shelf to snap the corresponding position on the vertical tube. TRUSTED STRENGTH TRAINING PARTNER WWW.FLYBIRDFITNESS.COM Flybird Fitness Flybird Fitness O cial...
Need help?
Do you have a question about the POWER TOWER STARTER101 and is the answer not in the manual?
Questions and answers