Table of Contents
Advertisement
Quick Links
Advertisement
Table of Contents

Related Manuals for D-Link DSL-500T


Summary of Contents for D-Link DSL-500T
-
Page 1: Adsl Router
DSL-500T ADSL Router User’s Guide (February 2004) 651DSL500T01... -
Page 2: Ce Mark Warning
- Consult the dealer or an experienced radio/TV technician for help. CE Mark Warning This is a Class B product. In a domestic environment, this product may cause radio interference in which case the user may be required to take adequate measures. DSL-500T DSL Router User’s Guide... -
Page 3: Wichtige Sicherheitshinweise
Gerätegewicht grőßer 3kg ist eine Leitung nicht leichter als H05VV-F, 3G, 0.75mm2 einzusetzen. WARRANTIES EXCLUSIVE IF THE D-LINK PRODUCT DOES NOT OPERATE AS WARRANTED ABOVE, THE CUSTOMER'S SOLE REMEDY SHALL BE, AT D- LINK'S OPTION, REPAIR OR REPLACEMENT. THE FOREGOING WARRANTIES AND REMEDIES ARE EXCLUSIVE AND ARE IN LIEU OF ALL OTHER WARRANTIES, EXPRESSED OR IMPLIED, EITHER IN FACT OR BY OPERATION OF LAW, STATUTORY OR OTHERWISE, INCLUDING WARRANTIES OF MERCHANTABILITY AND FITNESS FOR A PARTICULAR PURPOSE. -
Page 4: Limitation Of Liability
This Warranty applies on the condition that the product Registration Card is filled out and returned to a D-Link office within ninety (90) days of purchase. A list of D-Link offices is provided at the back of this manual, together with a copy of the Registration Card. - Page 5 Spare parts and spare kits Ninety (90) days D-Link’s sole obligation shall be to repair or replace the defective Hardware during the Warranty Period at no charge to the original owner or to refund at D-Link’s sole discretion. Such repair or replacement will be rendered by D-Link at an Authorized D-Link Service Office.
- Page 6 D-Link, the sellers, or the liquidators expressly disclaim their warranty obligation pertaining to the product. Repair by anyone other than D-Link or an Authorized D-Link Service Office will void this Warranty. Disclaimer of Other Warranties: EXCEPT FOR THE LIMITED WARRANTY SPECIFIED HEREIN, THE PRODUCT IS PROVIDED “AS-IS”...
-
Page 7: Table Of Contents
About This User’s Guide ... ix Before You Start ... ix Installation Requirements ... ix INTRODUCTION ... 1 Router Description and Operation... 1 Standards Compatibility and Compliance... 3 Front Panel Display... 4 Rear Panel Connections ... 5 HARDWARE INSTALLATION ... 6 Power on Router... - Page 8 Update Gateway... 53 Ping Test ... 54 OAM Test ... 55 Status Menus ... 56 Network Statistics ... 57 Connection Status ... 58 DHCP Clients... 58 Modem Status ... 59 Product Information ... 59 System Log ... 60 Help Menu ... 60 TECHNICAL SPECIFICATIONS...61 IP ADDRESS SETUP...63 IP CONCEPTS ...65...
-
Page 9: Installation Overview
About This User’s Guide This user’s guide provides instructions on how to install the DSL-500T ADSL Router and use it to connect a computer or Ethernet LAN to the Internet. If you are using a computer with a functioning Ethernet port, the quickest and easiest way to set up the DSL-500T is follow the instructions provided in the Quick Installation Guide. -
Page 10: Ethernet Port (Nic Adapter)
DSL-500T DSL Router User’s Guide disabled by other software (such as virus protection or web user security packages) that may be running on your computer. Ethernet Port (NIC Adapter) Any computer that uses the Router must be able to connect to it through the Ethernet port on the Router. This connection is an Ethernet connection and therefore requires that your computer be equipped with an Ethernet port as well. -
Page 11: Information You Will Need From Your Adsl Service Provider
IP address used for DHCP service on the LAN when DHCP is enabled. This is the subnet mask used by the DSL-500T, and will be LAN Subnet Mask for the used throughout your LAN. The default subnet mask is DSL-500T 255.255.255.0. -
Page 12: Information You Will Need About Your Lan Or Computer
ADSL connection in the future. Once you have the above information, you are ready to setup and configure your DSL-500T ADSL Router. The Modem may be reset to its factory default settings by performing a Restore settings operation within the management interface, see System Commands for more information. -
Page 13: Introduction
ADSL technology enables many interactive multi-media applications such as video conferencing and collaborative computing. The Router is easy to install and use. The DSL-500T connects to single computer or an Ethernet LAN via a standard Ethernet interface. The ADSL connection is made using ordinary twisted-pair telephone line with standard connectors. -
Page 14: Router Features
Router Features The DSL-500T ADSL Router utilizes the latest ADSL enhancements to provide a reliable Internet portal suitable for most small to medium sized offices. DSL-500T advantages include: • PPP (Point-to-Point Protocol) Security – The DSL-500T ADSL Router supports PAP (Password Authentication Protocol) and CHAP (Challenge Handshake Authentication Protocol) for PPP connections. -
Page 15: Standards Compatibility And Compliance
Standards Compatibility and Compliance The DSL-500T complies with or is compatible with the following standards as recognized by their respective agencies. • ITU G.992.2 (G.lite “Splitterless ADSL”) compliant • ITU-T Rec. I.361 compliant • RFC 791 Internet Protocol compliant •... -
Page 16: Packing List
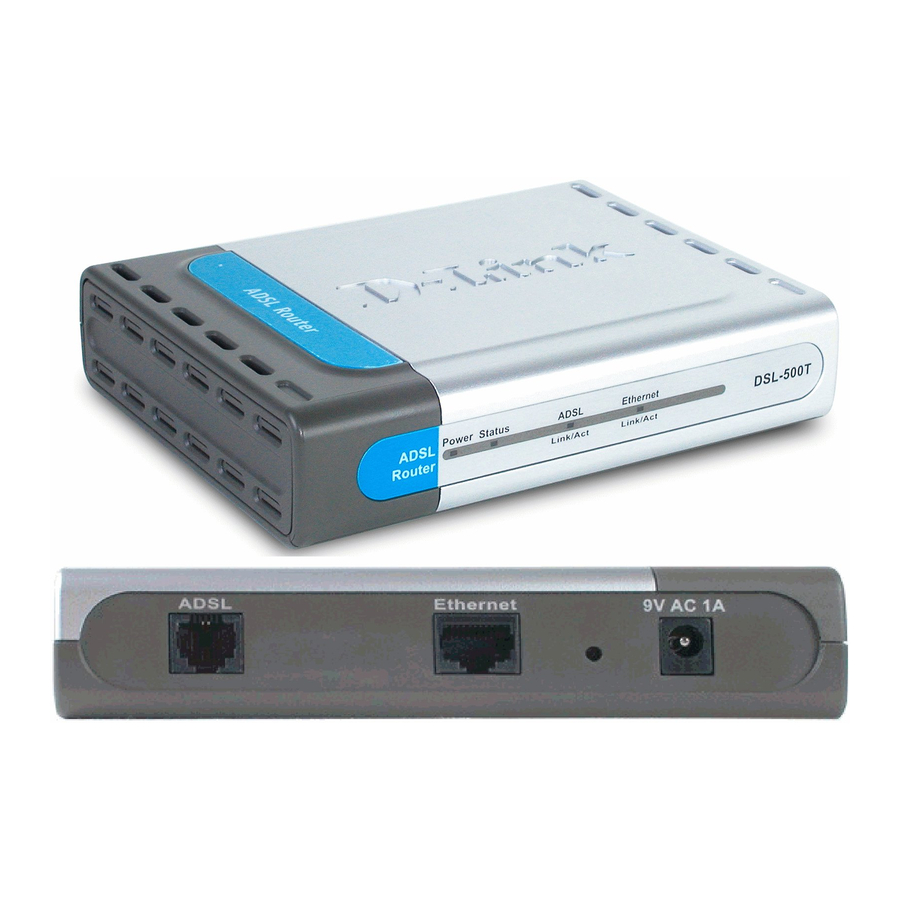
ADSL negotiation process has been settled. A blinking green light indicates activity on the WAN (ADSL) interface. A solid green light indicates a valid link on startup. This light will blink when Ethernet: Link/Act there is activity currently passing through the Ethernet port. DSL-500T ADSL Router User’s Guide... -
Page 17: Rear Panel Connections
ADSL port, connect ADSL cable here The Router may be rebooted by disconnecting and then reconnecting the power. Note DSL-500T ADSL Router User’s Guide Ethernet port, connect Ethernet cable here Factory... -
Page 18: Hardware Installation
LAN IP settings. The factory default IP address of the Router is 192.168.1.1 and the subnet mask is 255.255.255.0, the default management Username is admin and the default Password is admin. DSL-500T ADSL Router User’s Guide... -
Page 19: Network Connections
If you wish to reserve the uplink port on the switch or hub for another device, connect to any on the other MDI-X ports (1x, 2x, etc.) with a crossed cable. DSL-500T ADSL Router User’s Guide... -
Page 20: Computer To Router Connection
DSL-500T ADSL Router User’s Guide Computer to Router Connection You can connect the Router directly to a 10/100BASE-TX Ethernet adapter card (NIC) installed on a PC using the Ethernet cable provided as shown in this diagram. -
Page 21: Basic Router Configuration
IP settings for the other computers. However, you cannot use the same IP address since every computer must have its own Note IP address that is unique on the local network. DSL-500T ADSL Router User’s Guide... - Page 22 Use the following steps to configure a computer running Windows XP to be a DHCP client. From the Start menu on your desktop, go to Settings, then click on Network Connections. In the Network Connections window, right-click on LAN (Local Area Connection), then click Properties. DSL-500T ADSL Router User’s Guide...
- Page 23 DSL-500T ADSL Router User’s Guide 3. In the General tab of the Local Area Connection Properties menu, highlight Internet Protocol (TCP/IP) under “This connection uses the following items:” by clicking on it once. Click on the Properties button.
-
Page 24: Windows 2000
4. In the Internet Protocol (TCP/IP) Properties dialog box, click the button labeled Obtain an IP address automatically. 5. Double-click OK to confirm and save your changes, and then close the Control Panel. Your computer is now ready to use the Router’s DHCP server. DSL-500T ADSL Router User’s Guide... -
Page 25: Windows 95 And Windows 98
6. Click OK to return to the Network dialog box, and then click OK again. You may be prompted to install files from your Windows 95/98 installation CD. Follow the instructions to install the files. 7. Click OK to restart the PC and complete the TCP/IP installation. DSL-500T ADSL Router User’s Guide... -
Page 26: Windows Nt 4.0 Workstations
3. In the Protocols tab, select TCP/IP, and then click Properties. 4. In the Microsoft TCP/IP Properties dialog box, click the Obtain an IP address automatically option. 5. Click OK twice to confirm and save your changes, and then close the Control Panel. DSL-500T ADSL Router User’s Guide... -
Page 27: Access The Configuration Manager
URL in the address bar should read: http://192.168.1.1. Login to Home Page A new window will appear and you will be prompted for a user name and password to access the web-based manager. DSL-500T ADSL Router User’s Guide Figure 3-1. Home - Login window... -
Page 28: Configure The Router
Internet. The Router must be configured to communicate with the systems that give it access to the larger network. Click either the Setup tab (or the Go to setup wizard hyperlink); the Setup window will appear. DSL-500T ADSL Router User’s Guide... -
Page 29: Setup Menu
DSL-500T ADSL Router User’s Guide Setup Menu The Setup window offers links to menus to configure settings for the LAN (Local Area Network) and for the WAN (Wide Area Network) setup. The first menu you see when clicking the Setup tab or the Go to setup wizard hyperlink is the Setup menu. - Page 30 If you are instructed by your ISP to change the Modulation type is used for your service, select the desired modulation type and then click Apply. The modulation types available are T1413, G.DMT, GLITE and MMODE. By default, the Router will automatically detect the modulation used; this setting is listed as MMODE (Multi-mode). DSL-500T ADSL Router User’s Guide...
-
Page 31: Configure Connection 1 For Pppoa
8. Click the Apply button when you have entered all the information. The web browser will briefly go blank. You are now finished changing setting for the primary WAN connection known as Connection 1. It is now necessary to save the changes you just made and restart the Router. DSL-500T ADSL Router User’s Guide... -
Page 32: Change The Connection Type
To configure Connection 1 for PPPoE, follow the steps listed below. Some of the settings do not need to be changed the first time the device is set up, but can be changed later if you choose. DSL-500T ADSL Router User’s Guide... -
Page 33: Configure Connection 1 For Bridge
Router act as a bridge, and just passes packets across the DSL port. When the device is used in this manner, it is necessary to install additional connection software on any computer or server used to access the Internet. DSL-500T ADSL Router User’s Guide... - Page 34 WAN to view the State of Connection 1, it should read Connected. If the WAN connection state does not appear to Connected after a few minutes, go back to the Connection 1 Setup menu, check the settings and make sure they are correct. DSL-500T ADSL Router User’s Guide...
-
Page 35: Configure Connection 1 For Static Ip For Wan
8. Based on the information provided by your ISP, enter the IP Address, Subnet Mask, Default Gateway (if provided), and Domain Name Services (DNS) values (if provided). 9. Select the desired Mode, Bridged or Routed. DSL-500T ADSL Router User’s Guide... -
Page 36: Configure Connection 1 For Dhcp For Wan
3. Type in a Name: in the space provided (conn_1_DHCP_8_35 is used in the above example). 4. If you are told to change the VPI or VCI values, type in the values given to you by your service provider. Many users will be able to use the default settings. DSL-500T ADSL Router User’s Guide... -
Page 37: Configure Connection 1 For Clip
1. Click the Connection 1 button under WAN Setup to view the default PPPoA Connection Setup configuration menu. DSL-500T ADSL Router User’s Guide... -
Page 38: Create A New Connection
Use the New Connection procedure to create new connection used for accounts that supports multiple virtual connections. For more information on creating and maintaining virtual connection, see Multiple Virtual Connections in the following chapter on Note Advanced Router Management. DSL-500T ADSL Router User’s Guide... - Page 39 Figure 3- 11. Setup a New Connection – Connection 2 Remember to save new configuration settings using the Save All button when you have made all the intended changes. Go to Tools Note DSL-500T ADSL Router User’s Guide System Commands Save All.
- Page 40 5. Remember to save any newly created connections using the Save All procedure in the Tools/System Commands menu. Figure 3- 12. Setup a New Connection – Connection 3 To delete any existing connection, go to the configuration menu for that connection and click the Delete button. Note DSL-500T ADSL Router User’s Guide...
-
Page 41: Dhcp Configuration For Lan
This specifies the amount of time (in seconds) a client can lease an IP address, from the dynamically allocated IP pool. Click the Apply button to make the changes to the DHCP settings. Remember to Save All in the Tools/System Commands menu. DSL-500T ADSL Router User’s Guide... -
Page 42: Enable Dhcp Relay
DSL-500T ADSL Router User’s Guide Enable DHCP Relay Some service providers provide DHCP service for private networks from their own servers. To enable DHCP service form outside your LAN select the DHCP Relay option and type in the server IP address in the Relay IP field. -
Page 43: Management Ip
DSL-500T ADSL Router User’s Guide Management IP The IP address of the Router can be changed to suit the requirements of your LAN. Remember, if you are using DHCP from the Router, the IP address must be consistent with the DHCP IP settings. -
Page 44: Save Configuration Changes
DSL-500T ADSL Router User’s Guide Save Configuration Changes Any changes made to the Router’s configuration must be saved to non-volitile memory or they will be lost if the Router is restarted or powered off. When you are finished making changes to the Router settings, follow the instructions here to save the new settings. - Page 45 DSL-500T ADSL Router User’s Guide Figure 3- 17. Available System Commands To save the new settings, click on the Save All button. It will take a second or two to perform the save. After the save is completed, a message appears in a new menu (see below).
-
Page 46: Advanced Router Management
DSL-500T ADSL Router User’s Guide Advanced Router Management Click the Advanced tab to access menus used to configure UPnP, Port Forwarding, Access Control, Advanced Security (including NAT, Firewall and DMZ setup), LAN Clients, Bridge Filters, Multicast pass- through, Static Routing and Dynamic Routing (RIP setup). -
Page 47: Upnp
DSL-500T ADSL Router User’s Guide UPnP UPnP supports zero-configuration networking and automatic discovery for many types of networked devices. When enabled, it allows other devices that support UPnP to dynamically join a network, obtain an IP address, convey its capabilities, and learn about the presence and capabilities of other devices. DHCP and DNS service can also be used if available on the network. -
Page 48: Lan Clients
DSL-500T ADSL Router User’s Guide LAN Clients The LAN Clients menu is used when establishing Port Forwarding, Access Control and Advanced Security rules for IP addresses on the LAN. This menu can be accessed directly by clicking on the LAN Clients button or hyperlink in the Advanced setup menu. -
Page 49: Port Forwarding
Figure 4-4. Advanced – Port Forwarding window There are many different pre-configured rules available for specific functions such as Internet gaming, VPN, streaming and interactive multi-media, standard TCP/IP protocols, reserved ports, p2p, network management applications, and so on. DSL-500T ADSL Router User’s Guide... - Page 50 5. Click on the Add> button to place the rule in the Applied Rules list of port forwarding that are actively applied to the client The Available Rules can be applied to a single client IP address. That is, it is not possible to use an applied rule for multiple IP addresses on the LAN. DSL-500T ADSL Router User’s Guide...
- Page 51 DSL-500T ADSL Router User’s Guide The User category for port forwarding is used to set up customized port forwarding rules. Figure 4- 5. Set up Custom Port Forwarding Rules To set up custom TCP or UDP port forwarding rules, follow these steps: 1.
- Page 52 DSL-500T ADSL Router User’s Guide Figure 4- 6. Port Forwarding User Rules Management 2. Type a Rule Name in the space provided. 3. Select the port Protocol from the pull-down menu - you may select TCP, UDP or both (TCP/UDP).
-
Page 53: Access Control
Traffic Type __ Any selection box, then click the Apply button. This will block all traffic from the WAN port to the specified client. Remember to save the configuration changes. DSL-500T ADSL Router User’s Guide Figure 4-7. Access Control menu... - Page 54 5. Type a number for the Port Map in the space provided. This is the local port being forwarded to. 6. Click the Apply button to create the new rule. The new rule will appear listed in the table of custom port control rules. DSL-500T ADSL Router User’s Guide...
-
Page 55: Advanced Security
DSL-500T ADSL Router User’s Guide Advanced Security Use the Advanced Security features of the Router to globally enable or disable NAT and Firewall protection for any WAN connection, enable or disable DMZ IP addresses, enable or disable remote Telnet or web management from specified IP addresses, and enable/disable ICMP ping packets from the WAN. -
Page 56: Dmz Ip Address
DSL-500T ADSL Router User’s Guide DMZ IP Address A DMZ address is used for a device that is not given basic protection of NAT and Firewall services. You may select an IP address from the pull-down menu or create a New IP by pressing the button. This brings up the LAN Clients menu in which you may create a static client IP or reserve a dynamically assigned IP address for DMZ designation. -
Page 57: Multicast Pass-Through
DSL-500T ADSL Router User’s Guide Multicast Pass-through Multicast pass-through can be enabled or disabled for any WAN connection. When enabled it allows IGMP packets to pass through the WAN interface. IGMP packets are used to control multicasts and discontinue multicasts to individual IP addresses when they are no longer needed. -
Page 58: Static Routing
DSL-500T ADSL Router User’s Guide Static Routing Use Static Routing to specify a route used for data traffic within your Ethernet LAN or to route data on the WAN. This is used to specify that all packets destined for a particular network or subnet use a predetermined gateway. -
Page 59: Dynamic Routing
DSL-500T ADSL Router User’s Guide Dynamic Routing The Router supports RIP v1 and RIP v2 used to share routing tables with other Layer 3 routing devices. It also supports use of password protection, which requires password verification for RIP requests. Use the Dynamic Routing menu to enable RIP and if desired to configure password protection. -
Page 60: Multiple Virtual Connections
DSL-500T ADSL Router User’s Guide Multiple Virtual Connections The Router can use up to eight simultaneous PVC connections. These additional connections occupy the same bandwidth used for ADSL service. Additional PVC connections can be added to establish a private connection to remote offices or maintain a server accessible through the WAN port. -
Page 61: Tools And Utility Menus
DSL-500T ADSL Router User’s Guide Tools and Utility Menus The menus lited under the Tools tab are used for System Commands to save settings, restart and reset the Router; to set up Remote Log information; for User Management; to update firmware and load saved configuraiton files (in the Update Gateway menu);... -
Page 62: User Management
2. Type in the new Password in the entry field provided. 3. Type in the new password again in the Confirm Password field. 4. If desired, change the Idle Timeout value. 5. Click Apply. DSL-500T ADSL Router User’s Guide Figure 4-14. User Management menu... -
Page 63: System Commands
Router will revert to the previously saved configuration upon rebooting the Router. The DSL-500T can be reset to the default configuration for all settings using Restore the Restore option. This will also change the both the LAN and WAN IP address of the device, so these will need to be reconfigured accordingly. -
Page 64: Remote Log
DSL-500T ADSL Router User’s Guide Remote Log Us the Remote Log menu to set up logging to servers or computers that are located outside the LAN or subnet of the Router. Figure 4-16. Remote Log menu Select the Log Level from the pull-down menu. The levels available are: Alert, Critical, Debug, Error, Info, Notice, Panic and Warning. -
Page 65: Update Gateway
Use the Update Gateway feature to load the latest firmware for the device. You can obtain the latest version of the DSL-500T firmware by logging onto the D-Link web site at www.dlink.com. Save the latest firmware version to a file on your computer or an accessible TFTP server. -
Page 66: Ping Test
DSL-500T ADSL Router User’s Guide Ping Test The Ping Test menu allows you to ping any IP address from the Router to test connectivity to the address. Figure 4-18. Tools – Ping Test window To Ping a device, first enter the IP address of the device that you wish to Ping into the first field, the Packet Size (in bytes) in the second field, and finally, enter the number of times you wish the Ping function to attempt a connection to the desired device into the third field. -
Page 67: Oam Test
DSL-500T ADSL Router User’s Guide OAM Test The OAM Test menu is used for trouble shooting connection problems on the WAN interface. You can test for connectivity on the service provider’s network for any WAN connection. Test for F5 or F4 connection on the near segment or end-to-end. -
Page 68: Status Menus
DSL-500T ADSL Router User’s Guide Status Menus Use the Status windows to display various performance data about the Router Figure 4-20. Status display links Click the hyperlink or menu button for the desired Status window. -
Page 69: Network Statistics
DSL-500T ADSL Router User’s Guide Network Statistics Figure 4-21. Network Statistics window Choose the desired interface at the top of the window and then click Refresh to view Ethernet network statistics. -
Page 70: Connection Status
DSL-500T ADSL Router User’s Guide Connection Status Figure 4-22. Connection Status window Click Refresh to view connection status information. DHCP Clients This window displays the status of all current DHCP clients. Figure 4-23. DHCP Clients window... -
Page 71: Modem Status
DSL-500T ADSL Router User’s Guide Modem Status This window displays DSL statistics and various modem status data. Figure 4-24. Modem Status window Product Information This window displays product information including hardware and firmware versions. Figure 4-25. Product Information window... -
Page 72: System Log
DSL-500T ADSL Router User’s Guide System Log The system log displays chronological event log data. Figure 4-26. System Log window Click Refresh to get the most current system log information. Help Menu Help menu links provide more information for configuring various Router functions. -
Page 73: Technical Specifications
G.lite: Downstream up to 1.5 Mbps Upstream up to 512 Kbps RJ-11 port ADSL telephone line connection Media Interface: RJ-45 port for 10/100BASET Ethernet connection DSL-500T ADSL Router User’s Guide GENERAL RFC 1661 (PPP) RFC 1994 (CHAP) RFC 1334 (PAP) - Page 74 DSL-500T ADSL Router User’s Guide Physical and Environmental DC Inputs: Input: 100V ~ 240V AC 50 ~ 60Hz Power Adapter: Output: 9V AC, 1A Power 9 Watts (max) Consumption: Operating 5° to 40° C (41° - 104° F) Temperature: Humidity:...
-
Page 75: Ip Address Setup
IP Address Setup The DSL-500T is designed to provide network administrators maximum flexibility for IP addressing on the Ethernet LAN. The easiest IP setup choice in most cases is to let the Router do it using DHCP, which is enabled by default. -
Page 76: Changing The Ip Address Of The Router
IP addressing on a LAN there are numerous resources freely available on the Internet. There are also many books and chapters of books on the subject of IP address assignment, IP networking and the TCP/IP protocol suite. DSL-500T ADSL Router User’s Guide Alternative IP Assignment IP Address Subnet Mask 10.0.0.1... -
Page 77: Ip Concepts
DSL-500T ADSL Router User’s Guide IP Concepts This appendix describes some basic IP concepts, the TCP/IP addressing scheme and show how to assign IP Addresses. When setting up the Router, you must make sure it has a valid IP address. Even if you will not use the WAN port (ADSL port), you should, at the very least, make sure the Ethernet LAN port is assigned a valid IP address. - Page 78 It is recommended that you choose private network IP Addresses from the above list. For more information on address assignment, refer to RFC 1597, Address Allocation for Private Internets and RFC 1466, Guidelines for Management of IP Address Space. DSL-500T ADSL Router User’s Guide IP Network Classes Network Addresses (Host Portion in Parenthesis) 1(.0.0.0) to 126(.0.0.0)
-
Page 79: Subnet Mask
The bits of the subnet mask correspond directly to the bits of the IP address. Any bit an a subnet mask that is to correspond to a net ID bit in the IP address must be set to 1. DSL-500T ADSL Router User’s Guide IP Class... -
Page 80: Microfilters And Splitters
DSL-500T ADSL Router User’s Guide Microfilters and Splitters Most ADSL clients will be required to install a simple device that prevents the ADSL line from interfering with regular telephone services. These devices are commonly referred to as microfilters or sometimes called (inaccurately) line splitters. -
Page 81: Line Splitter
Line - This port connects to the wall jack. ADSL – This port connects to the Modem. Phone – This port connects to a telephone or other telephone device. The diagram below illustrates the proper use of the splitter. DSL-500T ADSL Router User’s Guide Line Splitter Installation... - Page 83 Le Florilege, No. 2, Allée de la Fresnerie, 78330 Fontenay-le-Fleury, France TEL: 33-1-3023-8688 FAX: 33-1-3023-8689 URL: www.dlink-france.fr E-MAIL: info@dlink-france.fr Germany D-Link Central Europe (D-Link Deutschland GmbH) Schwalbacher Strasse 74, D-65760 Eschborn, Germany TEL: 49-6196-77990 FAX: 49-6196-7799300 URL: www.dlink.de BBS: 49-(0) 6192-971199 (analog) BBS: 49-(0) 6192-971198 (ISDN)
- Page 84 Centurion, Gauteng, South Africa TEL: 27-12-665-2165 FAX: 27-12-665-2186 URL: www.d-link.co.za E-MAIL: attie@d-link.co.za Spain D-Link Iberia (Spain and Portugal) Sabino de Arana, 56 bajos, 08028 Barcelona, Spain TEL: 34 93 409 0770 FAX: 34 93 491 0795 URL: www.dlink.es E-MAIL: info@dlink.es...
- Page 85 E-MAIL: Wxavier@dlink-me.com U.K. D-Link Europe (United Kingdom) Ltd Floor, Merit House, Edgware Road, Colindale, London NW9 5AB United Kingdom TEL: 44-020-8731-5555 SALES: 44-020-8731-5550 FAX: 44-020-8731-5511 SALES: 44-020-8731-5551 BBS: 44 (0) 181-235-5511 URL: www.dlink.co.uk E-MAIL: info@dlink.co.uk U.S.A. D-Link U.S.A. 17575 Mt. Herrmann, Fountain Valley, CA 92708 TEL: 1-714-885-6000 FAX: 1-866-743-4905 INFO: 1-800-326-1688 URL: www.dlink.com...
-
Page 86: Registration Card
8. What category best describes your company? Aerospace Engineering Education Retail/Chainstore/Wholesale System house/company Other____________________________________________________________ 9. Would you recommend your D-Link product to a friend? Don't know yet 10.Your comments on this product? _________________________________________________ __________________________________________________________________________________________ __________________________________________________________________________________________ __________________________________________________________________________________________ Registration Card * Product installed in type of computer (e.g., Compaq 486)
Need help?
Do you have a question about the DSL-500T and is the answer not in the manual?
Questions and answers