Yamaha MW12CX Owner's Manual
Usb mixing studio
Hide thumbs
Also See for MW12CX:
- Owner's manual (32 pages) ,
- Owner's manual (31 pages) ,
- Service manual (106 pages)

Related Manuals for Yamaha MW12CX


Summary of Contents for Yamaha MW12CX
- Page 1 Owner’s Manual Bedienungsanleitung Mode d’emploi Manual de instrucciones...
- Page 2 : NEUTRAL BROWN : LIVE As the colours of the wires in the mains lead of this apparatus may not correspond with the coloured makings identifying the terminals in your plug proceed as follows: The wire which is coloured BLUE must be connected to the terminal which is marked with the letter N or coloured BLACK.
- Page 3 Yamaha service personnel. CAUTION Always follow the basic precautions listed below to avoid the possibility of physical injury to you or others, or damage to the device or other property. These precautions include, but are not limited to, the following: •...
- Page 4 The MW mixer may heat up by as much as 15 to 20°C while the power is on. This is normal. Please note that the panel temperature may exceed 50°C in ambient temperatures higher than 30°C, and use caution to prevent burns.
-
Page 5: Table Of Contents
Please read through this manual carefully before beginning use, so that you will be able to take full advantage of your mixer’s superlative features and enjoy trouble-free operation for years to come. After reading the manual, please store it in a safe place. -
Page 6: Introduction
Note that trace current continues to flow while the switch is in the STANDBY position. If you do not plan to use the mixer again for a long while, please be sure CAUTION to unplug the adaptor from the wall outlet. -
Page 7: Mixer Basics
NOTE • In order to have continuous use of Cubase AI, including support and other benefits, you will need to register the software and activate your software license by starting it while the computer is connected to the Internet. Click the “Register Now”... -
Page 8: Powering Up The System
Stereo types are also as well as to connect the mixer’s outputs to a power amplifier or known as “TRS” connectors related gear: balanced or unbalanced. Balanced cables are... -
Page 9: Adjusting Level And Tone
If you want a little more presence you can turn the HIGH end up a bit. Or you can boost the bass a little if you feel the ON switch low end is lacking. -
Page 10: Recording With Cubase Ai
This section describes the procedure for recording to the Cubase AI software we installed earlier via the MW mixer. Cubase AI 6 is used for the examples in this manual. For details about other versions of Cubase AI or Cubase AI NOTE operation in general, refer to the PDF manual provided with the software. - Page 11 The ASIO Direct Sound Full Duplex Setup dialog box switch to [ASIO DirectX Full Duplex Driver]. will be displayed. Check only the input port and output Also set the [Outputs] in the same way, and then close port [USB Audio CODEC] checkbox, and then click the window.
- Page 12 Inspector Make sure the [Record Enable] button for the track to be recorded is turned on. If the [Record Enable] button is off, click it to turn it on. Recording results Play the instrument to be recorded, and adjust the MW mixer’s GAIN control, chan- Play the part.
-
Page 13: Mixing With Cubase Ai
Step Mixing with Cubase AI In this section we’ll try mixing down multiple recorded audio tracks to stereo, and creating an audio file. Mixes can be stored as WAV or AIFF files, which can then be recorded to audio CDs. - Page 14 “Panning” creates the illusion of stereo space by changing the relative levels of each track’s signal sent to the left and right speakers. If a signal is sent only to the left speaker, the Enter a file name and select a destina- sound will appear to come from the far left side of the stereo tion for the file as well as a file type.
-
Page 15: Reference
Reference Setup Reference Guitar Powered Speakers Synthesizer Foot Switch (YAMAHA FC5) Bass Recorder CD Player Microphone Effect Processor Effect Processor (exciter) Headphones Powered Monitor Powered Monitor Speaker Speakers Personal Computer MW12CX MW12CX/MW12C Owner’s Manual... -
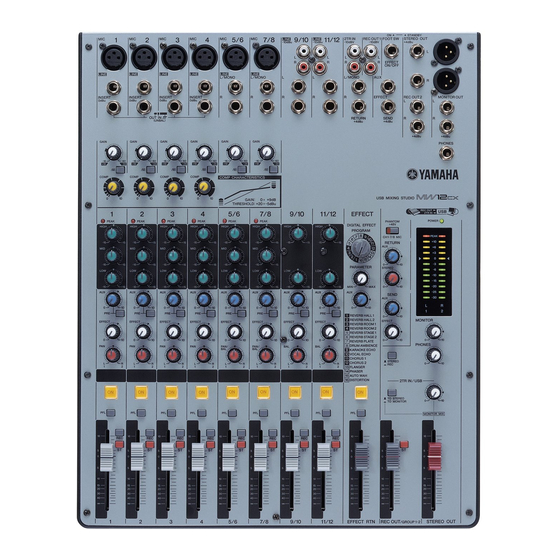
Page 16: Front & Rear Panels
Reference Front & Rear Panels The following applies to both the MW12CX and MW12C. In cases where different features need to be described for each model, the MW12CX feature will be described first, followed by the MW12C feature in brackets: MW12CX (MW12C). - Page 17 Signals input to the L input (odd channel) go PEAK Indicator to the REC L bus or to the Stereo L bus; signals input to the The peak level of the post-EQ signal is detected, and the R input (even channel) go to the REC R bus or the Stereo R PEAK indicator lights red when the level reaches 3 dB bus.
-
Page 18: Master Control Section
• A signals input via both the 2TR IN input and the USB input are mixed. REC OUT 1 (L, R) Jacks These are RCA pin jacks that can be used to connect to an external stereo recorder. The signal processed by the REC OUT fader is output via these jacks. - Page 19 • When turning the switch on ( ), be sure that via the 2TR IN jacks and the USB connector are sent to the only condenser mics are connected to the XLR MONITOR OUT jacks, the PHONES jack, and the level input jacks (CHs: 1 to 7/8).
-
Page 20: Digital Effect
These parameter values are reset when the power is turned off. AUX Control Adjusts the level of the signal sent from the internal digital effect unit to the AUX bus. The EFFECT RTN fader does not affect the level of the signal sent to the NOTE AUX bus. -
Page 21: Digital Effect Program List
DISTORTION DRIVE Adds a sharp-edged distortion to the sound. * “LFO” stands for Low Frequency Oscillator. An LFO is normally used to modulate another signal, determining the modulation speed and waveform shape. Jack List Input and Output Jacks Polarities Configurations... -
Page 22: Troubleshooting
❑ Are your speaker cables connected properly, or are they shorted? No sound. ❑ Are the ON switch, ST switch, and REC switch for the channels you are using turned on? ❑ Are the volume controls of your sources, audio devices, applications software, computer operating system, etc., set at appropriate levels? - Page 23 1. Select [System Preferences ...] from the Apple menu and then select “Sound” to open the “Sound” dialog window. 2. Click the “Output” tab and set the volume slider at the bottom of the window to its maxi- mum level.
- Page 24 ❑ Are you playing back a large number of audio tracks? The number of tracks you can play at the same time will depend on the performance of the computer you are using. You may experience intermittent playback if you exceed your computer’s capabilities.
-
Page 25: Specifications
Foot Switch (Digital Effect On/Off) LED Level Meter Pre MONITOR Level 2x12 points LED meter (PEAK, +10, +6, +3, 0, -3, -6, -10, -15, -20, -25, -30 dB) PEAK lights if the signal level reaches 3 dB below the clipping level. -
Page 26: Analog Input Specifications
Where 0 dBu = 0.775 Vrms and 0 dBV= 1 Vrms * Sensitivity : The lowest level that will produce an output of +4 dB (1.23 V), or the nominal output level when the unit is set to the maximum level. (All faders and level controls are at their maximum position.) ■... -
Page 27: Dimensional Diagrams
* Specifications and descriptions in this owner’s manual are for information purposes only. Yamaha Corp. reserves the right to change or modify products or specifications at any time without prior notice. Since specifications, equipment or options may not be the same in every locale, please check with your Yamaha dealer. -
Page 28: Block Diagram And Level Diagram
Reference Specifications ■ Block Diagram and Level Diagram [-6dBu] CTRL R/GROUP L/GROUP STEREO STEREO EFFECT HIGH HIGH HIGH MW12CX/MW12C Owner’s Manual... -
Page 29: About The Accessory Disk
• In order to have continuous use of the DAW software in • Yamaha makes no representations or warranties with the accessory disk, including support and other bene- fits, you will need to register the software and activate... - Page 30 • Doppelklicken Sie zur Installation auf einem Mac-Com- puter auf das Symbol „Cubase AI*.mpkg“ oder „Cubase AI* Start Center“. „ * “ gibt die Stelle an, an der im tatsächlichen Symbol- namen die Versionsnummer angezeigt wird. Für Informationen über die minimalen Systemanforderungen und die neuesten Informationen zu der auf der Disc befindli-...
-
Page 31: A Propos Du Disque Accessoire
Le disque accessoire contient des logiciels DAW pour Win- nologies GmbH. dows et Mac. • Toute copie du logiciel ou de ce mode d’emploi en tout ou en partie, par quelque moyen que ce soit, est expressément • Prenez soin d’installer le logiciel DAW avec le compte NOTE interdite sans le consentement écrit du fabricant. - Page 32 • Yamaha no ofrece garantía o declaración alguna en relación • Para usar de forma continua el software DAW del disco con el uso del software y de la documentación, y no se res- complementario, incluida asistencia técnica y otras ven- ponsabiliza de los resultados del uso de este manual ni del tajas, deberá...
- Page 33 Niederlassung und bei Yamaha Vertragshändlern in den jeweiligen Bestimmungsländern erhältlich. Pour plus de détails sur les produits, veuillez-vous adresser à Yamaha ou au distributeur le plus proche de vous figurant dans la liste suivante. Para detalles sobre productos, contacte su tienda Yamaha más cercana o el distribuidor autorizado que se lista debajo.
- Page 34 Yamaha Web Site (English only) http://www.yamahasynth.com/ Yamaha Manual Library http://www.yamaha.co.jp/manual/ C.S.G., Pro Audio Division © 2007-2011 Yamaha Corporation 111POGR*.*-01D0 ZA68630...
Need help?
Do you have a question about the MW12CX and is the answer not in the manual?
Questions and answers