Table of Contents
Advertisement
Quick Links
Advertisement
Table of Contents

Related Manuals for Bison Pumps Cadron Creek Play


Summary of Contents for Bison Pumps Cadron Creek Play
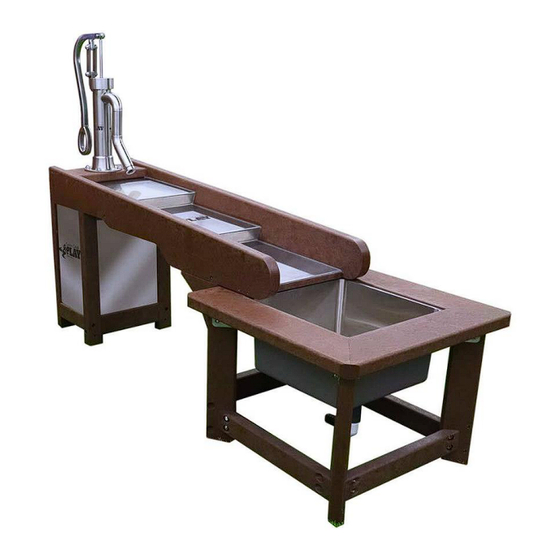
- Page 1 Waterfall Table and Basin Playground Pump Owner’s Manual Serial No. Rev B...
-
Page 2: Table Of Contents
Table of Contents Waterfall Table System Components ......... 4 Supply & Drain Line Components ..........4 Required Tools ................5 Step 1 - Unboxing................ 5 Step 2 - Anchoring ..............9 Step 3 - Attaching the Pump ............13 Step 4 - Attaching the Tank ............14 Step 5 - Attaching the Tank Lines .......... - Page 3 Detail E: Concrete Installation Layout ........23 Detail F: Exploded Parts Diagram… .......... 24 Detail G: Part Listing ..............25 Contact Please read and understand all instructions. If help is needed or you have questions regarding your product, you can email technical support at sales@CadronCreekPlay.com or call our toll-free number 1-888-403-7867.
-
Page 4: Waterfall Table System Components
Waterfall Table System Components: One (1) Lil Guppy Playground Pump (A) One (1) Waterfall Table (B) One (1) Basin Table (C) One (1) Tank Assembly (D) One (1) Access panel (E) Four (4) Pump Fasteners (F) (Bolts with Security Nuts) Eighteen (18) Anchor Plate Fasteners (G) (Mounting Bolts with Washers &... -
Page 5: Required Tools
500 lbs. See Photo 1. Note: Please verify that you have received everything that you ordered. If there is anything that is missing or does not match, please call Cadron Creek Play immediately to correct the situation. 1) Loosen and remove the rachet straps to remove the lid. - Page 6 2) Fold down the side pockets to gain better access inside the crate if needed. (See Photo 2) Pull up and out to fold side pockets down. 3) Remove the banding and open the Playground Pump, Tank Assembly, and anchor hardware each packaged inside its labeled box.
- Page 7 6) Once outside the crate, remove the access panel (Detail F – Item 4) of the Waterfall Table Assembly by removing the four (4) 3/8”-16 x 1.5” Socket Head Bolts and washers using a 5/16” allen wrench or hex bit. (See Detail F Items 17 &...
- Page 8 Photo 8 – First Collapsible Side Photo 9 – Second Collapsible Side 11) Fold each of the longer side walls down toward the middle of the crate (See Photos 10 & 11) Photo 11 – Fourth Collapsible Side Photo 10 – Third Collapsible Side...
-
Page 9: Step 2 - Anchoring
12) Place the lid on top making sure each corner is covered and tighten the three (3) ratchet straps as shown until snug. There are holes near the bottom of the crate base to attach strap hooks to. (See Photo 12) Photo 12 –... - Page 10 3) After outlining each anchor plate, remove the Waterfall Table System from its location being careful not to remove the outline on the concrete. Remove each anchor plate from the waterfall table system except for the two short anchor plates. Use a 7/32” allen wrench and the provided security nut socket.
- Page 11 Photo 14 – Anchor Plate & Anchor Install 8) Hammer the wedge anchor (N) until the flat washer is flush with the anchor plate (M). Make sure anchor plates are square with each other and level (use shims if needed). Then tighten the hex nut to the recommended torque value of 20 ft.-lbs.
- Page 12 Photo 17 –Basin Table Logo Orientation Note: The exposed anchor will fit through the bottom of each basin table leg. Note: Attach each anchor plate fastener hand tight at first, then fasten using tools while alternating sides until all fasteners are fully tightened. Recommended torque value is 20 ft-lbs.
-
Page 13: Step 3 - Attaching The Pump
Photo 18 – Waterfall Table Anchor Bolts Photo 19 – Waterfall Table Anchor Nuts Note: The access panel (E) will need to stay removed to fasten the two upstream anchor plates (M-1 & M-2) (See Photo 19). Leave the access panel set aside. Step 3 - Attaching the Lil Guppy Playground Pump (A): 1) Place the Lil Guppy Playground Pump (A) on top of the pump platform (V) so that... -
Page 14: Step 4 - Attaching The Tank
Step 4 - Attaching the Waterfall Table Tank (D): 1) Remove the access panel (E) and lower the tank support bolts (I) (if not already done). 2) Set tank (D) inside the back opening, push up on the quick connect socket (Item 20) connected to the fittings on the bottom of the pump and insert the quick connect plug (Item 21) on... -
Page 15: Step 5 - Attaching The Tank Lines
3) Once in place, turn the tank support bolts to raise them until flush with the bottom of the tank and hand tighten. DO NOT OVERTIGHTEN Step 5 - Attaching the Tank Lines: 1) Attach the water supply line (S) to the inlet ball valve (K-1) at the bottom left of the tank using a flex line (X). -
Page 16: Step 6 - Filling The Tank
Pump - Periodic maintenance is required every 2-3 months. Cadron Creek Play suggests cleaning of the piston assembly with fresh clean water. Be sure to inspect the wear items like cup seals and O-rings. These can be replaced as needed using the Cadron Creek Play Maintenance Kit. -
Page 17: Winterizing The System
Winterizing the System: *** Failure to winterize may void the warranty. *** 1) Shut off the water supply at the Shut off valve (R). 2) Remove the access panel. 3) Open or take off the cap on the drain ball valve (K-2) to drain the tank’s water. 4) Close the inlet ball valve (K-1). -
Page 18: Appendix
Appendix... -
Page 19: Detail A: Waterfall Table System Components
Detail A Waterfall Table System Components... -
Page 20: Detail B: Waterfall Table System Piping
Detail B: Waterfall Table System Piping... -
Page 21: Detail C: Waterfall Table System Dimensions
Detail C: Waterfall Table System Dimensions... -
Page 22: Detail D: Waterfall Table Pump & Tank
Detail D: Waterfall Table Pump & Tank... - Page 23 Detail E: Concrete Installation Layout...
- Page 24 Detail F: Exploded Parts Diagram...
- Page 25 Detail G: Part Listing Item No. Part Number Description Quantity 60-001-0-00-01 Lil Guppy Playground Pump for WFT 66-001-0-01-01 Waterfall Table Assembly 66-002-0-01-01 Basin Table Assembly 66-001-0-01-08 Access Panel 66-001-0-14-01 Tank Assembly 66-001-0-15-01 Anchor Plate Assembly LH 66-001-0-16-01 Anchor Plate Assembly RH 66-001-0-17-01 Anchor Plate Assembly Short RH 66-001-0-18-01...
Need help?
Do you have a question about the Cadron Creek Play and is the answer not in the manual?
Questions and answers