Table of Contents

Related Manuals for Bison Pumps 1900


Summary of Contents for Bison Pumps 1900
- Page 1 Bison Pumps www.bisonpumps.com Model 1900 Stainless Steel Pitcher Pump OWNER’S MANUAL For Pump Revisions: B, C Serial No. Proudly Manufactured in Conway, Arkansas, UNITED STATES OF AMERICA. Rev C Model 1900 Owner's Manual Rev C 1 of 31...
-
Page 2: Table Of Contents
Detail B-3: Two-Pipe Jet Pump ..........21 Detail C: Standard Installation with a Pressure Tank ....22 Detail D: Orientation of Sink Installation ........23 Detail E: Handle Orientation… ..........24 Model 1900 Owner's Manual Rev C 2 of 31... - Page 3 Detail I: Total Vertical Lift ............28 Detail J: Drain Back Water Shut-off Valve and Drain Valve ..29 Detail K: Exploded View ............. 30 Detail L: Part Listing ..............31 Model 1900 Owner's Manual Rev C 3 of 31...
-
Page 4: Product Specifications
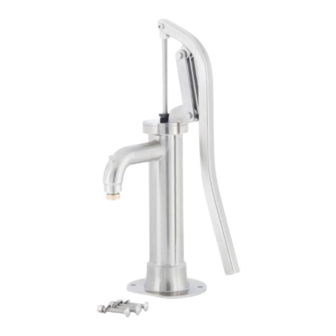
Owner’s Manual Product Specifications Description: The Bison Model 1900 Stainless Steel Pitcher Pump is a shallow well pump for static water levels less than 25 vertical feet and up to 300 horizontal feet from the water source. Design and Construction •... -
Page 5: Installation Options
Bison Pumps immediately to correct the situation (1-800-339-2601). Record your Bison Model 1900 Pump Serial Number on the front page of this manual. Location – Before deciding on the location of your Bison Pump, you should consider whether you intend to use it to pressurize your home water system. -
Page 6: Installing Indoors With A Countertop
2” NPT, then a Reducing Bushing will need to be installed in the hand pump prior to installation. Bison Pumps offers a stainless steel reducing bushing to downsize from 2” to 1 1/4” or 1”... - Page 7 Step #6: Connect the water source to the pump The Bison Model 1900 Stainless Steel Pitcher Pump can accept 2” NPT pipe. Again, if your incoming water pipe is less than 2” NPT, then you will need a reducing bushing to downsize the pipe from 2” NPT to the size of your water supply pipe.
-
Page 8: Installing On A Driven Well Point With A 2" Npt
Step #3: Adjust the handle orientation The Bison Model 1900 Stainless Steel Pitcher The pump will come with the handle in either the 3, 6, or 9 o’clock position (assuming the spout is at 12 o’clock). To adjust the position of the handle, remove the four top screws (Detail E –... -
Page 9: Installing Into A System With Electric Pumps
One-Pipe Jet Pump With a One-Pipe Jet Pump installation, the Model 1900 Stainless Steel Pitcher Pump can be installed if the total vertical lift is 25 feet or less. The total vertical lift is the distance from the bottom of the pump to the static water level (See Detail I). -
Page 10: How To Winterize The Pump
To winterize the pump, you need to drain it of water to prevent freezing which can cause damage to the pump. The Bison Model 1900 Stainless Steel Pitcher Pump is equipped with special drain features inside the pump body that allow water to drain from both above and below the piston (Detail G). - Page 11 If the water source valve was closed during the draining operation, turn the valve on to allow the pump to have access to water. If using the Bison Pumps Drain Back Water Shut-off Valve and Drain Valve, open the drain back water shut-off valve and make sure the drain valve is closed.
-
Page 12: How To Pressurize A Water System
How to Pressurize a Water System Tools required: Pipe Wrench, Check Valve, Pressure Gauge and Potable Water Hose* Bison Pumps offers a Pressurizing Kit consisting of a Lead-Free Brass Check Valve, a 100 PSI Pressure Gauge, a Bleed-off Valve, and a 10’ Potable Water Hose. - Page 13 Turn the power on to the electric pump to allow it to begin normal operations. Step #7: Return the Model 1900 pump to normal operating condition Loosen the Gland Nut (Detail H – Item A) until water leaks during normal pumping action. Next hand- tighten the Gland Nut in ¼...
-
Page 14: Maintenance
In cases of the combination of high usage and/or low water quality, the sealing components may need to be replaced. Bison Pumps offers a Seal Maintenance Kit which consists of replacements for sealing components in the pump and a Seal Pick Tool. See the table below for contents of the Seal Maintenance Kit. - Page 15 See “Other Accessories” below and Detail K for ordering details. Hardware Maintenance – With proper care, it is unlikely that you will need to replace the hardware used to assemble your Model 1900 Stainless Steel Pitcher Pump. However, Bison Pumps offers the hardware separately under “Other Maintenance Items.”...
-
Page 16: Appendix
Bison Pumps www.bisonpumps.com Appendix Model 1900 Owner's Manual Rev C 16 of 31... -
Page 17: Installation Measurement Detail
Bison Pumps www.bisonpumps.com Installation Measurement Detail Model 1900 Owner's Manual Rev C 17 of 31... -
Page 18: Detail A: Standard Sink Installation
Bison Pumps www.bisonpumps.com Detail A: Standard Sink Installation Model 1900 Owner's Manual Rev C 18 of 31... -
Page 19: Detail B-1: Standard Submersible Pump
Bison Pumps www.bisonpumps.com Detail B-1: Standard Submersible Pump Model 1900 Owner's Manual Rev C 19 of 31... -
Page 20: Detail B-2: One-Pipe Jet Pump
Bison Pumps www.bisonpumps.com Detail B-2: One-Pipe Jet Pump Model 1900 Owner's Manual Rev C 20 of 31... -
Page 21: Detail B-3: Two-Pipe Jet Pump
Bison Pumps www.bisonpumps.com Detail B-3: Two-Pipe Jet Pump Model 1900 Owner's Manual Rev C 21 of 31... -
Page 22: Detail C: Standard Installation With A Pressure Tank
Detail C: Standard Installation with a Pressure Tank 1/4 TURN BRASS OR STAINLESS STEEL BALL VALVE SERVICE PIPE TO HOME PRESSURE TANK PIPE FROM WELL BRASS OR STAINLESS STEEL TEE ELECTRIC SUBMERSIBLE Model 1900 Owner's Manual Rev C 22 of 31... -
Page 23: Detail D: Orientation Of Sink Installation
Bison Pumps www.bisonpumps.com Detail D: Orientation of Sink Installation Model 1900 Owner's Manual Rev C 23 of 31... -
Page 24: Detail E: Handle Orientation
Bison Pumps www.bisonpumps.com Detail E: Handle Orientation Model 1900 Owner's Manual Rev C 24 of 31... -
Page 25: Detail F: Driven Well Point Installation
Bison Pumps www.bisonpumps.com Detail F: Driven Well Point Installation Model 1900 Owner's Manual Rev C 25 of 31... -
Page 26: Detail G: Winterizing
Bison Pumps www.bisonpumps.com Detail G: Winterizing Model 1900 Owner's Manual Rev C 26 of 31... -
Page 27: Detail H: Pressurizing A Water System
Bison Pumps www.bisonpumps.com Detail H: Pressurizing a Water System Model 1900 Owner's Manual Rev C 27 of 31... -
Page 28: Detail I: Total Vertical Lift
Bison Pumps www.bisonpumps.com Detail I: Total Vertical Lift Model 1900 Owner's Manual Rev C 28 of 31... -
Page 29: Detail J: Drain Back Water Shut-Off Valve And Drain Valve
Bison Pumps www.bisonpumps.com Detail J: Drain Back Water Shut-off Valve and Drain Valve Model 1900 Owner's Manual Rev C 29 of 31... -
Page 30: Detail K: Exploded View
Bison Pumps www.bisonpumps.com Detail K: Exploded View Model 1900 Owner's Manual Rev C 30 of 31... -
Page 31: Detail L: Part Listing
04-001-3-71-01 Packing Gland Cup Seal 50-100-0-07-00 Gland Nut 04-139-3-70-02 Top Plate O-Ring 50-001-0-06-01 Top Plate Assembly 04-029-0-74-01 Reducer Bushing (2” to 1 ¼”) (Std.) 04-029-0-74-02 Reducer Bushing (2” to 1”) (Opt.) Model 1900 Owner's Manual Rev C 31 of 31...
Need help?
Do you have a question about the 1900 and is the answer not in the manual?
Questions and answers