Table of Contents
Advertisement
Quick Links
Advertisement
Table of Contents

Related Manuals for Bison Pumps Cadron Creek PLAY Pump-n-Play


Summary of Contents for Bison Pumps Cadron Creek PLAY Pump-n-Play
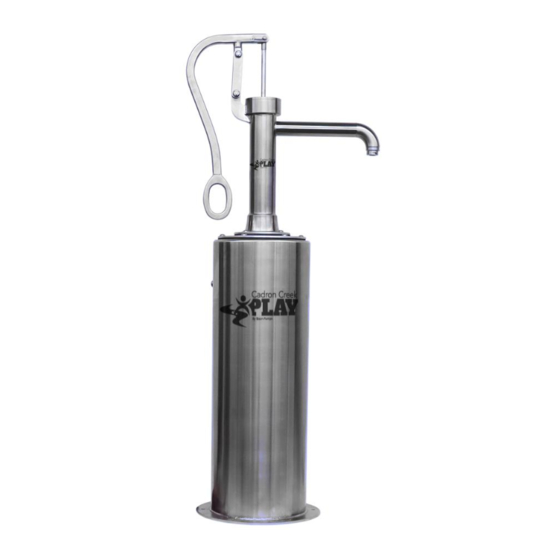
- Page 1 Pump-n-Play OWNER’S MANUAL Serial No. _____________________________ Rev -...
-
Page 3: Table Of Contents
Table of Contents Product Specifications…………………………………………………………..4 System Components.……………………………………………………………….5 Required Tools.………………………………………….…………………………….5 Installation.………………………………………………………………………………6 Winterize……………………………………………………………………………..….8 Dewinterize..……………………………………………………………………………8 Appendix Diagram A: Pump-n-Play Installation…………………………….….……10 Diagram B: Pump-n-Play Exploded View……….………….……….…..11 Diagram C: Part Listing.………………….……..……………………....12... -
Page 4: Product Specifications
Pump-n-Play Owner’s Manual Product Specifications Description: The Pump-n-Play is a pump system designed for kids between the ages of 5 and 12. The manually operated stainless steel pump simulates the action of a traditional water hand pump. However, no well is needed as it can be connected to a pressurized water line (like city water) which automatically refills the above-ground tank as water is pumped out of the tank. -
Page 5: System Components
Pump-n-Play System Components: (See Diagrams B & C) One (1) Lil Guppy Playground Pump One (1) Suction Pickup Tube One (1) Tank One (1) pre-installed Block Off Cover Two (2) Gaskets a. (5a) - Pump b. (5b) - Tank One (1) pre-adjusted Float Valve mounted in the tank One (1) pre-installed 3/4”... -
Page 6: Installation
Installation Warning – You must comply with your local plumbing code. Contact a certified plumber if you have questions about proper plumbing codes in your area. Before you begin the installation of your new pump, open the box and inspect the contents. Verify that you have received everything that you ordered. - Page 7 C) Locate and mark the six (6) 3/8” clearance holes (H) at the tank’s mounting flange. For a concrete platform using Tapcons® or concrete anchor bolts: a. Place the tank aside and drill the holes. Be sure to drill at least as deep as your Tapcons® or anchor bolts are long and to clean each hole for dust and debris after drilling.
-
Page 8: Winterize
Step 5: Operation of Lil Guppy Playground Pump Begin pumping the handle on the Lil Guppy pump. Water should begin to flow from the spout after 2-3 strokes. Please refer to the Lil Guppy Playground Pump Owner’s Manual for operation and maintenance information about the Lil Guppy Playground Pump. -
Page 9: Appendix
Appendix... -
Page 10: Diagram A: Pump-N-Play Installation
DIAGRAM A: Pump-n-Play Installation... -
Page 11: Diagram B: Pump-N-Play Exploded View
DIAGRAM B: Pump-n-Play Exploded View... -
Page 12: Diagram C: Part Listing
Diagram C: Part Listing Item No. Part Number Description Quantity 60-002-0-00-00 Lil Guppy Playground Pump 65-005-0-10-17 Suction Pickup Tube 65-005-0-10-02 Tank 65-005-0-10-07 Block Off Cover 65-005-0-10-14 Pump Gasket 65-005-0-10-13 Tank Gasket 65-005-0-10-10 Float Valve 65-005-0-10-12 Inlet Ball Valve 04-000-1-45-20 Security Bolt Bit 04-000-1-45-19 Security Bolts 65-005-0-13-01...
Need help?
Do you have a question about the Cadron Creek PLAY Pump-n-Play and is the answer not in the manual?
Questions and answers