Table of Contents
Advertisement
Quick Links
Advertisement
Table of Contents

Related Manuals for Pioneer DMP-555


Summary of Contents for Pioneer DMP-555
- Page 1 DIGITAL MEDIA PLAYER DMP-555 Operating Instructions...
- Page 2 NOTE: THE NO USER-SERVICEABLE PARTS COMPARTMENT WARNING IS LOCATED ON THE APPLIANCE BOTTOM.
- Page 3 [For U.S. model] IMPORTANT NOTICE H006AEn The serial number for this equipment is located in the rear panel. Please write this serial number on your enclosed warranty card and keep it in a secure area. This is for your security.
-
Page 4: Table Of Contents
(diluted in five to six parts water), wring the cloth well, and wipe away the dirt. Use a dry cloth to wipe the surface dry. Do not use volatile liquids such as benzene or thinner which will damage the unit. - Page 5 When performing forced ejection, be sure to follow the precautions below. temperatures. Avoid leaving discs in cars; the interior of a car in direct sunlight 1 Be sure to turn OFF the power of the player, and check that the disc has stopped can become extremely hot.
-
Page 6: Features
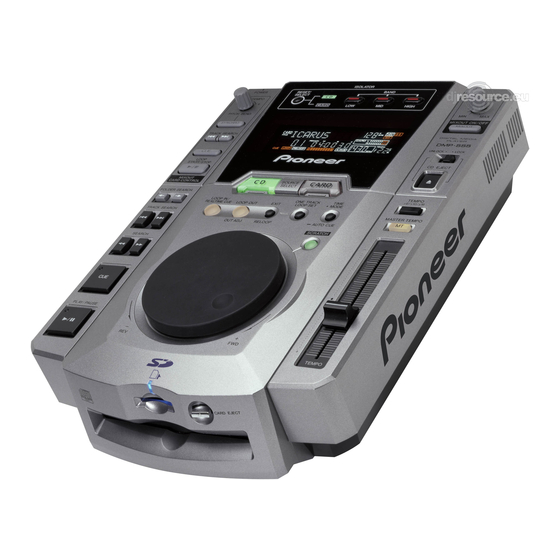
FEATURES This component is a digital media player designed to play both compact discs and solid-state memory cards, and equipped with a “card mix” (dual mode) function, thus providing the features and operational convenience demanded by professional DJs in clubs and disco environments. -
Page 7: Connections
(sound output and CONTROL terminal connection) Use the supplied audio cables. Connect the white plug to the L (left) terminal and the red plug to the R (right) terminal. Connect the supplied control cord to enable control of the unit from the mixer to allow fader start play and back cue. - Page 8 CARD MONITOR. 3. Connecting control cord to allow relay play Alternate playback can be automatically performed when the CONTROL terminals of two units are connected with the supplied control cord. P.17 DMP-555...
-
Page 9: Connecting The Power Cord
NOTE: When the Digital mode switch (DIGITAL OUT) is set to ON, the DJ functions (cue, loop, reloop, tempo adjust, Jog dial, Card mixing and Isolator) do not work. And the muted pause mode is used instead of the audible pause mode. -
Page 10: Panel Facilities
28 CARD indicator P. 13 Lights when a memory card is loaded and ready to play. The indicator flashes if the 8 Card mix LOOP START/STOP button / indicator (3/ 7) (*) loaded card is not formatted correctly, or if it contains no track contents. - Page 11 38 ISOLATOR BAND HIGH select button / indicator (*) P. 17 from the disc loading slot. When the CD EJECT LOCK switch is set to LOCK, the disc Press to cut the high-range frequency band. will not be ejected unless the button is pressed from the pause mode.
-
Page 12: Disc And Memory Card Loading/Unloading
÷ Do not leave memory cards inside automobiles in sunlight, or other locations ÷ Only one disc can be loaded at a time. Never attempt to load more than one exposed to high temperatures or direct sunlight. -
Page 13: Dj Player Operation
÷ If the + or = button is pressed during display of folder numbers and names ÷ No sound will be heard if a select button is pressed when no media is loaded (example: 00 Root), the search function will move in the selected direction corresponding to the pressed button. -
Page 14: To Skip To Other Tracks
÷ While holding either one of the buttons depressed, rotate the Jog dial in the a factor of ten. ÷ If the back button + is pressed when “00” is displayed, the search will move to direction corresponding to the direction you wish to skip; the unit will en- the last folder on the media;... -
Page 15: Changing Playback Speed
After specifying a cueing point, press the CUE button. of dial rotation. ÷ The sound at the specified Cue point will continue to play as long as the ÷ When dial rotation is stopped, tempo returns to previous speed. CUE button is pressed. -
Page 16: Advanced Operations
START/STOP LOOP IN/REAL TIME CUE button at the desired loop-in 3/ 7 point. ÷ This step is not necessary if you wish to use a pre-selected cue point as the LOOP IN/ beginning point for the loop. REAL TIME CUE 3. -
Page 17: Isolator Function
DJ mixer channel fader. The cross fader may also be used to perform fading starts on the player as well. The fader may also be re- turned to its original position to return the player to the cueing point (i.e., to per- form back cueing). -
Page 18: Card Mixing (Dual Mode)
÷ With the mix output set to OFF, perform track selection or check the con- and begins again (seamless one-track loop). tents of the memory card as desired; then set to cue pause mode, and set the ÷ If the LOOP START/STOP button (3/7) is pressed during playback, MIXOUT button to ON. - Page 19 7 BPM value input (BPM Edit function) begin synchro card playback again. ÷ If the BPM of the two sources does not match perfectly, the tempo of the two The DJ program software “DJ Booth” has been designed to allow track BPM will begin to deviate.
-
Page 20: Computer-Linked Operations
EDIT mode and return to the original CARD mode. COMPUTER-LINKED OPERATIONS When a USB cable is used to link the Digital Media Player to a computer, the pro- gram software provided with the player can be installed to allow the player to be used for playback of music located on the computer, and the Digital Media Player can be used as a memory card writer. -
Page 21: Troubleshooting
TROUBLESHOOTING Incorrect operations can be mistaken as malfunctions. If you believe the unit is not operating correctly, consult the chart below. Sometimes incorrect operation may be due to a malfunction in another component. If the problem is not fixed, check the other components used with the player. If the problem still persists, contact your nearest Pioneer authorized service center or dealer for service. -
Page 22: Error Message Display
÷ The BPM value measured by the DMP-555 may differ from the BPM value recorded on a CD or from our DJ mixer, but this difference is a result of differences in the BPM value measurement method; not a result of a fault with the player. -
Page 23: Specifications
That operation is not allowed during the Digital-Out mode is ON. CD LOCKED CD is locked from ejecting. Eject Lock switch is active and the disc is not able to eject during playing. REWRITING SD memory card is busy rewriting itself. - Page 24 “Recording equipment and copyright: Recording equipment non-commercial use and does not convey a license nor imply should be used only for lawful copying and you are advised to any right to use this product in any commercial (i.e. rev- check carefully what is lawful copying in the country in which enue-generating) real time broadcasting (terrestrial, satel- you are making a copy.
Need help?
Do you have a question about the DMP-555 and is the answer not in the manual?
Questions and answers