Advertisement
Table of Contents
Quick Reference Guide
■
Accessories
The following accessories are supplied with this product.
Remote control
Preparing the remote control
1
3
2
2
■
Items necessary for connection
Speakers
Ex.
Front speaker
• Use speakers with an impedance of at least 6Ω. 4Ω speakers can also be used as the front speakers. For more information on speaker
impedance, refer to page 3.
• If you are using a CRT monitor, we recommend that you use magnetically shielded speakers.
• Prepare at least two front speakers. The priority of the other speakers is as follows:
1
Two surround speakers
2
One center speaker
3
One (or two) surround back speaker (s)/presence speakers
External components
TV
Batteries (2)
AM loop antenna
(AAA, R03, UM-4)
1
Take off the battery compartment cover.
2
Insert the two supplied AAA batteries
into the battery case, following the
polarity markings.
3
Snap the battery compartment cover
back into place.
Center speaker
Playback device such as
BD (Blu-ray Disc)/DVD players
Indoor FM antenna
Be sure to aim the remote control directly at the remote
control sensor on this unit during operation.
Ex.
Surround speaker, surround back
speaker, and presence speaker
Cable
• Cables for connecting external components
(may differ depending on the components you are connecting)
• Speaker cables
(a quantity to match the number of speakers you are connecting)
• Audio pin cable
(for subwoofer)
- 1 -
VIDEO AUX input cover
YPAO microphone
within 20 feet (6 m)
Ex.
Active subwoofer
English
for U.S.A.
Ex.
Advertisement
Table of Contents

Related Manuals for Yamaha RX-A800


Summary of Contents for Yamaha RX-A800
-
Page 1: Preparing The Remote Control
Active subwoofer speaker, and presence speaker • Use speakers with an impedance of at least 6Ω. 4Ω speakers can also be used as the front speakers. For more information on speaker impedance, refer to page 3. • If you are using a CRT monitor, we recommend that you use magnetically shielded speakers. -
Page 2: Connect A Tv
Connect and install as follows the fi rst time you use this unit. See the following explanations for the connections for each number. BD/DVD player (recorder) This unit Front speaker R Front speaker L Subwoofer Surround speaker R Center speaker... -
Page 3: Connect The Speakers
This may damage this unit or the speakers. If the speaker cables SPEAKERS SPEAKERS S S P P E E A A K K E E R R S S FRONT CENTER SURROUND... -
Page 4: Listening To Tv Audio
VIDEO with video input only. Video input to this unit is output to a TV using output jacks of the When connecting to a non-HDMI compatible TV Connect to the TV using the same type of connection that you used to same kind. -
Page 5: Connect The Ac Power Cable
• When playback, select the corresponding input source to which the jack is connected. • At the default settings, input sources and sound programs are preset on the SCENE keys. When a playback device is connected to HDMI 1, pressing BD/DVD under SCENE key selects the HDMI 1 input. When a playback device is connected to AV3, pressing CD under SCENE selects the AV3 input. -
Page 6: Set Up The Speaker Parameters Automatically (Ypao)
Yamaha Parametric Room Acoustic Optimizer (YPAO) function that adjusts the speaker balance automatically with a simple procedure. When using YPAO, a test tone will be output from the speakers for approximately 3 minutes to measure acoustics. Be aware of the following when using YPAO. - Page 7 PHONES YPAO MIC TONE CONTROL SILENT CINEMA You can use the following functions with this unit. For details on the operations, refer to the Owner’s Manual on the supplied CD-ROM. Adjustment for various parameters to match your FM/AM tuner listening environment - Manual preset tuning - Sound quality control with a parametric equalizer <PEQ Select>...
-
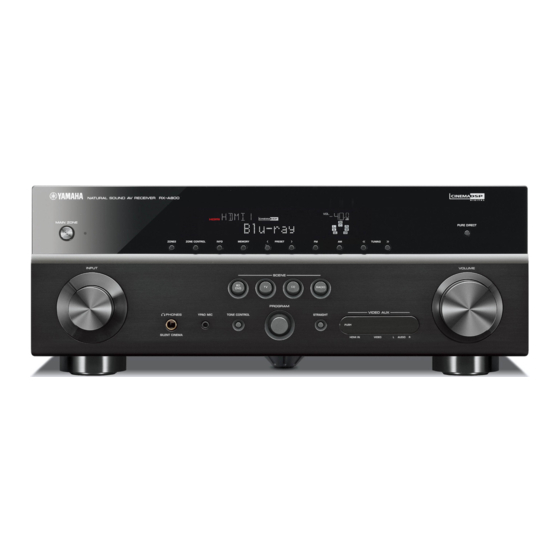
Page 8: Operation Guide
- Pressing and holding this key allows you to store input sources/sound fi eld programs. SLEEP PARTY STRAIGHT PURE DIRECT - Press this key when this unit is in standby mode to switch on the unit. SCENE RADIO Adjusts the volume level OPTION ON SCREEN The current volume level is displayed on the front panel display.
Need help?
Do you have a question about the RX-A800 and is the answer not in the manual?
Questions and answers