Advertisement
Table of Contents
- 1 Table of Contents
- 2 Introduction
- 3 Important Safety Information
- 4 Know Your Monitor
- 5 Preparation
- 6 Using Your Monitor Without a Smart Device
- 7 Using Your Monitor with a Smart Device
- 8 Using Memory Function
- 9 Other Settings
- 10 Error Messages and Troubleshooting
- 11 Maintenance
- 12 Optional Accessories
- 13 Specifications
- 14 FCC Statement
- 15 Limited Warranty
- 16 Guidance and Manufacturer's Declaration
- Download this manual
Advertisement
Table of Contents

Related Manuals for Omron BP7255


Summary of Contents for Omron BP7255
- Page 1 ® INSTRUCTION MANUAL 5 Series Upper Arm Blood Pressure Monitor Model BP7255 3144691-5B...
-
Page 2: Table Of Contents
Table of Contents Introduction ....................3 Important Safety Information ................4 1. Know Your Monitor ................9 2. Preparation ..................15 3. Using Your Monitor without a Smart Device ........19 4. Using Your Monitor with a Smart Device ..........21 5. Using Memory Function ...............24 6. -
Page 3: Introduction
Safety Instructions This instruction manual provides you with important information about the OMRON BP7255 Upper Arm Blood Pressure Monitor. To ensure the safe and proper use of this monitor, READ and UNDERSTAND all of these instructions. If you do not understand these instructions or have any questions, contact 1-800-634-4350 before attempting to use this monitor. -
Page 4: Important Safety Information
Important Safety Information Read the Important Safety Information in this instruction manual before using this monitor. Follow this instruction manual thoroughly for your safety. Keep for future reference. For specific information about your own blood pressure, CONSULT WITH YOUR PHYSICIAN. Indicates a potentially hazardous situation which, if not Warning avoided, could result in death or serious injury. - Page 5 • Consult with your physician before using this monitor if you have common arrhythmias such as atrial or ventricular premature beats or atrial fibrillation; arterial sclerosis; poor perfusion; diabetes; pregnancy; pre- eclampsia or renal disease. NOTE that any of these conditions in addition to patient motion, trembling, or shivering may affect the measurement reading.
- Page 6 Indicates a potentially hazardous situation which, if not Caution avoided, may result in minor or moderate injury to the user or patient, or cause damage to the equipment or other property. • Stop using this monitor and consult with your physician if you experience skin irritation or discomfort.
- Page 7 • DO NOT use this monitor with other medical electrical (ME) equipment simultaneously. This may result in incorrect operation of the devices and/or cause an inaccurate reading. • Avoid bathing, drinking alcohol or caffeine, smoking, exercising and eating for at least 30 minutes before taking a measurement. •...
- Page 8 Data Transmission • DO NOT replace the batteries or unplug the AC adapter while your readings are being transferred to your smart device. This may result in incorrect operation of this monitor and failure to transfer your blood pressure data. AC Adapter (optional accessory) Handling and Usage •...
-
Page 9: Know Your Monitor
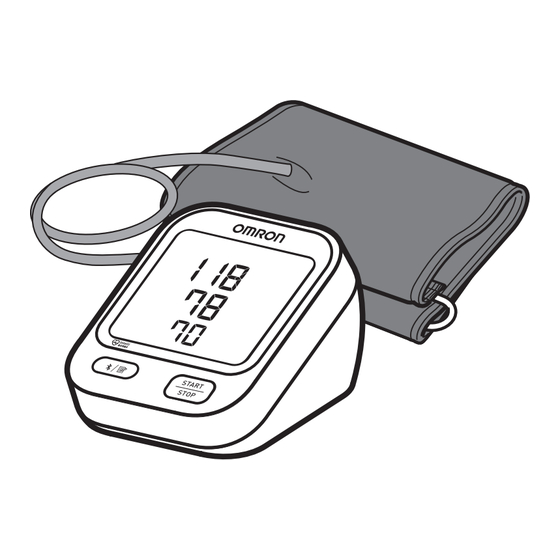
1. Know Your Monitor Contents/Product Includes Monitor, Wide-Range D-Ring Cuff, 4 “AA” batteries, instruction manual, quick start guide Monitor and Arm Cuff Front of the monitor Display [Connection/Memory] button [START/STOP] button... - Page 10 Left side, back and bottom of the monitor Air jack AC adapter jack (for optional AC adapter) Battery compartment Arm cuff (Upper arm circumference: 9" - 17" (22 - 42 cm)) Air plug Air tube...
- Page 11 Display and Symbols Memory symbol Appears when viewing readings stored in the memory. Bluetooth ON symbol Appears when your readings are being transferred. Bluetooth OFF symbol Appears when Bluetooth is disabled.
- Page 12 Sync symbol • Flashes when the stored memory is almost full • Appears when the stored memory is completely full Once you pair your monitor with your smart device, transfer your readings immediately before the monitor deletes the oldest reading. Up to 30 readings can be stored in the internal memory of your monitor.
- Page 13 Movement error symbol Appears with your reading when your body is moving during a measurement. If it appears, remove the arm cuff and wait for 2 to 3 minutes. Then, reapply the cuff, remain still and take another measurement. Irregular heartbeat symbol •...
- Page 14 Classification of BP (Blood Pressure) ACC/AHA 2017 Hypertension guidelines define categories of BP in adults as below. Categories of BP in Adults* BP Category Systolic BP Diastolic BP Normal < 120 mmHg < 80 mmHg Elevated 120 - 129 mmHg and <...
-
Page 15: Preparation
2. Preparation Installing Batteries Remove the battery cover. Insert 4 “AA” batteries as indicated in the battery compartment. Close the battery cover. Note • When the “ ” symbol flashes on the display, it is recommended that you replace the batteries. •... - Page 16 Blood Pressure Measurement Tips To help ensure an accurate reading, follow these directions: • Stress raises blood pressure. Avoid taking measurements during stressful times. • Measurements should be taken in a quiet place. • It is important to take measurements at the same times each day. Taking measurements in the morning and in the evening is recommended.
- Page 17 Plug the arm cuff into your monitor by inserting the air plug into the air jack securely until it clicks. Click Place your hand through the cuff loop. Pull the cuff until it reaches your upper left arm. Note • The bottom edge of the arm cuff 0.5 inch (1 to 2 cm) should be 0.5 inch (1 to 2 cm) above the inside elbow.
- Page 18 To take a measurement on your right arm When you take a measurement on your right arm, the air tube should run along the side of your elbow, along the bottom of your arm. Be careful not to rest your arm on the air tube.
-
Page 19: Using Your Monitor Without A Smart Device
3. Using Your Monitor without a Smart Device This monitor tracks readings for 1 user. If you are sharing with another, manually track your readings separately. Taking a Measurement You can use your monitor without pairing to a smart device. To pair your monitor with a smart device, refer to sub-section 4.1. - Page 20 Remain still and do not talk until the entire measurement process is complete. The “ ” symbol flashes at every heartbeat. Your blood pressure and pulse rate are displayed. If either the systolic or the diastolic reading is high (refer to sub-section 1.3), “High”...
-
Page 21: Using Your Monitor With A Smart Device
Download and install the compatible OMRON app onto your smart device. If you already have the compatible OMRON app and have created your account, open the app and add your new monitor. Open the app and follow the pairing instructions shown on your smart... - Page 22 • If the “Err” appears, follow the instructions in the app. • Your monitor automatically turns off after 10 seconds. • Be aware that OMRON will not be responsible for the loss of data and/or information in the app. • Only compatible OMRON apps should be used with this monitor to help ensure correct data transfer.
- Page 23 Disabling/Enabling Bluetooth Warning • After the pairing process is completed, this product always emits radio frequencies (RF) in the 2.4 GHz band. DO NOT use this product in locations where RF is restricted, such as on an aircraft or in hospitals. Disable the Bluetooth feature in this monitor, or remove the batteries and unplug the AC adapter when in RF restricted areas.
-
Page 24: Using Memory Function
5. Using Memory Function Your monitor automatically stores up to 30 readings. This monitor tracks readings for 1 user. If you are sharing with another, manually track your readings separately. Viewing the Readings Stored in Memory Press the button. The Memory number appears for 2 seconds before the pulse rate is displayed. The most recent reading stored in the memory will be numbered as “1”. -
Page 25: Other Settings
6. Other Settings Restoring Your Monitor to the Default Settings To delete all the information stored in your monitor, follow the instructions below. Make sure that your monitor is turned off. Press the button. After a memory number appears, the latest reading will appear. While holding the button down, press and hold the [START/STOP]... -
Page 26: Error Messages And Troubleshooting
7. Error Messages and Troubleshooting If any of the below problems occur during measurement, check to make sure that no other electrical device is within 12 inches (30 cm) of the monitor. If the problem persists, refer to the table below. Display/Problem Possible Cause Solution... - Page 27 Display/Problem Possible Cause Solution Do not touch the arm cuff and/or bend the air tube The arm cuff is inflated while taking a exceeding the maximum measurement. If inflating allowable pressure. appears the arm cuff manually, refer to sub-section 3.1. Moving or talking during a measurement results in Remain still and do not talk...
- Page 28 Display/Problem Possible Cause Solution appears Apply the arm cuff correctly, then take another measurement. Refer to sub- section 2.3. The pulse rate is not Remain still and sit correctly detected correctly. during a measurement. If “Irregular heartbeat” continues to appear, it is recommended that you consult with your physician.
- Page 29 Display/Problem Possible Cause Solution Refer to sub-section 4.1 for pairing your monitor with The monitor is waiting for your smart device, or press pairing with the smart the [START/STOP] button to device. flashes cancel pairing and turn your monitor off. More than 24 readings are Pair or transfer your not transferred.
- Page 30 Display/Problem Possible Cause Solution Blood pressure varies constantly. Many factors including Readings appear too stress, time of day, and/or how you apply the arm cuff, high or too low. may affect your blood pressure. Review sub-sections 2.2 - 2.4 and section 3. Follow the instructions shown in the smart device, or visit Any other the “Help”...
-
Page 31: Maintenance
8. Maintenance Maintenance To protect your monitor from damage, follow the directions below: • Changes or modifications not approved by the manufacturer will void the user warranty. Caution • DO NOT disassemble or attempt to repair this monitor or other components. This may cause an inaccurate reading. - Page 32 Gently fold the air tube into the arm cuff. Note • Do not bend or crease the air tube excessively. Do not store your monitor and other components: • If your monitor and other components are wet. • In locations exposed to extreme temperatures, humidity, direct sunlight, dust or corrosive vapors such as bleach.
-
Page 33: Optional Accessories
9. Optional Accessories Small D-Ring Cuff Wide-Range D-Ring Cuff Arm circumference Arm circumference 7" - 9" (17 - 22 cm) 9" - 17" (22 - 42 cm) Model: Model: HEM-CS24-B HEM-CS24-BZ HEM-RML31-B HEM-RML31-BZ •Same as the arm cuff provided with the product. - Page 34 Using the AC Adapter (optional accessory) Note • Make sure not to place your monitor in a location where it is difficult to plug and unplug the AC adapter. Insert the AC adapter plug into the AC adapter jack on the back side of your monitor.
-
Page 35: Specifications
10. Specifications Model BP7255 HEM-716CT2-Z Display LCD digital display Cuff pressure range 0 to 299 mmHg Blood pressure SYS: 60 to 260 mmHg measurement range DIA: 40 to 215 mmHg Pulse measurement range 40 to 180 beats / min. Pressure: ±3 mmHg Accuracy Pulse: ±5 % of display reading... - Page 36 Monitor: 5 years or the time when reaching 10000 times of use. Durable period (Service Arm cuff: 5 years or the time when reaching 10000 life) times of use. Optional AC adapter: 5 years +50 °F to +104 °F (+10 °C to +40 °C) / 15 to 90 % RH Operating conditions (non-condensing) / 800 to 1060 hPa Storage / Transport...
- Page 37 Note • These specifications are subject to change without notice. • This monitor is clinically investigated according to the requirements of ISO 81060-2:2013 and complies with ISO 81060-2:2013 and ISO 81060-2:2018+A1:2020. In the clinical validation study, K5 was used on 85 subjects for determination of diastolic blood pressure.
- Page 38 Pictogram on the Product Types of marks used to indicate the correct positioning of the artery for the upper arm Identifies the type of cuff that is compatible with the blood pressure monitor...
-
Page 39: Fcc Statement
11. FCC Statement FCC CAUTION Changes or modifications not expressly approved by the party responsible for compliance could void the user's authority to operate the equipment. This device complies with part 15 of the FCC Rules. Operation is subject to the following two conditions: (1) This device may not cause harmful interference, and (2) this device must accept any interference received, including interference that may cause undesired operation. -
Page 40: Limited Warranty
12. Limited Warranty Your BP7255 Blood Pressure Monitor, excluding the arm cuff and batteries is warranted to be free from defects in materials and workmanship appearing within 2 years from the date of purchase, when used in accordance with the instructions provided with the monitor. - Page 41 OMRON SHALL NOT BE LIABLE FOR LOSS OF USE OR ANY OTHER SPECIAL, INCIDENTAL, CONSEQUENTIAL OR INDIRECT COSTS, EXPENSES OR DAMAGES. SOME STATES DO NOT ALLOW THE EXCLUSION OR LIMITATION OF INCIDENTAL OR CONSEQUENTIAL DAMAGES, SO THE ABOVE LIMITATION OR EXCLUSION MAY NOT APPLY TO YOU.
-
Page 42: Guidance And Manufacturer's Declaration
The Bluetooth ® word mark and logos are registered trademarks owned by Bluetooth SIG, Inc. and any use of such marks by OMRON HEALTHCARE Co., Ltd. is under license. Other trademarks and trade names are those of their respective owners.
Need help?
Do you have a question about the BP7255 and is the answer not in the manual?
Questions and answers
How to set time and date on omron BP7255
To set the time and date on the Omron BP7255:
1. Insert the batteries correctly. The year will flash on the display.
2. If nothing appears, press the button to display the year.
3. Use the up or down button to adjust the year. Hold the button to scroll quickly.
4. Press the button to confirm the year. The month will start flashing.
5. Repeat the same steps to set the month, day, hour, and minute.
6. Press the button to store the settings.
7. The monitor will automatically turn off 3 seconds after setting the minutes.
Note: The date and time will also be automatically set when the monitor is paired with the “OMRON connect US/CAN” app.
This answer is automatically generated
How to erase all data on the Omron BP7255