Advertisement
Available languages
Available languages
IT-EN-FR-DE-ES
i s t r u z i o n i o r i g i n a l i - o r i g i n a l i n s t r u c t i o n s - n o t i c e d ' o r i g i n e - O r i g i n a l a n l e i t u n g - i n s t r u c c i o n e s o r i g i n a l e s
M A N U A L E D ' U S O E I N S T A L L A Z I O N E
U S E R A N D I N S T A L L A T I O N M A N U A L
M A N U E L D ' U T I L I S A T I O N E T D ' I N S T A L L A T I O N
B E N U T Z E R - U N D I N S T A L L A T I O N S A N L E I T U N G
M A N U A L D E U S O - I N S T A L A C I Ó N
DI24
230V ~ 50Hz
ADI24J 2401 - 4117900_00
Advertisement
Table of Contents

Related Manuals for AERMEC DI24


Summary of Contents for AERMEC DI24
- Page 1 B E N U T Z E R - U N D I N S T A L L A T I O N S A N L E I T U N G M A N U A L D E U S O - I N S T A L A C I Ó N DI24 230V ~ 50Hz...
- Page 3 SOMMARIO ÍNDICE Applicazioni ............................4 Aplicaciones ..........................48 Menu’ display DI24 ........................6 Menú de la pantalla DI24 ......................50 Visualizzazione della pagina principale ................7 Visualización de la página principal ...................51 Menu’ display DI24 ........................10 Menú de la pantalla DI24 ......................54 Menu’ display DI24 ........................10 Menú...
- Page 4 APPLICAZIONI SOLUZIONE STAND ALONE: Connessione modbus TTL (max 30 m) Fan coil con termostato della famiglia VMF SOLUZIONE CONTROLLO DI ZONA: Connessione mod bus TTL (max 30 m) Fan coil slave 5 Fan coil slave 1 Fan coil master SOLUZIONE IMPIANTO CON CASSETTE FCL E GRIGLIE GLF: MODBUS TTL MASTER SLAVE #1...
-
Page 5: Connessioni Elettriche
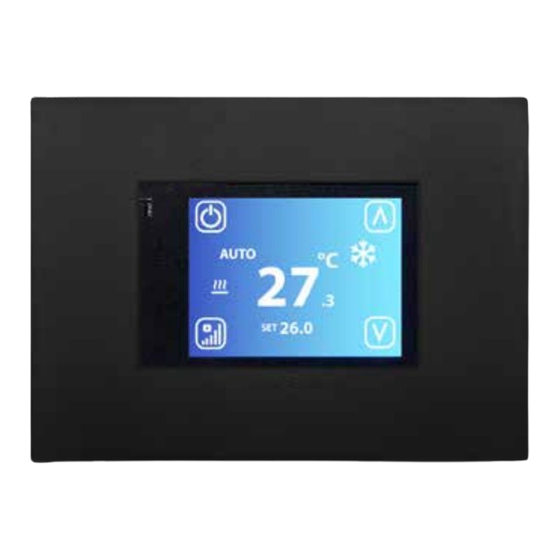
Legenda RX_TX_Mode TX_RX Per connettere l’interfaccia utente DI24 ai termostati e VMF-E19/E19I si deve utilizzare il cavo interfaccia dedicato cod. 5152810: Per un corretto funzionamento del sistema si deve fare attenzione alla corrispondenza funzionale dei singoli cavetti: 1 Marrone TX_RX... - Page 6 Poli da collegare alla morsettiera data a corredo con il cavetto dedicato (cod. 5152810) MENU’ DISPLAY DI24 Il pannello interfaccia DI24 è caratterizzato da un display resistivo da 2.4” e l’applicativo è contraddistinto da diverse visualizzazioni che accompagnano l’utente nella navigazione dei diversi menù.
- Page 7 Inattività dell’utilizzatore di almeno 30 secondi Pressione in un punto qualsiasi dell’area del touch VISUALIZZAZIONE DELLA PAGINA PRINCIPALE All’interno di questa visualizzazione è possibile: Verificare lo stato di funzionamento del termostato Modificare il modo di funzionamento del termostato Accende/spegnere/abilitare le fasce orarie del termostato Accedere alla pagina di modifica del setpoint di funzionamento del termostato Accedere al menù...
- Page 8 Indice Nome Descrizione Ad ogni pressione del tasto si determina lo stato di abilitazione del termostato: ➞ON ➞ PROGRAMMA ORARIO ATTIVO ↵ La funzione di “Programma orario” è attivabile solamente se il termostato non è connesso ad un sistema di supervisione tramite seriale RS485. Tasto cambio modo di funzionamento Quando è...
- Page 9 Indice Nome Descrizione Tasto decrementa Con il tasto si possono decrementare i valori delsetpoint o dei parametri presenti nell’interfaccia. AL1 ➞ mancata comunicazione tra l’interfaccia utente ed il termostato AL2 ➞ fault inverter Stringa allarme AL3 ➞ sonda aria interfaccia utente guasta Durante la procedura di auto indirizzamento (o di forzatura di visualizzazione dell’indirizzo seriale) del termostato l’interfaccia utente sarà...
- Page 10 MENU’ DISPLAY DI24 Per accedere alla pagina di visualizzazione e modifica del setpoint è sufficiente premere uno dei due pulsanti dalla pagina principale. Inattività dell’utilizzatore di almeno 30 secondi Pagina principale Pagina cambio set Pressione del tasto incrementa o decrementa Pressione in un punto qualsiasi dell’area del touch...
- Page 11 All’interno di questa pagina si può: 1. Selezionare i sotto-menù in cui si vuole continuare a navigare • A. Con la pressione del tasto si ritorna alla pagina principale • B. Con la pressione del tasto si entra nel menù modifica parametri •...
- Page 12 VISUALIZZAZIONE DELLA PAGINA PROGRAMMAZIONE ORARIA Nel pannello ID24 la fascia oraria giornaliera è suddivisa in 24 ore (dalle ore 00 alle 23) e per ogni ora si può selezionare uno dei seguenti stati: 0 ➞ SPENTO 1 ➞ ABILITATO A FUNZIONARE CON SET POINT #1 (Parametri P1 e P3) 2 ➞...
- Page 13 VISUALIZZAZIONE DELLA PAGINA MODIFICA PARAMETRI Indice Nome Descrizione Per i parametri legati alla selezione di una funzionalità si riporta una stringa che riporta Label del parametro l’indicazione della scelta effettuata Indice del parametro Indice del parametro che si sta visualizzando, il range dei parametri va da P0 a P15 Nome del parametro Indica il nome/funzione associata al parametro visualizzato Tasto ritorno alla home...
- Page 14 CONTROLLO TRAMITE AERSUITE L'applicazione AerSuite consente il controllo da remoto dell''interfaccia utente DI24, con termostati VMF-E19/VMF-E19I, attraverso Smart Device con sistema operativo iOS e Android. Si tratta di un’applicazione per Smartphone e Tablet con la quale l’utente sarà in grado di accedere e gestire da remoto il funzionamento del proprio impianto.
- Page 15 APPLICATIONS STAND ALONE SOLUTION: Connessione modbus TTL Modbus TTL connection (max 30 m) Fan coil with VMF family thermostat Fan coil con termostato della famiglia VMF ZONE CONTROL SOLUTION: Connessione mod bus TTL Modbus TTL connection (max 30 m) Fan coil slave 5 Fan coil slave 1 Fan coil master SYSTEM SOLUTION WITH FCL BOXES AND GLF GRIDS:...
-
Page 16: Electrical Connections
RX_TX_Mode TX_RX To connect the DI24 user interface to the thermostats and VMF-E19/E19I you must use the dedicated interface cable code 5152810: For correct system operation, attention must be paid to the functional correspondence of the individual cables: 1 Brown... -
Page 17: Standby Display
Poles to be connected to the terminal board supplied with the dedicated cable (cod. 5152810) DI24 DISPLAY MENU The DI24 interface panel features a 2.4" resistive display and the application is characterised by various displays that accompany the user in navigating the different menus. - Page 18 Inattività dell’utilizzatore di almeno 30 secondi User inactivity of at least 30 seconds Pressione in un punto qualsiasi dell’area del touch Press anywhere on the touch screen area DISPLAY THE PASSWORD PAGE Within this display, it is possible to: Check the operating state of the thermostat Change the thermostat operating mode Switch on/off/enable the thermostat time periods Access the thermostat operating setpoint change page...
- Page 19 Index Name Description Each press of the button determines the enabling state of the thermostat: ➞ON ➞ ACTIVE TIME PROGRAMME ↵ The 'Time program' function can only be activated if the thermostat is not connected to a supervisory system via RS485 serial. Key to change the operating mode When the time programme is enabled, above the button...
- Page 20 Index Name Description Decrease button button can be used to decrease the setpoint or parameter values in the interface. AL1 ➞ no communication between user interface and thermostat AL2 ➞ fault inverter Alarm string AL3 ➞ faulty user interface air probe During the self-addressing procedure (or forcing the display of the serial address) of the thermostat, the user interface will be characterised as follows: Index...
- Page 21 DI24 DISPLAY MENU To access the setpoint display and editing page, simply press one of the two buttons from the main page. Inattività dell’utilizzatore di almeno 30 secondi User inactivity of at least 30 seconds Pagina principale Pagina cambio set...
- Page 22 On this page you can: 1. Select the sub-menus in which you want to continue browsing • A. Press to return to the main page • B. Press to enter the parameter edit menu • C. Press to enter the time programming menu •...
- Page 23 VIEWING THE TIME PROGRAMMING PAGE In the ID24 panel the daily time slot is divided into 24 hours (from 00 to 23) and for each hour you can select one of the following states: 0 ➞ WORN OUT 1 ➞ ENABLED TO WORK WITH SET POINT #1 (Parameters P1 and P3) 2 ➞...
- Page 24 DISPLAYING THE PARAMETER EDIT PAGE Index Name Description For the parameters linked to the selection of a feature, a string is given indicating the choice Parameter label made Parameter index Index of the parameter being displayed, parameter range P0 to P15 Parameter name Indicates the name/function associated with the displayed parameter Return-to-home button...
- Page 25 CONTROL VIA AERSUITE The AerSuite application allows remote control of the DI24 user interface, with VMF-E19/VMF-E19I thermostats, via Smart Devices with iOS and Android operating systems. It is an application for Smartphones and Tablets with which the user will be able to remotely access and manage the operation of their system.
- Page 26 APPLICATIONS SOLUTION AUTONOME : Connessione modbus TTL Connexion modbus TTL (max 30 m) (max 30 m) Convecteur à ventilation avec thermostat de la famille VMF Fan coil con termostato della famiglia VMF APPLICATION CONTRÔLE DE ZONE : Connessione mod bus TTL Connexion mod bus TTL (max 30 m) (max 30 m)
-
Page 27: Connexions Électriques
RX_TX_Mode TX_RX Pour connecter l'interface utilisateur DI24 aux thermostats et aux VMF-E19/E19I, il faut utiliser le câble d'interface dédié code 5152810 : Pour un fonctionnement correct du système, il faut faire attention à la correspondance fonctionnelle de chaque câble : 1 Marron... - Page 28 Pôles à connecter au bornier fourni avec le câble dédié (code 5152810) MENU D'AFFICHAGE DI24 Le panneau d'interface DI24 est doté d'un écran résistif de 2,4 pouces et l'application se caractérise par divers affichages qui accompagnent l'utilisateur dans la navigation dans les différents menus.
- Page 29 Inattività dell’utilizzatore di almeno 30 secondi Inactivité de l'utilisateur pendant au moins 30 secondes Pressione in un punto qualsiasi dell’area del touch Appuyer n'importe où dans la zone tactile AFFICHAGE DE LA PAGE PRINCIPALE Dans le cadre de cet affichage, il est possible de : Vérifier l'état de fonctionnement du thermostat Modifier le mode de fonctionnement du thermostat Allumer/éteindre/activer les tranches horaires du thermostat...
- Page 30 Index Description Chaque pression sur la touche détermine l'état d’activation du thermostat : ➞ON ➞ PROGRAMME HORAIRE ACTIVÉ ↵ La fonction de « Programme horaire » ne peut être activée que si le thermostat n'est pas connecté à un système de supervision via une liaison série RS485. Lorsque le programme horaire est activé, sur la touche figure la chaîne PRG suivie des Touche de changement du...
- Page 31 Index Description Touche de diminution La touche permet de diminuer les valeurs des points de consigne ou des paramètres dans l'interface. AL1 ➞ manque de communication entre l'interface utilisateur et le thermostat AL2 ➞ fault inverter Chaîne d'alarme AL3 ➞ sonde à air de l'interface utilisateur en panne Pendant la procédure d'auto-adressage (ou de forçage de l'affichage de l'adresse série) du thermostat, l'interface utilisateur sera caractérisée comme suit : Index...
- Page 32 MENU D'AFFICHAGE DI24 Pour accéder à la page d'affichage et à la modification du point de consigne, il suffit d'appuyer sur l'un des deux boutons à partir de la page principale. Inattività dell’utilizzatore di almeno 30 secondi Inactivité de l'utilisateur pendant au moins 30 secondes...
- Page 33 Sur cette page, on peut : 1. Sélectionner les sous-menus dans lesquels on souhaite poursuivre la navigation • A. Appuyer sur la touche pour revenir à la page principale • B. Appuyer sur la touche pour accéder au menu de modification des paramètres •...
- Page 34 VISUALISATION DE LA PAGE DE PROGRAMMATION HORAIRE Dans le panneau ID24, la tranche horaire quotidienne est divisée en 24 heures (de 00 à 23) et pour chaque heure, vous pouvez sélectionner l'un des états suivants : 0 ➞ DÉSACTIVÉ 1 ➞ PERMET DE FONCTIONNER AVEC LE POINT DE CONSIGNE #1 (Paramètres P1 et P3) 2 ➞...
- Page 35 AFFICHAGE DE LA PAGE DE MODIFICATION DES PARAMÈTRES Index Description Pour les paramètres liés à la sélection d'une fonctionnalité, une chaîne de caractères est Étiquette du paramètre donnée pour indiquer le choix effectué Index du paramètre Index du paramètre affiché, la plage de paramètres va de P0 à P15 Nom du paramètre Indique le nom/fonction associé...
- Page 36 CONTRÔLE VIA AERSUITE L'application AerSuite permet de contrôler à distance l'interface utilisateur DI24, avec les thermostats VMF-E19/VMF-E19I, via des dispositifs intelligents dotés des systèmes d'exploitation iOS et Android. Il s'agit d'une application pour smartphones et tablettes qui permet à l'utilisateur d'accéder à distance à...
- Page 37 ANWENDUNGEN LÖSUNG STAND-ALONE: Connessione modbus TTL Verbindung Modbus TTL (max 30 m) (max 30 m) Gebläsekonvektor mit Thermostat der VMF-Familie Fan coil con termostato della famiglia VMF LÖSUNG BEREICHSSTEUERUNG: Connessione mod bus TTL Verbindung Modbus TTL (max 30 m) (max 30 m) Slave-Gebläsekonvektor 5 Fan coil slave 5 Slave-Gebläsekonvektor 1...
- Page 38 4 3 2 1 Legende RX_TX_Modus TX_RX Für den Anschluss der Benutzerschnittstelle DI24 an die Thermostate und VMF-E19/E19I muss das spezielle Schnittstellenkabel 5152810 verwendet werden: Für den ordnungsgemäßen Betrieb der Anlage muss auf die funktionale Übereinstimmung der einzelnen Kabel geachtet werden: 1 Braun TX_RX 2 Grün...
- Page 39 Die Pole sind an die Klemmenleiste anzuschließen, die mit dem entsprechenden Kabel geliefert wird (cod. 5152810) DISPLAY-MENÜ DI24 Das DI24-Schnittstellenpanel verfügt über ein 2,4"-Resistiv-Display und die Anwendung zeichnet sich durch verschiedene Anzeigen aus, die den Benutzer bei der Navigation durch die verschiedenen Menüs begleiten.
- Page 40 Inattività dell’utilizzatore di almeno 30 secondi Inaktivität des Benutzers von mindestens 30 Sekunden Pressione in un punto qualsiasi dell’area del touch Drücken Sie eine beliebige Stelle im Touchbereich ANZEIGE DER HAUPTSEITE Innerhalb dieser Anzeige ist es möglich: den Betriebszustand des Thermostats zu überprüfen auf eine andere Betriebsart des Thermostats einzuschalten die Thermostat-Timer-Zeiten ein- auszuschalten/zu aktivieren auf die Seite zur Änderung des Thermostat-Sollwerts zu zugreifen...
- Page 41 Inhalt Bezeichnung Beschreibung Jeder Druck auf die Taste bestimmt den aktivierten Zustand des Thermostats: ➞EIN ➞ ZEITPROGRAMM AKTIV ↵ Die Funktion "Zeitprogramm" kann nur aktiviert werden, wenn der Thermostat nicht über die serielle RS485-Schnittstelle an ein Überwachungssystem angeschlossen ist. Wenn das Zeitprogramm aktiviert ist, erscheint über der Schaltfläche die Zeichenfolge Taste zu Umschalten der Betriebsart...
- Page 42 Inhalt Bezeichnung Beschreibung Taste zum „Verringern“ Die Taste kann verwendet werden, um den Sollwert oder die Parameterwerte in der Schnittstelle zu verringern. AL1 ➞ keine Kommunikation zwischen Benutzerschnittstelle und Thermostat AL2 ➞ Fehler Wechselrichter Alarmstring AL3 ➞ defekte Benutzerschnittstelle-Luftsonde Während des Selbstadressierungsvorgangs (oder der Forcierung der Anzeige der seriellen Adresse) des Thermostats wird die Benutzeroberfläche wie folgt gekennzeichnet: Inhalt Bezeichnung...
- Page 43 DISPLAY-MENÜ DI24 Um die Seite zur Anzeige und Bearbeitung des Sollwerts aufzurufen, drücken Sie einfach eine der beiden Tasten oder der Hauptseite. Inattività dell’utilizzatore di almeno 30 secondi Inaktivität des Benutzers von mindestens 30 Sekunden Pagina principale Pagina cambio set Hauptseite Seite „Sollwert ändern“...
- Page 44 Auf dieser Seite können Sie: 1. die Untermenüs wählen, in denen Sie weiterblättern möchten • A. Drücken Sie , um zur Hauptseite zurückzukehren. • B. Drücken Sie , um das Menü zur Bearbeitung der Parameter aufzurufen. • C. Drücken Sie , um das Menü...
- Page 45 ANZEIGEN DER ZEITPROGRAMMIERUNGSSEITE Im ID24-Panel ist das tägliche Zeitfenster in 24 Stunden (von 00 bis 23) unterteilt und für jede Stunde können Sie einen der folgenden Zustände auswählen: 0 ➞ DEAKTIVIERT 1 ➞ AKTIVIERT ZUM ARBEITEN MIT SOLLWERT #1 (Parameter P1 und P3) 2 ➞...
- Page 46 ANZEIGEN DER SEITE ZUR BEARBEITUNG DER PARAMETER Inhalt Bezeichnung Beschreibung Für die Parameter, die mit der Auswahl eines Merkmals verbunden sind, wird einen String Label des Parameters angegeben, die die getroffene Wahl angibt Index des Parameters Index des angezeigten Parameters, Parameterbereich P0 bis P15 Name des Parameters Gibt den Namen/die Funktion an, der/die mit dem angezeigten Parameter verbunden ist Zurück-nach-Home-Taste...
- Page 47 (nur beim Konfigurieren der App) STEUERUNG ÜBER AERSUITE Die AerSuite-Anwendung ermöglicht die Fernsteuerung der DI24-Benutzeroberfläche mit VMF-E19/VMF-E19I-Thermostaten über Smart Devices mit iOS- und Android-Betriebssystemen. Es handelt sich dabei um eine Anwendung für Smartphones und Tablets, mit der der Benutzer aus der Ferne auf seine Anlage zugreifen und es verwalten kann.
- Page 48 APLICACIONES APLICACIÓN AUTÓNOMA: Connessione modbus TTL Conexión modbus TTL (max 30 m) (máx 30 m) Fan coil con termostato de la familia VMF Fan coil con termostato della famiglia VMF SOLUCIÓN CONTROL DE ZONA: Connessione mod bus TTL Conexión mod bus TTL (max 30 m) (máx 30 m) Fan coil slave 5...
-
Page 49: Conexiones Eléctricas
TX-RX Para conectar la interfaz de usuario DI24 a los termostatos y VMF-E19/E19I, debe usar el cable de interfaz dedicado cód. 5152810: Para que el sistema funcione correctamente, debe prestarse atención a la correspondencia funcional de cada uno de los cables: 1 Marrón... - Page 50 Polos que deben conectarse al bornero suministrado con el cable dedicado (cód. 5152810): MENÚ DE LA PANTALLA DI24 El panel de interfaz DI24 cuenta con una pantalla resistiva de 2,4" y la aplicación se caracteriza por varias pantallas que acompañan al usuario en la navegación por los distintos menús.
- Page 51 Inattività dell’utilizzatore di almeno 30 secondi Inactividad del usuario de al menos 30 segundos Pressione in un punto qualsiasi dell’area del touch Pulse en cualquier parte de la zona táctil VISUALIZACIÓN DE LA PÁGINA PRINCIPAL Dentro de esta visualización, es posible: Comprobar el estado de funcionamiento del termostato Modificar el modo de funcionamiento del termostato Encender/apagar/habilitar las franjas horarias del termostato...
- Page 52 Índice Nombre Descripción Cada vez que se pulsa el botón determina el estado activado del termostato: ➞ON ➞ PROGRAMA HORARIO ACTIVO ↵ La función "programación horaria" sólo puede activarse si el termostato no está conectado a un sistema de supervisión vía serie RS485. Cuando el programa horario está...
- Page 53 Índice Nombre Descripción Tecla disminuir El botón se puede utilizar para disminuir los valores de setpoint o los parámetros presentes en la interfaz. AL1 ➞ no hay comunicación entre la interfaz de usuario y el termostato. AL2 ➞ fallo del inverter Cadena de alarma AL3 ➞...
- Page 54 MENÚ DE LA PANTALLA DI24 Para acceder a la página de visualización y modificación del setpoint, basta con pulsar uno de los dos botones desde la página principal. Inattività dell’utilizzatore di almeno 30 secondi Inactividad del usuario de al menos 30 segundos...
- Page 55 Dentro de esta página puede: 1. Seleccionar los submenús en los que desea seguir navegando • A. Pulsando el botón se regresa a página principal • B. Pulsando el botón se entra en el menú de modificación de parámetros • C.
- Page 56 VISUALIZACIÓN DE LA PÁGINA DE PROGRAMACIÓN HORARIA En el panel ID24 la franja horaria diaria se divide en 24 horas (de 00 a 23) y para cada hora se puede seleccionar uno de los siguientes estados: 0 ➞ DESACTIVADO 1 ➞ HABILITADO PARA TRABAJAR CON SET POINT #1 (Parámetros P1 y P3) 2 ➞...
- Page 57 VISUALIZACIÓN DE LA PÁGINA DE MODIFICACIÓN DE LOS PARÁMETROS Índice Nombre Descripción Para los parámetros vinculados a la selección de una funcionalidad, se proporciona una Etiqueta del parámetro cadena que indica la elección realizada Índice del parámetro Índice del parámetro visualizado, gama de parámetros P0 a P15 Nombre del parámetro Indica el nombre/función asociado al parámetro visualizado Botón de retorno a la página...
- Page 58 CONTROL A TRAVÉS DE AERSUITE La aplicación AerSuite permite controlar a distancia la interfaz de usuario DI24, con termostatosVMF-E19/VMF-E19I a través de dispositivos inteligentes con sistemas operativos iOS y Android. Es una aplicación para Smartphones y Tabletas con la que el usuario podrá acceder y gestionar remotamente el funcionamiento de su instalación.
- Page 59 DATI DIMENSIONALI DI24CP • DIMENSIONS DI24CP • DIMENSIONS DI24CP • ABMESSUNGEN DI24CP [MM]: POSIZIONAMENTO • POSITIONING • POSITIONNEMENT • POSITIONIERUNG • POSICIONAMIENTO [M]:...
- Page 60 “FOR PLASTERBOARD” BOX WITH 3 MODULES” ROUND BOX WITH 2 MODULES ALTO•UP ALTO•UP DI24 è compatibile con le scatole da in- DI24 is compatible with flush and wall DI24 est compatible avec les boîtiers DI24 ist mit Unterputzdosen und Auf-...
- Page 64 AERMEC S.p.A. si riserva la facoltà di apportare in qualsiasi momento tutte le modifiche ritenute necessarie per il miglioramento del prodotto. Les données mentionnées dans ce manuel ne constituent aucun engagement de notre part. Aermec S.p.A. se réserve le droit de modifier à tous moments les don- nées considérées nécessaires à...
Need help?
Do you have a question about the DI24 and is the answer not in the manual?
Questions and answers