Advertisement
Quick Links
Advertisement

Subscribe to Our Youtube Channel
Related Manuals for Article NERA 3 Drawer Chest


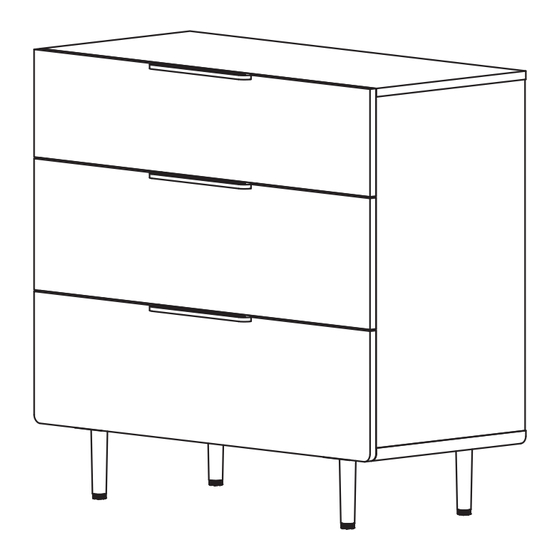
Summary of Contents for Article NERA 3 Drawer Chest
- Page 1 VERSION 1.0 Assembly Instructions NERA 3 Drawer Chest...
- Page 2 DIFFICULTY surface such as a carpet to prevent scratches. If you’re having difficulty, our friendly Customer Care team is always here to help. Call us at 1.888.746.3455 during business hours, email service@article.com or chat live at article.com. ANTI-TIP Installation Required...
- Page 3 Page 3 of 3 NERA 3 Drawer Chest ×12 Adjust levelers as needed.
-
Page 4: Adjustment Instructions
Structural integrity is warranted only if all alware here to help. Call us at 1.888.746.3455 during business fasteners are properly installed and tightened, hours, email service@article.com or chat live at article.com. and the drawer is moved only per instruction. FIXED A CROOKED DRAWER ×2... - Page 5 NERA 3 Drawer Chest Soft Closing Drawers Adjustment Page 2 of 3 REMOVE DRAWER ×2...
- Page 6 NERA 3 Drawer Chest Soft Closing Drawers Adjustment Page 3 of 3 INSTALL DRAWER ×2 ×2...
- Page 7 NERA 3 Drawer Chest NERA 3 Drawer Chest Page 1 of 3 Page 1 of 3 Anti-Tip Installation Anti-Tip Installation 1010 Raymur Ave. 1010 Raymur Ave. Vancouver, BC V6A 3T2 Vancouver, BC V6A 3T2 ANTI-TIP RESTRAINT INSTALLATION ANTI-TIP RESTRAINT INSTALLATION...
- Page 8 NERA 3 Drawer Chest Page 2 of 3 Anti-Tip Installation × 2 × 2 Drill holes in wall using 8mm / 5/16" drill bit.
- Page 9 NERA 3 Drawer Chest Page 3 of 3 Anti-Tip Installation ×4 Insert back drawer to the angle bracket (A). Make sure to take out drawers as shown to secure angle bracket (A) with screws (E).
- Page 10 ANTI-TIP Page 1 of 3 Interlock Installation 1010 Raymur Ave. Vancouver, BC V6A 3T2 ANTI-TIP INTERLOCK INSTALLATION WARNING! Children have died from furniture tipover. To reduce the risk of furniture tipover: • ALWAYS install anti-tip device provided. • NEVER put a TV on this product. NOTE: This product has an anti-tip •...
- Page 11 ANTI-TIP Page 2 of 3 Interlock Installation If any interlock at any drawers are disengaged - It means the drawers can’t be closed properly. Take the disengaged drawer out. (Please refer to the main assembly instruction above.)
- Page 12 ANTI-TIP Page 3 of 3 Interlock Installation Open the peg of the interlock to the position shown above. Put the drawer back into position. If more than 1 drawers are disengaged, simply repeat the above steps until all drawers are in place.
Need help?
Do you have a question about the NERA 3 Drawer Chest and is the answer not in the manual?
Questions and answers