Table of Contents
Advertisement
Quick Links
Advertisement
Table of Contents

Related Manuals for Janome 725


Summary of Contents for Janome 725
- Page 1 Instruction Book Model 725 Needle Punching Machine...
- Page 2 IMPORTANT SAFETY INSTRUCTIONS This machine is designed and manufactured for HOUSEHOLD use only. This machine is not a toy. Do not allow children to play with this machine. This machine is not intended for use by children or mentally infirm persons without proper supervision. When using this machine, basic safety precautions should always followed, including the following: Read all instructions before using this machine.
-
Page 3: Table Of Contents
TABLE OF CONTENTS SECTION 1. OPERATING INSTRUCTIONS Names of Parts ..........................Extension Table ..........................Standard Accessories ........................Connecting to the Power Supply ....................... Controlling the Punching Speed ......................Adjusting the Presser Foot Height ..................... Replacing the Needle Unit ......................... SECTION 2. PUNCHING EMBROIDERY Carded Fiber Punching ........................ -
Page 4: Section 1. Operating Instructions
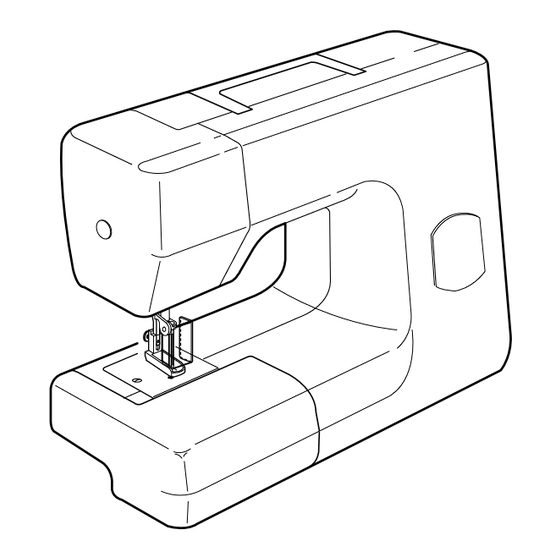
SECTION 1. OPERATING INSTRUC- TIONS Names of Parts Face plate Carrying handle Extension table (accessory storage) Needle plate Presser foot Thumbscrew Finger/eye guard Needle clamp Needle unit Needle clamp screw Needle hole Handwheel Presser foot lifter Machine socket Power switch... -
Page 5: Extension Table
Extension Table The extension table provides an extra surface for handling large fabrics. To detach: Pull the extension table to the left away from the machine. To attach: Slide the table onto the machine, inserting the pin and tab into the holes. Push the table to snap it in place. q Pin w Tab e Holes... -
Page 6: Connecting To The Power Supply
Do not modify the plug in any way. Foot control model YC-482J or TJC-150 is for use with Punching machine model 725. Controlling the Punching Speed The punching speed can be varied with the foot control. The harder you press the control, the faster the... -
Page 7: Adjusting The Presser Foot Height
WARNING– To reduce the risk of injury: Be sure to turn the power switch off and unplug the machine before adjusting the presser foot height or changing the needle. Adjusting the Presser Foot Height The height of the presser foot should be adjusted depending on the thickness of materials being punched. -
Page 8: Section 2. Punching Embroidery
SECTION 2. PUNCHING EMBROIDERY Carded Fiber Punching 1 Draw a design pattern with tailor’s chalk on the right side of the base fabric. NOTES: Felt or firm woven fabrics such as denim and tweed are recommended for the base fabrics. Avoid using soft, fine fabrics as they tend to be punched into a hole. -
Page 9: Yarn Punching
Yarn Punching 1 Draw a design pattern with tailor’s chalk on the right side of the base fabric. NOTES: Felt or firm woven fabrics such as denim and tweed are recommended for the base fabrics. Avoid using soft, fine fabrics as they tend to be punched into a hole. -
Page 10: Reverse Punching
Reverse Punching This technique applies a piece of fabric or carded fiber to the wrong side of a base fabric. The design will show through on the right side of the base fabric. 1 Draw a mirror image of the design pattern with a tailor’s chalk on the wrong side of the base fabric. -
Page 11: Section 3. Care And Maintenance
SECTION 3. CARE AND MAINTENANCE Cleaning the Machine WARNING– To reduce the risk of injury: Turn the power switch OFF and unplug the machine when performing any cleaning or maintenance. Remove the extension table and open the bed cover. q Bed cover Remove any lint and dust accumulated inside the cover. -
Page 12: Replacing The Light Bulb
Replacing the Light Bulb WARNING– To reduce the risk of burn: Turn the power switch OFF and unplug the machine before replacing the light bulb. The bulb could be HOT. Protect your fingers when handling it. Do not dismantle the machine other than explained in this section. - Page 13 725-800-XXX (E) Printed in Thailand...
Need help?
Do you have a question about the 725 and is the answer not in the manual?
Questions and answers