Advertisement
Quick Links
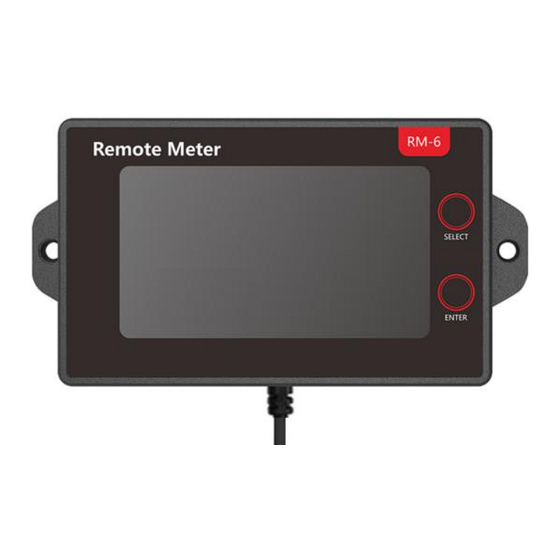
1. Product Features
◆ LCD graphical main menu, for real-time monitoring of real-time data and operating status of
the controller.
◆ Two-button design for menu viewing and parameters setting, easy to operate.
◆ No external power supply is required, and the LCD unit can be powered by connecting it to the
controller via a communication cable.
◆ Embedded installation.
◆ Industrial grade design, allowing for use in a variety of harsh environments.
2. Appearance
3. Installation Dimensions
Product dimensions: 104.5*55.5*11.8mm
Installation dimensions: 96*φ3.5mm
4. Technical Parameters
Items
Model
Applicable models of
controller
Input voltage
Parameter values
RM-6
MC2420N10/MC2430N10/MC2440N10/MC2450N10
5V-12V
Advertisement

Subscribe to Our Youtube Channel
Related Manuals for BougeRV 40A MPPT - 48V


Summary of Contents for BougeRV 40A MPPT - 48V
- Page 1 1. Product Features ◆ LCD graphical main menu, for real-time monitoring of real-time data and operating status of the controller. ◆ Two-button design for menu viewing and parameters setting, easy to operate. ◆ No external power supply is required, and the LCD unit can be powered by connecting it to the controller via a communication cable.
-
Page 2: Button Operations
Standby power consumption < 0.03W Operating power < 0.04W consumption Fixed baud rate 9600bps Communication mode Interface type PH2.0 Connection cable length 1.5M Operating temperature -35℃ ~ +65℃ IP rating IP32 Weight Altitude ≤ 3000M Dimensions 104.5*55.5*11.8mm 5. Button Operations Buttons Functions SELECT... -
Page 3: System Parameter Settings
7. System Parameter Settings 1) Methods In any menu, press and hold “ENTER” to enter the “Parameter Settings” menu: Press the “ENTER” button to adjust parameter value; Press the “SELECT” button to switch between different setting items; Press and hold the “ENTER” button for 2 seconds to save what has been set and exit setting mode; Select the "FLD/GEL/SLD/LI"... - Page 4 BOOST Boost charge voltage (USE) 9.0~17.0V Floating charge voltage FLOAT 9.0~17.0V (USE) Low voltage disconnection 9.0~17.0V recovery voltage(USE) Low voltage disconnection 9.0~17.0V voltage(USE) Battery type System voltage Equalizing charge voltage(USE) Boost charge voltage(USE) Over discharge voltage(USE) Over discharge return voltage (USE) Floating charge voltage(USE) 9.
- Page 5 Battery of 12V or 24V normal voltage is Check if it is set to the corresponding system voltage, or set to connected, battery icon on the LCD flashes automatic identification and restart the controller slowly, and the code E1 is displayed. Battery icon indicator flashes quickly and the battery is not being charged.
Need help?
Do you have a question about the 40A MPPT - 48V and is the answer not in the manual?
Questions and answers