Table of Contents
Advertisement
Available languages
Available languages
Advertisement
Chapters
Table of Contents

Related Manuals for auronic AU3265


Summary of Contents for auronic AU3265
- Page 1 LIDAR ROBOTSTOFZUIGER MET STOFOPVANGSTATION NL/BE – Handleiding - LiDAR Robotstofzuiger met stofopvangstation EN – User manual - LiDAR Robot vacuum cleaner with dust collection station FR/BE – Manuel d’utilisation - LiDAR Robot aspirateur avec station de dépoussiérage AU3265 / AU3267...
- Page 2 Index NL/BE – Handleiding EN – User manual FR/BE – Manuel d’utilisation...
- Page 3 Service en garantie Indien je service of informatie nodig hebt omtrent je product, neem dan contact op met onze klantenservice via service@auronic.nl. Wij verlenen 2 jaar garantie op onze producten. De klant dient een aankoopbewijs te kunnen tonen wanneer er beroep wordt gedaan op de garantie. Productdefecten moeten binnen 2 jaar na aankoopdatum worden gemeld bij ons.
-
Page 4: Table Of Contents
INHOUDSOPGAVE 1. Introductie 1.1 Beoogd gebruik 1.2 Productoverzicht 1.3 Productspecificaties 1.4 Overige eigenschappen 1.5 Inhoud verpakking 1.6 Bijgevoegde accessoires 2. Veiligheid 2.1 Algemeen 2.2 Personen 2.3 Gebruik 2.4 Elektra 2.5 Accu 3. Instructies voor gebruik 3.1 Opladen 3.2 Schoonmaakzone inrichten 3.3 Verbinding maken met het Wi-Fi-netwerk 3.4 Verbinding maken met de app hotspot 3.5 Het waterreservoir en de dweil gebruiken/demonteren... -
Page 5: Introductie
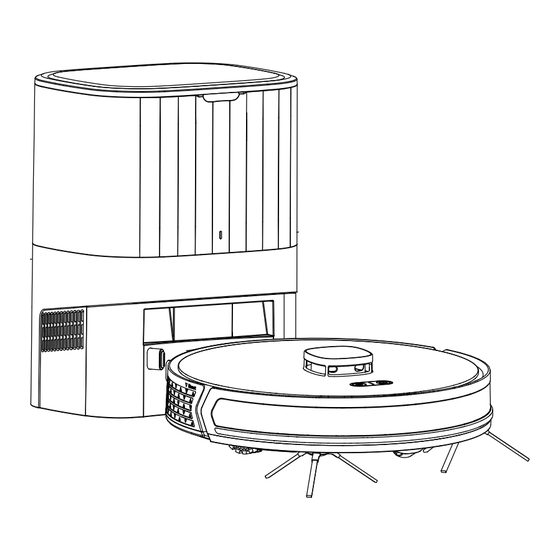
Nederlands 1. INTRODUCTIE Bedankt dat je hebt gekozen voor een Auronic product! Volg altijd de veiligheidsvoorschriften voor veilig gebruik. 1.1 Beoogd gebruik Dit product is ontworpen voor het opzuigen van los, droog vuil zoals stof, pluizen of kruimels op gladde oppervlakken en tapijt. Daarnaast heeft het een dweilfunctie, uitsluitend voor gebruik op harde vloeren. - Page 6 1.2.5 Vooraanzicht stofopvang- en oplaadstation 1.2.4 Robot 1.2.6 Onderaanzicht stofopvang- en oplaadstation 1.2.7 Bovenaanzicht stofopvang- en oplaadstation Robot 2. Stopfopvang- en oplaadstation 3. Dweilhouder 21. Oplaadklem 4. Dweil 22. Zijborstel 5. Stofopvangbak (stofopvangstation) 23. Klifsensor (Klifdetectie op 9 cm) 6. Zijborstel 24.
-
Page 7: Productspecificaties
34,5 x 34,5 x 9,7 cm Afmeting stofopvang- en 26 x 21 x 34,7 cm oplaadstation Gewicht robot 3 kg Gewicht stofopvang- en oplaadstation 3,7 kg Kleur AU3265: Zwart AU3267: Wit Materiaal Snoerlengte 1,2 m Veiligheidsklasse Adapter: 2 Oplaadstation/robot: 3 Soort stekker/adapter Spanning robot 19V 1.0A... - Page 8 SmartLife Mobiele app-bediening Y-vormig dweilen. Afstandsbediening. Realtime reinigingsstatus/-zone. Virtuele muur/verboden zone. Schoonmaakzone. Bluetooth versie Bluetooth naam Auronic Sensor/laser LDS-sensor (laserafstandsmeting) Hall-sensor (detectie van waterreservoir en dweilen) Klif-/Antivalsensor (infrarood) Wanddetectiesensor (laser) LiDAR (brengt de ruimte in kaart) Laserklasse 940nm laser (voldoet aan IEC 60825 Klasse I) Zuigdruk 4000 Pa / 0.58 psi...
-
Page 9: Overige Eigenschappen
Nederlands Schoonmaakstand Normaal Y-reiniging Randreiniging Spotreiniging (in een oplopende cirkel naar buiten) Vierkantreiniging (in een groter vierkant naar buiten) Filter HEPA H11 Reinigingsmodus Stofafzuiging + Nat-dweilfunctie Intelligente prestaties Functie voor automatisch opladen als de batterij bijna leeg is. Op tapijt automatisch de zuigkracht aanpassen. Gesproken aanwijzingen. -
Page 10: Bijgevoegde Accessoires
Bewaar de beschadigde onderdelen en verpakking om je klacht te onderbouwen. Auronic LiDAR Robotstofzuiger met stofopvangstation - Zwart - Model AU3265 - EAN 8721055560357 Auronic LiDAR Robotstofzuiger met stofopvangstation – Wit - Model AU3267 - EAN 8721055560388 1.6 Bijgevoegde accessoires... -
Page 11: Personen
Nederlands Gebruik geen accessoires die niet aangeboden worden door de leverancier. Deze kunnen • een gevaar vormen voor de gebruiker en het product beschadigen. Gebruik het product alleen voor de doeleinden aangegeven in deze handleiding. • Haal het product niet uit elkaar, repareer en herstel het product niet. Dit kan schade aan het •... -
Page 12: Gebruik
verantwoordelijk is voor de veiligheid van de gebruiker. Laat niemand op het product staan, om persoonlijk letsel en schade aan het product te • voorkomen. Houd baby’s, kinderen en huisdieren uit de buurt wanneer het product in werking is. • 2.3 Gebruik Gebruik het product niet in de buurt van een bad, een douche, een zwembad, of bij een •... -
Page 13: Elektra
Nederlands functioneren. Zet niks op het product. • Plaats het product en het oplaadstation altijd op een effen, stabiel en niet ontvlambaar • oppervlak. Het product zal niet correct werken op donkere kleuren hoogpolig tapijt. Donker gekleurd • hoogpolig tapijt zorgt ervoor dat de sensoren van het product niet correct kunnen werken. Bewaar of gebruik het product niet op plaatsen (tafels, meubels, leuningen, trappen, stoelen, •... -
Page 14: Accu
Verplaats het product niet als het aan staat. Zet het product altijd uit voordat je hem • verplaatst of schoonmaakt. Gebruik alleen de adapter en/of accessoires die door de leverancier geleverd worden om • oververhitting, explosies, elektrische schokken, brand, andere schade en persoonlijk letsel te voorkomen. -
Page 15: Instructies Voor Gebruik
Nederlands 3. INSTRUCTIES VOOR GEBRUIK 3.1 Opladen Onderstaande instructies zijn van toepassing als je de robot wil bedienen met de bedieningsknoppen op de robot. Je kunt de robot ook bedienen via de app. Bekijk hiervoor de instructies bij 3.9. LET OP! ◊... -
Page 16: Schoonmaakzone Inrichten
Opmerking ◊ Als de locatie van het oplaadstation verandert, is het mogelijk dat de robot de eerder opgeslagen route niet meer terugvinden. ◊ Wanneer het schoonmaken voltooid is of het resterende acculading lager is dan 20%, zal de robot automatisch naar het oplaadstation gaan en start het opladen automatisch. ◊... -
Page 17: Verbinding Maken Met Het Wi-Fi-Netwerk
Nederlands 3.3 Verbinding maken met het Wi-Fi-netwerk 6. Houd minimaal 3 seconden ingedrukt. Je hoort een “ding dong”-geluid en de robot geeft een stemmelding “Verbinding maken met netwerk”. 8. Het groene lampje van knippert langzaam. 9. De robot maakt verbinding met het netwerk. 10. -
Page 18: Zijborstels Installeren
Open de rubberen stop van het waterreservoir, vul het waterreservoir met water en monteer vervolgens de rubberen stop op de juiste plek. 2. Bevestig de dweil met de klittenbandsluiting aan de dweilhouder. Bevestig de dweilhouder aan de onderkant van het waterreservoir/de stofopvangbak. 3. -
Page 19: Uitschakelen/Stoppen Met Schoonmaken
Nederlands 3.8 Uitschakelen/Stoppen met schoonmaken Onderstaande instructies zijn van toepassing als je de robot wil bedienen met de bedieningsknoppen op de robot. Je kunt de robot ook bedienen via de app. Bekijk hiervoor de instructies bij 3.9. Stoppen met schoonmaken: Druk op deze knop om het schoonmaken te pauzeren tijdens •... - Page 20 6. Tik in de “Smart Life” app op “+” en dan op “Add Device” in de keuzelijst. De app zal op zoek gaan naar de robot en deze tonen zodra het beschikbaar is. Tik dan op “Add” om de robot toe te voegen aan de app. Je kunt de robot ook verbinden via een •...
- Page 21 Nederlands 3.9.1 Geplande schoonmaak instellen Je kunt een schoonmaaktijd inplannen zodat de robot automatisch op het opgegeven tijdstip begint met schoonmaken. Na het schoonmaken gaat de robot naar het oplaadstation om op te laden. Tik op “Settings > Schedule > Add”. 2.
- Page 22 Tik op “Slim > Selected zone cleaning > Confirm” om een specifieke zone schoon te maken. 2. Tik op de gewenste zone in de kaart. De geselecteerde zone zal oplichten. Je kunt meerdere zones selecteren op de kaart. 3. Tik op om een nieuw schoonmaakproces te starten.
- Page 23 Nederlands Tik op om de zone te wissen. • Houd ingedrukt om de zone te draaien. • Houd ingedrukt om de zone te vergroten/verkleinen. • 3. Tik op “Save” om de kaart op te slaan. 3.9.6 Dweilen in een Y-patroon Je kunt instellen dat de robot in een Y-patroon gaat dweilen.
- Page 24 3.9.9 Niet storen-modus Wanneer je de “Niet storen”-modus activeert, zal de robot niet automatisch schoonmaken of stembegeleiding afspelen. Je kunt de app gebruiken om de modus in of uit te schakelen. Tik op “Settings > Switch disturb”. 2. Tik op de knop bij “Do not disturb switch” om het te activeren.
- Page 25 Nederlands 3.9.12 Robot zoeken Soms kan het voorkomen dat je de robot niet kunt vinden omdat deze bijvoorbeeld onder een tafel of bank stil is blijven staan. Je kunt de robot dan via de app oproepen zodat je weet waar je moet zoeken. Tik op “Settings >...
- Page 26 3.9.15 Maateenheid instellen Je kunt in de app de gewenste maateenheid instellen. Je hebt keuze uit “m2” en “ft2”. Tik op “Settings > Unit”. Tik de gewenste maateenheid aan. 2. De gekozen maateenheid wordt automatisch opgeslagen bij het aantikken. Bij de gekozen maateenheid staat een blauw vinkje.
-
Page 27: Indicatielichten
Nederlands 3.9.18 Status en accu lading In de app wordt linksboven weergegeven wat de huidige status en accu lading van de robot is. 3.9.19 Robot terugsturen naar het oplaadstation Je kunt in de app de robot de opdracht geven om terug te keren naar het oplaadstation. -
Page 28: Probleemoplossing
WiFi verbinding Groen lampje brandt continu verbonden Aan het verbinden Groen lampje knippert met WiFi * Als er sprake is van een storing, brandt continu rood en wordt er een stemmelding gegeven. Verplaats op dat moment de positie van de robot, schakel de robot uit en start het opnieuw op. 3.10.2 Stofopvang- en oplaadstation Status Indicatielicht... - Page 29 Nederlands Gebruik de originele meegeleverde De robot laadt niet op. De gebruikte adapter is niet het mee- adapter. geleverde model. Controleer of de stekker van het De robot maakt slecht contact met de oplaadstation goed in het stopcon- oplaadklemmen wanneer deze op het tact zit.
- Page 30 Het wordt aanbevolen om de robot te De robot kan één of meerdere zones De vloer is pas gewaxt en/of gepolijst. gebruiken nadat de vloerwas droog is. niet schoonmaken. Dit vermindert de wrijving tussen het aandrijfwiel en de grond. Er wordt aangeraden om de woonom- Vanwege de verschillende thuisom- geving zo in te richten dat de robot op gevingen kan de robot in sommige...
- Page 31 Nederlands Laad de robot op of zet de robot aan. De robot werkt niet naar behoren. De accu is op of de robot staat uit. Gebruik een zachte doek om de afdek- Er zit een voorwerp in de sensor. king van de sensor schoon te maken. Er zit vuil op de sensor.
-
Page 32: Stemmeldingen
4.2 Stemmeldingen Als de robot in storing is, knippert rood of blijft deze continu branden en klinkt er een stemmelding. Volg de instructies op die in de stemmelding worden gegeven om de storing op te lossen. Als de bovenstaande methode het probleem niet oplost, probeer dan het volgende: Druk de resetknop in met een naald. -
Page 33: De Stofbuis Reinigen
Nederlands 5.2 De stofbuis reinigen Als het indicatielampje van het oplaadstation continu rood brandt, is het raadzaam de stofbuis te reinigen. Verwijder de stekker van het stofopvangstation uit het stopcontact. 2. Keer het stofopvangstation om en controleer of de stofbuis geblokkeerd is door vreemde voorwerpen. 3. -
Page 34: Het Waterreservoir/De Stofopvangbak En De Filters Reinigen
5.5 Het waterreservoir/de stofopvangbak en de filters reinigen Druk op de knop in het midden van het waterreservoir/de stofopvangbak en trek deze horizontaal uit de robot. 2. Open het waterreservoir/de stofopvangbak. 3. Open het waterreservoir/de stofopvangbak en leeg deze boven een prullenbak. 4. -
Page 35: De Hoofdborstel Reinigen
Nederlands 5.6 De hoofdborstel reinigen Zie 1.2 Productoverzicht voor de aanduidingen. Open het deksel van de hoofdborstel aan de onderkant van de robot. 2. Verwijder de hoofdborstel uit de robot. 3. Als er stof, haren of vuil op de zuigpoort of de hoofdborstel zitten, gebruik dan de reinigingskam om het te verwijderen. -
Page 36: Het Universele Zwenkwiel Reinigen
De zijborstel is een gebruiksvoorwerp. Vervang deze elke 3-6 maanden om het reinigende effect te garanderen. 5.8 Het universele zwenkwiel reinigen Wrik het universele zwenkwiel aan de onderkant van de robot voorzichtig met een schroevendraaier eruit. 2. Haal het universele zwenkwiel eruit en verwijder stof, haar en vuil. Je kunt de reinigingskam gebruiken om het te verwijderen. -
Page 37: De Oplaadklemmen Op De Robot Reinigen
Nederlands 5.10 De oplaadklemmen op de robot reinigen Veeg voorzichtig de oplaadklemmen en de behuizing schoon met een wattenstaafje of een zachte doek. 5.11 Onderhouden Door de robot tijdig en correct te onderhouden blijft de robot naar behoren functioneren. Slecht of niet tijdig onderhoud kan de levensduur van de robot verkorten. -
Page 38: Weggooien En Recyclen
7. WEGGOOIEN EN RECYCLEN Denk aan het milieu en lever een bijdrage aan een schonere leefomgeving! Je kunt bij je gemeente terecht voor alle informatie over de mogelijkheden voor het afvoeren van afgedankte producten. 7.1 Afvoeren Gooi het product aan het einde van zijn levensduur niet weg met het normale huisvuil, maar lever hem in op een door de overheid aangewezen inzamelpunt om het te laten recyclen. -
Page 39: Symbolen
Nederlands 3. Verwijder de accu en plaats het accudeksel. 4. Breng de accu naar een professioneel recyclingbedrijf. 8. SYMBOLEN In deze handleiding, op de verpakking en op het product worden de volgende waarschuwingen en symbolen gebruikt (indien van toepassing). Symbool Omschrijving Volg de instructies op in de handleiding en bewaar deze voor de toekomst. -
Page 40: Ce-Conformiteitsverklaring
Pas op: breekbaar. Veiligheidsklasse 3 stekker. Waarschuwing! Gevaar door elektriciteit, risico op elektrische schokken! 9. CE-CONFORMITEITSVERKLARING Dit product voldoet aan alle eisen en voorschriften conform 2014/35/EU, de richtlijn 2014/30/EU en de richtlijn 2009/125/EC. De volledige EU-conformiteitsverklaring is verkrijgbaar bij de leverancier. 10. - Page 41 Service and warranty If you need service or information regarding your product, please contact our customer service at service@auronic.nl. We provide a 2-year warranty on our products. Customer must be able to show proof of purchase when claiming warranty. Product defects must be reported to us within 2 years from the date of purchase.
- Page 42 TABLE OF CONTENTS 1. Introduction 1.1 Intended use 1.2 Product overview 1.3 Product specifications 1.4 Other features 1.5 Contents of package 1.6 Included accessories 2. Safety 2.1 General 2.2 People 2.3 Use 2.4 Electrical 2.5 Battery 3. Instructions for use 3.1 Charging 3.2 Setting up the cleaning zone 3.3 Connecting to the Wi-Fi network...
-
Page 43: Introduction
English 1. INTRODUCTION Thank you for choosing a Auronic product! Please always follow the instructions for safe usage. 1.1 Intended use This product is designed for vacuuming loose, dry dirt such as dust, lint or crumbs on smooth surfaces and carpets. In addition, it has a mopping function exclusively for use on hard floors. - Page 44 1.2.5 Front view of dust collection and charging station 1.2.6 Bottom view of dust collection and charging station 1.2.7 Top view of dust collection and Robot charging station 2. Plug collection and charging station 3. Mop holder 4. Mop 5. Dust collection tray 21.
-
Page 45: Product Specifications
26 x 21 x 34.7 cm charging station Weight of robot 3 kg Weight of dust collection and charging 3.7 kg station Color AU3265: Black AU3267: White Material Cord length 1.2 m Safety class Adapter: 2 Charging station/robot: 3 Type of plug/adapter Robot voltage 19V 1.0A... - Page 46 Y-shaped mop. Remote control. Real-time cleaning status/zone. Virtual wall/banned zone. Cleaning zone. Bluetooth version Bluetooth name Auronic Sensor/Laser LDS sensor (laser distance measurement) Hall sensor (water tank and mop detection) Cliff sensor (infrared) Wall detection sensor (laser) LiDAR (mapping space)
-
Page 47: Other Features
English Cleaning mode Normal Y-cleaning Edge cleaning Spot cleaning (in an ascending circle to the outside) Square cleaning (in a larger square outward) Filter HEPA H11 Cleaning mode Dust extraction + Wet mopping function Intelligent performance Automatic charging function when the battery is low. On carpet, automatically adjust suction power. -
Page 48: Included Accessories
Auronic LiDAR Robot vacuum cleaner with dust collection station - Black - Model AU3265 - EAN 8721055560357 Auronic LiDAR Robot vacuum cleaner with dust collection station - White - Model AU3267 - EAN 8721055560388 1.6 Included accessories 1x User manual •... -
Page 49: People
English Use the product only for the purposes indicated in this user manual. • Do not disassemble, repair or restore the product. Doing so may cause damage to the • product. For your own safety, these parts should only be replaced by authorized service personnel. -
Page 50: Use
2.3 Use Do not use the product near a bathtub, shower, swimming pool, or near a (laundry) tub • filled with water. Do not touch the product and power cord with wet hands. Do not allow the product to come into contact with water. Do not immerse the product in water. If water does get in or on the product, turn the product off immediately and contact our customer service department. -
Page 51: Electrical
English Do not use the product on an inclined surface. • Make sure the 2-in-1 water tank/dust storage is empty before using the product. • Do not use the product in an area where people or pets are sleeping or lying down. •... -
Page 52: Battery
otherwise the product will not charge correctly. Do not press the charging terminals with your hands; never use loaded objects to contact • the charging terminals, this may cause injury. 2.5 Battery If the battery leaks, avoid contact with skin, eyes, open skin or wounds. Wear gloves. In case •... - Page 53 English 2. Place the robot 1 meter in front of the charging station. 3. Press and hold for 3 seconds to turn on the robot. 4. Press to start automatic charging. The robot gives a voice notification “Return to charging station”. 5.
-
Page 54: Setting Up The Cleaning Zone
3.2 Setting up the cleaning zone Ensure that the cleaning area is set up according to the following guidelines before use. -�- Power cord(s) and other items lying on the Roll up the fringes of the carpet or make sure ground can entangle the robot. -
Page 55: Using/Dismantling The Water Tank And Mop
English Note ◊ Make sure the WiFi is set to 2.4GHz before the robot connects to the app. The robot cannot connect to a 5G network. ◊ There is a reset switch on the side of the robot. Press it with a needle in case of a malfunction. -
Page 56: Installing The Side Brushes
3.6 Installing the side brushes Push the two side brushes one at a time into the designated spot on the bottom of the robot. When you hear a “click”, the side brush is correctly installed. 3.7 Turn on/Clean/Pause The instructions below apply if you want to operate the robot using the control buttons on the robot. - Page 57 English 3. Install the “Smart Life” app and create an account. 4. Press and hold on the robot for 6 seconds to turn on the robot. 5. Press and hold on the robot for at least 4 seconds until the robot gives a voice prompt “Start app connection mode”.
- Page 58 11. Click on “Robot Vacuum Cleaner” to open the interface as shown here. 12. To remove the robot from the app, hold down the device name and click “Remove Device”. 3.9.1 Set scheduled cleaning You can schedule a cleaning time so that the robot automatically starts cleaning at the specified time.
- Page 59 English 3.9.2 Setting up automatic cleaning After startup, the robot will pause to map the area and position itself. It starts by scanning the area by passing by the corners. It then plans the cleaning zone in an S pattern. The robot automatically creates a cleaning zone allowing it to clean efficiently and automatically returns to the charging station to recharge after cleaning.
- Page 60 3.9.5 Setting virtual wall/forbidden zone You can set one or more zones not to be cleaned. The robot will not clean the set zone(s) and will only clean other zones. Tap “Map Edit > Restricted Areaedit > +” to add a zone to be avoided by the robot during the cleaning process.
- Page 61 English 3.9.8 Volume of voice notifications You can adjust the volume and language of voice notifications in the app to your liking. Tap “Settings > Voice and volume”. 2. At “Volume Setting” set the volume by moving the slider. 3. At “Voice Data”, select the desired language by tapping “Use”...
- Page 62 3.9.11 Status of the components You can view the status of the robot’s individual components such as the filter, side brushes, main brush and mop in the app. Tap “Settings > Consumables management”. 2. View the status for each component. 3.
- Page 63 English If you turn this feature on, after fully charging, the robot will return to the last point where it left off cleaning, and continue. If you turn this feature off, the robot will start cleaning again after fully charging. Tap “Settings >...
- Page 64 3. At “Hechting” you can set the suction by tapping the desired position: Closed: no suction • Eco: low suction/economic mode (low battery consumption) • Normal: normal suction power • Strong: high suction power • 4. Tap “Confirm” to save your choices. 3.9.18 Status and battery charge The app displays the current status and battery charge of the robot in the upper left corner.
-
Page 65: Indicator Lights
English 3.10 Indicator lights 3.10.1 Robot Status On/Off button Charging button Standby Green light continuously on Charging Red light flashing Pause Green light continuously on Operating Green light continuously on Battery (almost) empty Red light continuously on Fault Red light blinks Enabled Green light blinks Disabled... -
Page 66: Troubleshooting
4. TROUBLESHOOTING 4.1 General faults If the following problems occur during operation of the robot, refer to the table below to find a solution. If the problems cannot be solved using these options, contact our customer service. Solution Problem Cause Configure your network and make sure The robot cannot connect to the app. - Page 67 English Use the original adapter provided. The robot is not charging. The adapter used is not the model provided. Check that the charging station is The robot makes poor contact with the properly plugged in. Check if the charging terminals when placed on charging station and the robot are dirty the charging station.
- Page 68 It is recommended to use the robot The robot cannot clean one or more The floor has been freshly waxed after the floor wax is dry. areas. and/or polished. This reduces friction between the drive wheel and the ground. It is recommended to set up the living Due to different home environments, area to allow the robot to work on the the robot cannot clean in some areas.
- Page 69 English Charge or turn on the robot. The robot is not working properly. The battery is depleted or the robot is off. Use a soft cloth to clean the sensor There is an object in the sensor. There cover. is dirt on the sensor. Make sure the mop does not cover the The mop sensor is blocked or not sensor.
-
Page 70: Voice Notifications
4.2 Voice notifications If the robot is malfunctioning, red flashes or stays on continuously and a voice notification sounds. Follow the instructions given in the voice notification to resolve the fault. If the above method does not resolve the problem, try the following: Press the reset button with a needle. -
Page 71: Cleaning The Dust Tube
English 5.2 Cleaning the dust tube If the indicator light of the charging station is continuously red, it is recommended to clean the dust tube. Unplug the dust collection station from the power outlet. 2. Turn the dust collection station over and check if the dust tube is blocked by foreign objects. -
Page 72: Cleaning The Water Tank/Dust Collector And Filters
5.5 Cleaning the water tank/dust collector and filters Press the button in the center of the water tank/dust collector and pull it horizontally out of the robot. 2. Open the water tank/dust collector. 3. Open the water tank/dust collector and empty it over a trash can. 4. -
Page 73: Cleaning The Main Brush
English 5.6 Cleaning the main brush See 1.2 Product Overview for designations. Open the main brush cover at the bottom of the robot. 2. Remove the main brush from the robot. 3. If there is dust, hair or dirt on the suction port or main brush, use the cleaning comb to remove it. -
Page 74: Cleaning The Universal Caster
5.8 Cleaning the universal caster Carefully pry out the universal caster at the bottom of the robot with a screwdriver. 2. Take out the universal caster and remove dust, hair and dirt. You can use the cleaning comb to remove it. Wipe it with a clean cloth. 3. -
Page 75: Cleaning The Charging Terminals On The Robot
English 5.10 Cleaning the charging terminals on the robot Gently wipe the charging terminals and housing with a cotton swab or soft cloth. 5.11 Maintenance Timely and proper maintenance will keep the robot functioning properly. Poor or untimely maintenance can shorten the life of the robot. The surface of the cliff/antenna sensor and charging station must be clean to work •... -
Page 76: Electric Appliance
7.1 Disposal At the end of its life, do not dispose of the product with normal household waste, but hand it in at a government designated collection point for recycling. Dispose of the packaging and accessories in accordance with the environmental regulations in force in your local council. -
Page 77: Symbols
English 8. SYMBOLS The following warnings and symbols are used in this manual, on the packaging and on the product (where applicable). Symbol Description Follow the instructions in the user manual and keep it for future reference. A warning with this symbol indicates a potentially hazardous situation that could result in serious damage and/or fatal injury. -
Page 78: Ce Declaration Of Conformity
Safety class 3 plug. Warning! Electrical danger, risk of electric shock! 9. CE DECLARATION OF CONFORMITY This product complies with all requirements and regulations according to 2014/35/ EU, Directive 2014/30/EU and Directive 2009/125/EC. The complete EU Declaration of Conformity is available at the supplier. 10. - Page 79 Service et garantie Si vous avez besoin d’un service ou d’une information concernant votre produit, veuillez contacter notre service clientèle via service@auronic.nl. Nous offrons une garantie de 2 ans sur nos produits. Pour obtenir un service pendant la période de garantie, le produit doit être retourné avec une preuve d’achat. Les défauts du produit doivent être signalés dans un délai de deux ans à...
- Page 80 TABLE DES MATIÈRES 1. Introduction 1.1 Utilisation prévue 1.2 Description du produit 1.3 Spécifications du produit 1.4 Autres caractéristiques 1.5 Contenu de l’emballage 1.6 Accessoires inclus 2. Sécurité 2.1 Général 2.2 Personnes 2.3 Utilisation 2.4 Électricité 2.5 Batterie 3. Mode d’emploi 3.1 Chargement 3.2 Configuration de la zone de nettoyage 3.3 Connexion au réseau Wi-Fi...
-
Page 81: Introduction
Français 1. INTRODUCTION Merci d’avoir choisi un produit Auronic ! Suivez toujours les instructions pour garantir une utilisation en toute sécurité. 1.1 Utilisation prévue Ce produit est conçu pour aspirer les saletés sèches et non adhérentes telles que la poussière, les peluches ou les miettes sur les surfaces lisses et les tapis. - Page 82 1.2.5 Vue de face de la station de dépoussiérage et de chargement 1.2.4 Robot 1.2.6 Vue inférieure de la station de dépoussiérage et de chargement 1.2.7 Vue de dessus Robot de la station de 2. Station d’arrêt et de charge dépoussiérage 3.
-
Page 83: Spécifications Du Produit
Poids du robot 3 kg Poids de la station de dépoussiérage 3,7 kg et de chargement Couleur AU3265 : noir AU3267 : blanc Matériau Longueur du câble 1,2 m Classe de sécurité Adaptateur : 2 Station de recharge/robot : 3... - Page 84 Télécommande. État du nettoyage en temps réel/zone. Mur virtuel/zone interdite. Zone de nettoyage. Version Bluetooth Nom Bluetooth Auronic Capteur/Laser Capteur LDS (mesure de la distance par laser) Capteur Hall (détection de réservoir d’eau et de serpillière) Capteur Falaise/ Antichute (infrarouge) Capteur de détection de mur (laser)
-
Page 85: Autres Caractéristiques
Français Mode de nettoyage Normal Nettoyage en Y Nettoyage des bords Nettoyage par points (dans un cercle ascendant vers l’extérieur) Nettoyage de carrés (dans un grand carré vers l’extérieur) Filtre HEPA H11 Mode de nettoyage Dépoussiérage + fonction de balayage humide Performance intelligente Fonction de chargement automatique lorsque la batterie est faible. -
Page 86: Accessoires Inclus
Conservez les pièces endommagées et l’emballage pour étayer votre plainte. Auronic LiDAR Robot aspirateur avec station de dépoussiérage - Noir - Modèle AU3265 - EAN 8721055560357 Auronic LiDAR Robot aspirateur avec station de dépoussiérage - Blanc - Modèle AU3267 - EAN 8721055560388 1.6 Accessoires inclus... -
Page 87: Personnes
Français remplacez-les par des pièces et des accessoires d’origine ou recommandés par le fabricant. N’utilisez pas d’accessoires non proposés par le fournisseur. Ceux-ci peuvent présenter un • danger pour l’utilisateur et endommager le produit. N’utilisez le produit qu’aux fins indiquées dans le présent manuel. •... -
Page 88: Utilisation
Le produit ne doit pas être utilisé par des personnes souffrant d’un handicap physique ou • mental. L’utilisation du produit n’est autorisée qu’en présence d’un superviseur responsable de la sécurité de l’utilisateur. Pour éviter les blessures corporelles et les dommages au produit, ne laissez personne se •... -
Page 89: Électricité
Français inclut la poussière, le sable, la terre, les plantes et autres obstacles similaires. Le non-respect de cette consigne peut entraîner un risque d’incendie, des blessures ou des dommages au produit. Ne laissez pas tomber le produit et ne le soumettez pas à des chocs importants. •... -
Page 90: Batterie
Avant de brancher le produit, assurez-vous que la tension secteur indiquée sur la plaque • signalétique correspond à celle de votre réseau électrique. Veillez à ne pas trébucher sur le(s) câble(s) et à ce que le(s) câble(s) ne soit(nt) pas plié(s), •... -
Page 91: Mode D'emploi
Français N’exposez pas la batterie à des températures élevées ou à une chaleur excessive. • Ne chauffez pas la batterie et ne la placez pas à proximité d’une source de chaleur. • Ne chargez pas la batterie avec un autre type de chargeur que la station de charge fournie •... -
Page 92: Configuration De La Zone De Nettoyage
Remarque ◊ Si le robot ne peut pas être mis en marche et que la batterie est vide, il est nécessaire d’amener manuellement le robot à la station de charge pour le recharger. Pour s’assurer que la charge a démarré correctement, le robot doit émettre un signal vocal «Start charging»... -
Page 93: Connexion Au Réseau Wi-Fi
Français 3.3 Connexion au réseau Wi-Fi Appuyez sur la touche et maintenez-la enfoncée pendant au moins 3 secondes. 2. Vous entendez un «ding dong» et le robot émet un message vocal «Connexion au réseau». 3. Le voyant vert clignote lentement. 4. -
Page 94: Installation Des Brosses Latérales
Ouvrez le bouchon en caoutchouc du réservoir d’eau, remplissez le réservoir d’eau et remettez le bouchon en caoutchouc au bon endroit. 2. Fixez la serpillière au porte-serpillière à l’aide de la bande Velcro. Fixez le porte-serpillière au fond du réservoir d’eau/ du collecteur de poussière. -
Page 95: Arrêt/Arrêt Du Nettoyage
Français 3.8 Arrêt/arrêt du nettoyage Les instructions ci-dessous s’appliquent si vous souhaitez commander le robot à l’aide des boutons de commande situés sur le robot. Vous pouvez également contrôler le robot via l’application. Pour ce faire, reportez-vous aux instructions de la section 3.9. Arrêter le nettoyage : Appuyez sur ce bouton pour interrompre le nettoyage pendant le •... - Page 96 6. Dans l’application «Smart Life», appuyez sur «+» puis sur «Add Device» dans la liste déroulante. L’application recherche le robot et l’affiche dès qu’il est disponible. Appuyez ensuite sur «Add» pour ajouter le robot à l’application. Vous pouvez également connecter le robot •...
- Page 97 Français 3.9.1 Réglage du nettoyage programmé Vous pouvez programmer une heure de nettoyage afin que le robot commence automatiquement à nettoyer à l’heure spécifiée. Après le nettoyage, le robot se rend à la station de charge pour se recharger. Tapez sur “Settings > Schedule >Add”.
- Page 98 3.9.3 Nettoyage des zones sélectionnées Vous pouvez définir la portée et l’emplacement d’une zone spécifique à nettoyer. Le robot nettoie alors la zone définie. Tapez sur “Slim > Selected zone cleaning > Confirm” pour nettoyer une zone spécifique. 2. Touchez la zone souhaitée sur la carte. La zone sélectionnée s’allume.
- Page 99 Français 2. Définissez la zone en ajustant le bloc bleu : Appuyez sur pour effacer la zone. • Appuyez sur et maintenez-le enfoncé pour faire pivoter la zone. • Appuyez sur et maintenez-le enfoncé pour augmenter/diminuer la zone. • 3. Appuyez sur « Save « (Enregistrer) pour enregistrer la carte. 3.9.6 Balayage en Y Vous pouvez configurer le robot pour qu’il passe la serpillière en Y.
- Page 100 3.9.9 Mode «Ne pas déranger» Lorsque vous activez le mode «Ne pas déranger», le robot ne nettoie pas automatiquement et ne diffuse pas de guide vocal. Vous pouvez utiliser l’application pour activer ou désactiver le mode. Appuyez sur « Settings > Switch disturb « (Réglages > Ne pas déranger).
- Page 101 Français 3.9.12 Trouver le robot Il peut arriver que vous ne puissiez pas trouver le robot parce qu’il s’est arrêté sous une table ou un banc, par exemple. Vous pouvez alors appeler le robot via l’application pour savoir où chercher. Appuyez sur «...
- Page 102 previous cleaning «. Si la case est bleue, la fonction est activée. Si la case est grise, la fonction est désactivée. 3.9.15 Régler l’unité de mesure Vous pouvez définir l’unité de mesure souhaitée dans l’application. Vous avez le choix entre «m2» et «ft2». Tapez sur «...
- Page 103 Français Normaal : puissance d’aspiration normale • Sterk : puissance d’aspiration élevée • 4. Appuyez sur «Confirm» pour enregistrer vos choix. 3.9.18 État et charge de la batterie L’application affiche l’état actuel et la charge de la batterie du robot dans le coin supérieur gauche.
-
Page 104: Voyants Lumineux
3.10 Voyants lumineux 3.10.1 Robot Statut Bouton de chargement Bouton d’alimentation En veille Voyant vert continu Arrêt Chargement Arrêt Voyant rouge clignotant Pause Voyant vert continu Arrêt Fonctionnement Voyant vert continu Arrêt Batterie (presque) vide Arrêt Voyant rouge continu Défaut Voyant rouge clignotant Arrêt Activé... -
Page 105: Résolution Des Problèmes
Français 4. RÉSOLUTION DES PROBLÈMES 4.1 Défauts généraux Si les problèmes suivants surviennent pendant le fonctionnement du robot, reportez-vous au tableau ci-dessous pour trouver une solution. Si les problèmes ne peuvent pas être résolus à l’aide de ces options, contactez notre service clientèle. Problème Cause Solution... - Page 106 Utilisez l’adaptateur d’origine fourni. Le robot ne se charge pas. L’adaptateur utilisé n’est pas le modèle fourni. Vérifiez que la prise de la station de Le robot entre mal en contact avec les charge est correctement branchée. bornes de charge lorsqu’il est placé sur Vérifiez si la station de charge la station de charge.
- Page 107 Français Il est recommandé d’utiliser le robot Le robot ne peut pas nettoyer une ou Le sol a été récemment ciré et/ou poli. une fois que la cire du sol est sèche. plusieurs zones. Cela réduit la friction entre la roue motrice et le sol.
- Page 108 Chargez ou allumez le robot. Le robot ne fonctionne pas La batterie est épuisée ou le robot est correctement. éteint. Utilisez un chiffon doux pour nettoyer le Un objet se trouve dans le capteur. Il y couvercle du capteur. a de la saleté sur le capteur. Assurez-vous que la serpillière ne Le capteur de vadrouille est bloqué...
-
Page 109: Messages Vocaux
Français 4.2 Messages vocaux En cas de dysfonctionnement du robot, clignote en rouge ou reste allumé en permanence et un message vocal retentit. Suivez les instructions données dans le message vocal pour résoudre le problème. Si la méthode ci-dessus ne résout pas le problème, essayez ce qui suit : Appuyez sur le bouton de réinitialisation à... -
Page 110: Nettoyage Du Tube À Poussière
5.2 Nettoyage du tube à poussière Si le voyant de la station de charge est continuellement allumé en rouge, il est conseillé de nettoyer le tube à poussière. Retirez la fiche de la station de dépoussiérage de la prise. 2. Retournez la station de dépoussiérage et vérifiez si le tube à... -
Page 111: Nettoyage Du Réservoir D'eau/Du Collecteur De Poussière Et Des Filtres
Français 5.5 Nettoyage du réservoir d’eau/du collecteur de poussière et des filtres Appuyez sur le bouton situé au centre du réservoir d’eau/récupérateur de poussière et retirez-le horizontalement du robot. 2. Ouvrir le réservoir d’eau/le collecteur de poussière. 3. Ouvrez le réservoir d’eau/le collecteur de poussière et videz-le dans une poubelle. 4. -
Page 112: Nettoyage De La Brosse Principale
5.6 Nettoyage de la brosse principale Voir 1.2 Présentation du produit pour les désignations. Ouvrez le couvercle du balai principal situé en bas du robot. 2. Retirez la brosse principale du robot. 3. S’il y a de la poussière, des cheveux ou des saletés sur l’orifice d’aspiration ou la brosse principale, utilisez le peigne de nettoyage pour les enlever. -
Page 113: Nettoyage De La Roulette Universelle
Français La brosse latérale est un ustensile. Remplacez-la tous les 3 à 6 mois pour garantir l’efficacité du nettoyage. 5.8 Nettoyage de la roulette universelle Retirez délicatement la roulette universelle située au bas du robot à l’aide d’un tournevis. 2. Retirez la roulette universelle et enlevez la poussière, les cheveux et la saleté. Vous pouvez utiliser le peigne de nettoyage pour les enlever. -
Page 114: Nettoyage Des Bornes De Recharge Du Robot
5.10 Nettoyage des bornes de recharge du robot Essuyez soigneusement les bornes de chargement et le boîtier avec un coton-tige ou un chiffon doux. 5.11 Entretien Un entretien correct et opportun permet au robot de fonctionner correctement. Un entretien insuffisant ou inopportun peut réduire la durée de vie du robot. La surface du capteur de falaise/antenne et de la station de charge doit être propre pour •... -
Page 115: Appareils Électriques
Français 7.1 Élimination En fin de vie, ne jetez pas le produit avec les ordures ménagères, mais déposez-le dans un point de collecte désigné par le gouvernement pour qu’il soit recyclé. L’emballage et les accessoires doivent être éliminés conformément à la réglementation environnementale en vigueur dans votre commune. -
Page 116: Symboles
8. SYMBOLES Les avertissements et symboles suivants sont utilisés dans ce manuel, sur l’emballage et sur le produit (le cas échéant). Symbole Description Suivez les instructions du manuel et conservez-le pour toute référence ultérieure. Un avertissement accompagné de ce symbole indique une situation potentiellement dangereuse pouvant entraîner des dommages graves et/ou des blessures mortelles. -
Page 117: Déclaration De Conformité Ce
Français Attention : fragile. Prise de classe de sécurité 3. Attention : danger électrique, risque d’électrocution ! Danger électrique, risque d’électrocution ! 9. DÉCLARATION DE CONFORMITÉ CE Ce produit est conforme à toutes les exigences et réglementations conformément à 2014/35/EU, à la directive 2014/30/EU et à la directive 2009/125/EC. La déclaration de conformité... - Page 120 AU3265 / AU3267 NL/BE - Handleiding - Oorspronkelijke handleiding EN - User manual - Translation of the original manual FR/BE - Manuel d’utilisation - Traduction du manuel original Geproduceerd in China Made in China Fabriqué en Chine ©LifeGoods B.V. Wisselweg 33, 1314 CB Almere (NL) www.auronic.nl - service@auronic.nl...
Need help?
Do you have a question about the AU3265 and is the answer not in the manual?
Questions and answers