Table of Contents
Advertisement
Quick Links
Advertisement
Table of Contents

Related Manuals for Weber PERFORMER TOUCH-N-GO


Summary of Contents for Weber PERFORMER TOUCH-N-GO
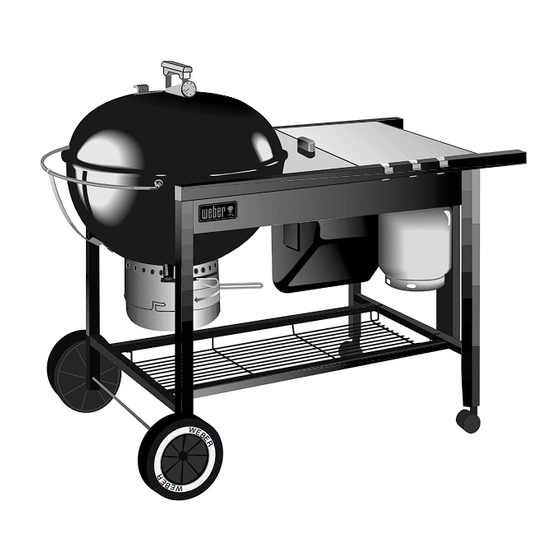
- Page 1 This Owner's Manual is provided and hosted by Appliance Factory Parts. Weber PERFORMER TOUCH - N GO (PRIOR 2000) Owner's Manual Shop genuine replacement parts for Weber PERFORMER TOUCH - N GO (PRIOR 2000) Find Your Weber Grill Parts - Select From 2037 Models -------- Manual continues below --------...
- Page 2 TOUCH-N-GO IGNITION ™ Owner’s Manual DANGER If you smell gas: Gas Ignition 1. Shut off gas to the appliance. 2. Extinguish any open flame. 3. Open lid. 4. If odor continues, immediately call your gas supplier or your fire department. WARNING 1.
-
Page 3: Warnings
DANGER Failure to follow the Dangers, Warnings and Cautions contained in this Owner’s Manual may result in serious bodily injury or death, or in a fire or an explosion causing damage to property. WARNINGS Do not store a spare or disconnected LP tank under or near this barbecue. Improper assembly may be dangerous. -
Page 4: Warranty & Patents
U.S. trademarks of Weber-Stephen Products Co., 200 East Daniels Road, Palatine, IL 60067-6266, U.S.A. This product is covered by one or more United States patents and patents in other nations globally. Printed in the U.S.A. -
Page 5: Table Of Contents
Direct cooking flexibility with wood or charcoal. IMPORTANT NEW FEATURES: Your Weber Gas Barbecue is equipped with a new and improved LP tank connection, that has additional safety features. They are: 1. The connection of the barbecue to the LP tank can be made without the use of tools. -
Page 6: General Instructions
The Performer Grill is portable so you can easily change Your Weber Gas Barbecue is not intended to be its location in your yard or on your patio. Portability installed in or on recreational vehicles and/or boats. -
Page 7: Parts Listing
39, 14-15 40-41 26,15... - Page 8 Parts can be ordered directly from Weber-Stephen Products Company by phone or mail. Note - Do not return parts to Weber-Stephen Products Co. without first contacting the Customer service Center by phone or mail. Returning the part may not be necessary.
-
Page 9: Tools Needed
While we give much attention to our products, Two Char-Basket Fuel Holders unfortunately an occasional error may occur. If a part is missing, do not go back to the store. Call the Weber Customer Service Center toll free 1-800-446-1071 to receive immediate assistance. Have your owner’s manual and serial number available for reference. - Page 10 Filler adapter Charcoal grate The following items will be found in the bottom carton. Hinged cooking grate Wheel frame Burner cleaning tool/ match holder Two bottom connectors Two wheels Front panel Axle Ash Catcher Ring Caster frame assembly The following items will be found in the hardware pack.
- Page 11 Place one end of the axle on the block of wood (or other protected surface). Tap on one hubcap. Put one wheel on the axle, WEBER side toward the hubcap. Slide the axle through the frame. Add the other wheel, WEBER side out. Tap on the hubcap.
- Page 12 Step 2 (cont.) - Once the One Touch Handle is through the handle slot of the Ash Catcher Ring, tilt the ring back down and position the locking clips over the couplings on the bottom of the bowl. Once the the locking clips are in position over the couplings push the ring straight down until the clips snap Caution: Make sure all Locking Clips are fully into position as shown in figure 2b.
-
Page 13: Assembly
Place front panel along inside edge of frame assembly with Weber logo on the side closest to the wheel Set the top frame on the ground so the leg tabs point up. frame and facing out. Slip washers on bolts, insert... - Page 14 Step 5 Step 6 Complete frame assembly Uncover CharBin lid You will need: two bottom connectors, tank holder Remove protective plastic covering from CharBin lid. assembly, four 1 3/4 inch bolts, four nylon washers and a Figure 6. 7/16 inch open-end or an adjustable wrench. CharBin lid Turn over partial frame assembly and remove twist tie from CharBin lid.
- Page 15 Step 7 Step 8 Install bowl assembly Install igniter You will need: bowl assembly, four 1 3/4 inch bolts, eight Note - The igniter wires have been attached to the nylon washers, four aluminum washers, four acorn nuts, igniter for factory testing of the ignition system. There is 7/16 inch open-end or adjustable wrench and pliers.
- Page 16 If the tank manufacturer has not resolved the issue to The bottom of the tank rests firmly on the lower lip of the your satisfaction, then call Weber-Stephen Products Co., tank holder assembly. Figure 9 (b). Customer Service Center.
- Page 17 The hose and regulator are connected in the following Step 11 manner: Check for gas leaks Slide back the collar of the quick disconnect on the tank valve. Figure 10 (a). Push the male fitting of the regulator DANGER into the quick disconnect, and maintain Do not use an open flame to check for gas pressure.
- Page 18 If bubbles occur, or if a bubble enlarges, the connection Step 12 is leaking. Turn OFF the gas at LP tank. Add bowl panel, tool holders and CharBin If the leak is at connection a) DO NOT OPERATE THE Storage Container BARBECUE.
- Page 19 Step 13 Note: Before sliding the CharBin into place check that Install ash catcher, control panel & bottom rack the Cooking grate holder is sitting loosely on the frame You will need: ash catcher, control panel and bottom brace and is conforming to the frame brace. Figure 14 a. rack.
- Page 20 Step 14 Add grates, Char-Basket Fuel Holders and lid You will need: charcoal grate, Char-Baskets, hinged cooking grate and lid. Place charcoal grate on bottom supports in bowl. Set Char-Baskets on charcoal grate, cooking grate on top supports, and lid on bowl. Figure 16. Figure 16...
-
Page 21: Operating Instructions
WARNING: Check hose before each use of barbecue for nicks, cracking, abrasions or cuts. If the hose is found to be unserviceable do not use barbecue. Replace using only Weber factory authorized replacement parts. Order from Weber- Stephen Products Co., Customer Service Center, or authorized dealer. -
Page 22: Insect Alerts
Manual Lighting Insect Alert Your Performer Grill, as well as any outdoor gas WARNING: Do not attempt to light manually without using the match holder. appliance, is a target for spiders and insects. They can nest in the venturi section of the burner tube causing gas 1) Open lid. -
Page 23: Cooking Methods
For additional information and cooking times, consult the This is for safety reasons so the user can avoid reaching Weber Owner's Guide. directly over burning coals. A few wood chunks or a handful of cooking woodchips may be added to hot coals for a mild smoke flavor in your foods. -
Page 24: Periodic Cleaning
Periodic Cleaning Storage To remove ashes from the bowl, move control rod side to When the Performer Grill is stored indoors, the gas side so damper blades sweep ashes through the bowl supply MUST BE DISCONNECTED and the LP tank vents and into the ash catcher. -
Page 25: Lp Tank Information
To perform leak checks: Turn test valve to the CLOSED the tank manufacturer has not resolved the issue to your position. Figure 11. Turn tank valve ON satisfaction, then call Weber-Stephen Products Co., (counterclockwise). Check for leaks by wetting the Customer Service Center. - Page 26 Note - 5 lb LP tanks made by other manufactures will not fit on the Weber Performer Grill. Do not attempt to To fill, take the LP tank to an RV center, or look up use them.
-
Page 27: Troubleshooting
Troubleshooting Problem Check Cure Burner burns with a yellow or Inspect burner for possible Clean burner. See Section orange flame, in conjunction obstructions. "Maintenance." with the smell of gas. Burner does not light, or flame Is flow limiting device activated? (See Section "Lighting is low. -
Page 28: Maintenance
Check hose before each use of barbecue for nicks, and orifice cracking, abrasions or cuts. If the hose is found to be unserviceable, do not use the barbecue. Replace using only Weber authorized replacement parts. Order from Weber-Stephen Venturi Products Co., Customer Service Center or an authorized dealer. - Page 29 PERIODIC QUICK CLEANING BURNER FLAME PATTERN The burner has been factory set for the correct air and We recommend that you periodically brush the gas mixture. The correct flame pattern is shown in Figure outside of the burner slots with a brass wire brush and 17.
Need help?
Do you have a question about the PERFORMER TOUCH-N-GO and is the answer not in the manual?
Questions and answers