Advertisement
Advertisement
Table of Contents

Subscribe to Our Youtube Channel
Related Manuals for AstroAI JY23P160-2301812


Summary of Contents for AstroAI JY23P160-2301812
- Page 1 JY23P160-2301812 PORTABLE MULTIFUNCTIONAL ELECTRIC PUMP USER MANUAL...
- Page 2 (Please make sure the pressure you set is higher than the current pressure of your tire.) Thank you again for choosing AstroAI. If you have any questions or concerns regarding your product, please contact us at support@astroai.com Please fully read and understand this manual before using this product and keep this manual for future reference.
- Page 3 WARNING Read the instructions carefully before use; incorrect usage may damage the product. Please pay attention to the safety of electricity when using it. Ensure the remaining battery can fulfill the task. Please do not use the product for other procedures. Keep the air compressor away from heat sources, such as a car's exhaust pipe.
- Page 4 Please do not use the air compressor in the rain or where there are any liquids. Do not store the air compressor in high temperatures or a humid environment. Disconnect the air compressor from all power sources when not in use. During continuous use, the air compressor may get hot.
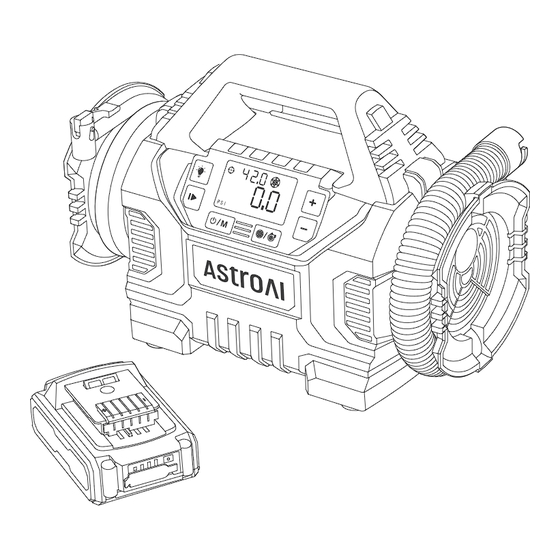
- Page 5 DIAGRAM 10 11 12 13 AC Power Plug Power/Unit Button Accessories Storage Part Screen LED Light Tire/Large Volume Button Valve Cap Storage Part Handle Quick Connector “+” & “-” Buttons Rechargeable Battery Port Large Volume Hose LED Button 12 V Cigarette Lighter Plug Inflate Button - 05 -...
- Page 6 2.0 AH Rechargeable Battery Pack Replacement Fuse Rechargeable Battery Charger Presta-Schrader Adapter 2 × Air Nozzles 2 × Tire Valve Caps Needle Valve Adapter 3 × Large Volume Nozzles - 06 -...
-
Page 7: Size Description
SIZE DESCRIPTION Air Hose Length: 89 cm/2.91 ft AC Power Cord Length: 3 m/9.84 ft Air Compressor Size: 29.5 × 15 × 19.5 cm/11.61× 5.90 × 7.67 in Large-Volume Hose: 43 cm/1.41 ft DC Power Cord Length: 3 m/9.84 ft Rechargeable Battery Charger: 1.8 m/5.9 ft - 07 -... - Page 8 FEATURES Three types of power supply. Tire mode and Large-volume mode. Auto Shuto : Once the pre-set air pressure is reached, the air compres- sor will automatically shut o . HD Large Screen: Provides accurate measurements. It is easy to oper- ate, read and understand.
- Page 9 INSTRUCTIONS Ensure that your car engine is running before you use it. 1. Choose the power supply. (We recommend you connect one power supply only.) 2. Press the Power/Unit Button to start the air compressor after the power is on. 3.
- Page 10 4. Use the “+” and “–” buttons to set the chosen pressure. Use the tire pres- sure guide on the inside of the driver’ s door for guidance. Make sure that the preset pressure is higher than the current pressure of your tire. 5.
- Page 11 6. Press the Inflate Button, and the air compressor will be working. 7. Press and hold the Power/Unit Button for 3 seconds to turn o the air compressor after inflation. (When using the Rechargeable battery pack, turning o the air compressor can maximize your power.) - 11 -...
- Page 12 Large-Volume mode 1. Press the Inflate Button, and the air compressor will be working. 2. Press Tire/Large volume Button to switch to the Large volume mode. - 12 -...
- Page 13 3. The hose gap should be inserted at the buckle position, and turn the hose counterclockwise to the end. If you need to deflate, insert the hose as the second picture instructed. 4. Choose a suitable nozzle to insert. 5. Press the Inflate Button to start the air compressor. - 13 -...
- Page 14 6. Press and hold the Power/Unit Button for 3 seconds to turn o the air compressor after inflation. (When using the Rechargeable battery pack, turning o the air compressor can maximize your power.) The installment and removal of the Rechargeable battery pack (The Rechargeable battery pack needs to be purchased separately).
- Page 15 2. Hold the handle, press the button above the battery to remove the battery. Charging method of the Rechargeable battery pack.(The Rechargeable battery pack and charger need to be purchased separately). 1. Connect the charger to the round hole jack of the Rechargeable battery pack, plug the power charger.
-
Page 16: Troubleshooting
2. Press and hold the power button to know the remaining battery of the Rechargeable battery pack; the battery lights will be lit when pressed. TROUBLESHOOTING Air compressor will not inflate Ensure the in-line fuse is securely inserted correctly; replace the fuse if necessary. -
Page 17: Specifications
Excessive use will slow the inflation rate of the air compressor. Let it cool for 10 minutes. SPECIFICATIONS Model JY23P160-2301812 Working Voltage US/CA DC 12 V/AC 120V 60 Hz 18 V Rechargeable battery pack JP DC 12 V/AC 100-110 V 50/60 Hz... -
Page 18: Package Included
20 Minutes (Tire Mode) 10 Minutes (Large-Volume Mode) Dimensions 11.61 × 5.90 × 7.67 in/29.5 × 15 × 19.5 mm Certificates PSE/CE/UKCA/FCC PACKAGE INCLUDED AstroAI Air Compressor ×1 Rechargeable Battery Pack Charger ×1 Air Nozzles ×2 Large Volume Nozzles ×3 Needle Valve Adapter ×1... -
Page 19: Warranty Period
WARRANTY PERIOD 2- Year Limited Warranty from AstroAI. Each AstroAI Portable Air Compressor will be free from defects in material and workmanship. This warranty does not cover damage from neglect, misuse, contamination, alteration, accident, or abnormal conditions of oper- ation or handling. - Page 20 Web:www.astroai.com E-mail:support@astroai.com...
Need help?
Do you have a question about the JY23P160-2301812 and is the answer not in the manual?
Questions and answers