Marantz CD6004 Owner's Manual
Cd6004 user manual
Hide thumbs
Also See for CD6004:
- Owner's manual (38 pages) ,
- Specification (2 pages) ,
- Product information (1 page)
Table of Contents
Advertisement
Advertisement
Table of Contents

Subscribe to Our Youtube Channel
Related Manuals for Marantz CD6004


Summary of Contents for Marantz CD6004
- Page 1 ESPAÑOL FRANÇAIS ENGLISH CD player CD6004 Owner’s Manual...
-
Page 2: Safety Precautions
The wide blade or the a Class B digital device, pursuant to Part 15 of the FCC Rules. These electric shock to persons. -
Page 3: Cautions On Installation
ESPAÑOL FRANÇAIS ENGLISH NOTES ON USE / OBSERVATIONS RELATIVES A L’UTILISATION / NOTAS SOBRE EL USO n CAUTIONS ON INSTALLATION PRÉCAUTIONS D’INSTALLATION WARNINGS AVERTISSEMENTS ADVERTENCIAS EMPLAZAMIENTO DE LA INSTALACIÓN • Avoid high temperatures. • Eviter des températures élevées. • Evite altas temperaturas. Allow for sufficient heat dispersion when Tenir compte d’une dispersion de chaleur... -
Page 4: Table Of Contents
ENGLISH Getting started Thank you for purchasing this marantz product. To ensure proper operation, please read this owner’s manual carefully before using the product. After reading the manual, be sure to keep it for future reference. Contents Getting started Basic operation Advanced operations ·······································································1... -
Page 5: Accessories
A D/A converter is an essential element for the audio quality of and song titles to be stored on an audio CD.CDs with the following a CD player. The CS4398 Cirrus Logic D/A Converter, which has logos support this function. -
Page 6: Cautions On Handling
• Place the discs flat, 12 cm discs in the outer tray guide (Figure 1), played in this unit. • Proper ventilation 8 cm discs in the inner tray guide (Figure 2). If the unit is left in a room full of the smoke from cigarettes, etc., for CD-R/CD-RW Figure 1 Figure 2 long periods of time, the surface of the optical pickup may get dirty, preventing it from receiving the signals properly. -
Page 7: Cautions On Handling
• Water droplets may form on discs if they are moved suddenly from a cold place (outdoors for example) to a warm place, but do not try to Approx. 16.4 ft / 5 m dry them off using a hair-dryer, etc. -
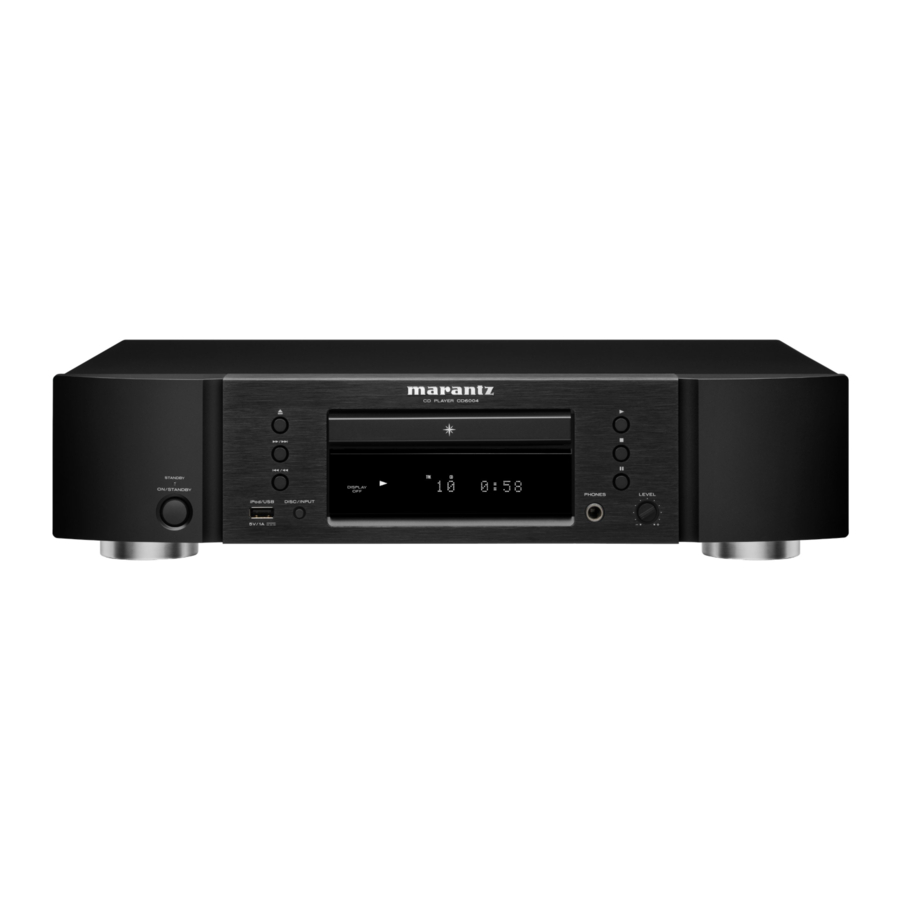
Page 8: Part Names And Functions
ENGLISH Part names and functions For buttons not explained here, see the page indicated in parentheses ( ). Front panel Display e r t i o Q0 q w e Power operation switch Headphone volume control knob A-B indicator D OFF (digital output OFF) indicator (ON/STANDBY) ············································... -
Page 9: Rear Panel
DIGITAL AUDIO OUT OPTICAL connector AC inlet (AC IN) ············································· (7) Search buttons (6, 7) ····················· (9, 19) ····································································· (13) Number buttons (0 – 9) ···················· (9, 11, 12) MENU button ·············································· (20) SOUND MODE button ······························· (12) A-B button ··················································· (10) RANDOM button ····························... -
Page 10: Basic Connections
• Do not unplug the power cord while the unit is operating. Doing so can result in humming or noise. • Do not use a power cord other than the cord supplied with this unit. • Do not connect the unit to the PHONO input connectors on the amplifier. -
Page 11: Basic Operation
[POWER] closed. NOTE • Do not force the tray in by hand while power is set to standby. This could cause a trouble. • Even when power is set to standby, electrical current passes through some circuits. If you do not intend to use the unit for an extended period of time, unplug the power cord from the household power outlet. -
Page 12: Playback Cds
Press to open and close the disc tray. <7/9> The number you enter is set about 1.5 seconds after you press the • Press to close the disc tray, and playback starts automatically. number buttons. To enter a two-digit number, be sure to press the Press two number buttons, one immediately after the other. -
Page 13: Listening With Headphone
You can view text information stored on a disc as CD-TEXT on this unit. You can specify the section within a track that you want to hear, and Mainly, information on the current track being played is displayed. Adjusting the volume play it back repeatedly. -
Page 14: Playing Tracks In A Specific Order (Program Playback)
, and select the tracks you want to program. • You can specify up to 30 tracks each for program playback. GExampleH To program tracks 3 and 12 to be played in that • Repeat playback, random playback, and AMS playback can be used order, press , and one after the other. -
Page 15: Skipping Tracks You Don't Want To Hear (Delete Program Playback)
• All of the delete program tracks are erased when is pressed to Quick replay cannot by used between different tracks. open the disc tray. Also, if the overall time of the track being played back is shorter than [DISPLAY] Pressing shows the display for the quick play setting time, or if the playback time is shorter than approximately 3 seconds. -
Page 16: Advanced Connections
“EXTERNAL” to use this feature. n Connecting the power cord (vpage 7) Digital audio output • If a flasher input connector is to be used, do not use the remote control input connector. You can enjoy digital recording when the player is connected to a CD Preparations recorder or other digital recording component. -
Page 17: Usb Memory Device/Ipod Connection
• When connecting an iPhone to this unit, keep the iPhone at least 20 cm away from this unit. If the iPhone is kept closer to this unit and a telephone call is received by the iPhone, noise may be output Remote from this device. -
Page 18: Advanced Operations
There are many music distribution sites on the Internet allowing you n Tag data Button located on both the main unit and to download music fi les in MP3 or WMA (Windows Media ® Audio) BUTTON the remote control ID3-Tags (Ver. 1.x and 2.x) formats. -
Page 19: Playing Mp3, Wma And Aac Files
The files in each folder are played back in the order in which Press the files were recorded on the media, from the oldest date and time. -
Page 20: Playback Ipod
ENGLISH Playback iPod ® Symbols used to indicate buttons in this manual With the unit, you can listen to music on an iPod and you can also Button located on both the main unit and NOTE operate the iPod with the main unit or the remote control. -
Page 21: Disconnecting The Ipod
During playback, press ID3-Tags (Ver.1.x and 2.x) [TEXT] The information changes in the following order each time Files created in the following formats and stored on a USB memory META-Tags (Compatible with title, artist and album names) pressed. device can be played. -
Page 22: Playing Files Stored On Usb Memory Devices
During playback, press and hold in <BUTTON> Button only on the main unit • When you remove your fi nger from the button, normal playback is [BUTTON] Button only on the remote control Connect the USB memory device to the USB port on resumed. -
Page 23: Removing The Usb Memory Device
• If a USB memory device is connected to this unit, marantz cannot The settings are saved, and the display returns to normal. be held responsible for the loss or damage to any data stored on the USB memory device. Selectable mode • The USB memory device will not operate if connected through a... -
Page 24: Timer Play (Timer Play Setting)
When this unit is connected to a commercially available external audio Audio timer <BUTTON> Button only on the main unit timer, the unit’s power is switched on and media playback starts at [BUTTON] Button only on the remote control the specifi ed time. -
Page 25: Cd Setup
[TEXT] When is pressed on the unit during disc playback, track You can set whether to play all of the files on the disc or just the files recorded on the disc) information is shown on the display. files within a folder for playback. -
Page 26: Usb Setup (Usb Memory Device Operation)
File Info (File information display selection) Button located on both the main unit and [TEXT] When is pressed on the unit while playing back fi les from a BUTTON the remote control The “USB Setup” operating layers are as shown below. - Page 27 If another USB memory device is inserted, the unit will start playing from the first file. • The unit may not play your desired file if files have been added to or deleted from the identical USB memory device.
-
Page 28: Ipod Setup (Ipod Operation)
Files included in the folder are displayed. Select the music fi le that you want to playback using , and press [REPEAT] Playback starts. [8, 9] NOTE This cannot be set when “iPod Ctrl=>” (vpage 26) is set to “1 Direct”. [MENU] [ENTER]... - Page 29 Video file The settings are saved, and the display returns to normal. Press to pause the track. Even if the input source is changed or the Remote control unit power is switched off, when the iPod is played again, playback...
-
Page 30: Auto Stb (Auto Standby Function)
Auto STB (Auto standby function) Button located on both the main unit and BUTTON the remote control If the stopped state continues for more than 30 minutes, this unit <BUTTON> Button only on the main unit Bit rate automatically switches to standby mode. -
Page 31: Troubleshooting
3. Are the other devices operating properly? • The information recorded is not • Record correct information If this unit does not operate properly, check the items listed in the table below. Should the problem persist, in an audio (CD-DA) format. Or that is compatible with to this there may be a malfunction. -
Page 32: Specifications
5 – 90 % (without dew) Operating humidity: music files stored on a USB memory device or iPod are played. z For purposes of improvement, specifications and design are subject to change without notice. GRemote controlH Problem Cause Corrective action... -
Page 33: Index
Switching the input source ·································· 8 iPod Ctrl Switching the unit display ······················ 16, 18, 19 Cable (Operating an iPod with its own controls) ·········· 26 Audio cable ·················································· 7, 13 iPod Setup ·························································· 25 Coaxial digital cable·········································· 13 Time display ······································· 9, 16, 18, 20 iPod cable ··················································... - Page 35 Dimensions / Dimensions / Dimensions Unit: inch (mm) 17-21/64 (440) Weight / Poids / Peso 6.6 kg (14 lbs 8.8 oz)
- Page 36 D&M Holdings Inc. Printed in China 5411 10731 02AS...
Need help?
Do you have a question about the CD6004 and is the answer not in the manual?
Questions and answers