Advertisement
Advertisement
Table of Contents

Related Manuals for dudupet DU4L-KA


Summary of Contents for dudupet DU4L-KA
- Page 1 Automatic Pet Feeder User Manual Model: DU4L-KA...
-
Page 2: Safety Instructions
Safety Instructions 1.Children should use this product under adult supervision. 2.Do not use the feeder for pets unable to reach the food bowl or with disabilities. 3.Do not immerse the base part in water, which will damage electronic components such as control panel. -
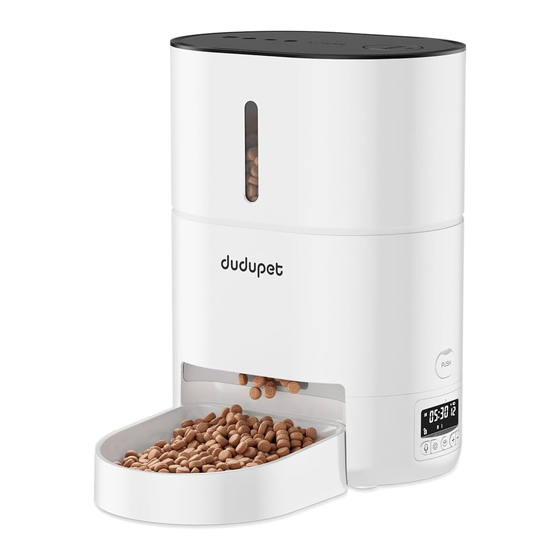
Page 3: Product Image
Product Image Front view Food Tank Lid Button to open cover Food Tank Body Food Outlet Control panel Food Bowl Bottom View Battery Compartment Tpye-C Interface Speaker... - Page 4 Display icon definition Time Display PUSH Meals 1 2 3 4 5 6 Unlock Lock Prompt the current battery level: When powered by the power supply alone, the battery indicator does not display. When powered by the battery or dual-mode power supply, the battery shows the current remaining battery level.
-
Page 5: Cleaning And Maintenance
Cleaning and Maintenance For the health of your pet, it is recommended to clean the feeder regularly. When it becomes dirty and there is a buildup of loose food in the food tank, you can remove the food tank for cleaning. Please use a soft damp cloth to clean the control panel and feeder base. - Page 6 Instructions 01 丨 Installation ◎ Take out the feeder from the packaging box. ◎ Place the feeder in the suitable location. ◎ Combine the food tray with the base of the feeder. 02 丨 Connect the power supply ◎ Plug the 5V/1A power adapter into the wall socket and connect the feeder.
- Page 7 03 丨 Put pet food into food tank ◎Fill the food tank with dry pet food. Close the lid and it will snap into place due to gravity. Note: Do not place canned, wet or moist food in the feeder. The recommended pet food size range is 3-10 mm.
- Page 8 05 丨 Set meal time and portions ◎ After the current time is set, press the set button , and the display will flash the number of meals. Press the plus / minus buttons to set 1-6 meals a day. 1 2 3 4 5 6 06 丨...
- Page 9 Set the feeding portion ◎ Press the button, the number of portions will flash. ◎ Press the plus / minus buttons to set feeding portion. ◎ If necessary, press the set button to repeat the above process for meals 2 to 6. 1 2 3 4 5 6 07 丨...
- Page 10 08 丨 Manual Feeding ◎ While in the unlocked state, simply press the button once to dispense a single portion of food. Note: The pre-set feeding schedule will not be affected. 09 丨 Restore factory setting ◎ In the locked mode, press & hold button for 6s to reset settings (time, feed plan and portion per meal, not including the recording) 10 丨...
-
Page 11: Simple Troubleshooting
Simple Troubleshooting Question Answer Q:I press any button but can not work. A:The screen will lock after 30 seconds of inactivity. To unlock the screen, please press and hold the button for 3 seconds. Q:I forgot the specific content of the feeding plan A:Unlock the screen and press the setting button, you can see meals displayed (but not portion per meal). -
Page 12: Specification
Specification Food tank capacity:4L Screen: LCD screen Power supply: DC 5V/1A power adapter; 3pcs alkaline D Size batteries Power adapter: AC110-240V input, DC5V output N.G: 1.52KG Size: 23*16.4*30.7cm Shenzhen Dudu Pet products Co., Ltd. 12 Months Warranty Support@dudupets.com BC-071-D...
Need help?
Do you have a question about the DU4L-KA and is the answer not in the manual?
Questions and answers
How do I just set the time after I already have the meals set?
To set the time on the Dudupet DU4L-KA after meals are already set:
1. Press and hold the setting button for 3 seconds until the time icon flashes.
2. The hour field will flash. Use the "+" or "−" buttons to set the hour.
3. Press the set button to move to the minute setting.
4. Use the "+" or "−" buttons to set the minutes.
5. During setting, hold "+" or "−" to adjust values quickly.
This answer is automatically generated