Table of Contents
Advertisement
Quick Links
RX540S Electric Pressure Washer
User Manual
[Revision 4.0 March 2024]
READ THIS MANUAL CAREFULLY BEFORE USE – FAILURE TO DO SO MAY RESULT IN INJURY, PROPERTY DAMAGE AND
MAY VOID WARRANTY. • KEEP THIS MANUAL FOR FUTURE REFERENCE. • Products covered by this manual may vary in
appearance, assembly, inclusions, specifications, description, and packaging.
Advertisement
Table of Contents

Subscribe to Our Youtube Channel
Related Manuals for JET USA RX540S


Summary of Contents for JET USA RX540S
- Page 1 RX540S Electric Pressure Washer User Manual [Revision 4.0 March 2024] READ THIS MANUAL CAREFULLY BEFORE USE – FAILURE TO DO SO MAY RESULT IN INJURY, PROPERTY DAMAGE AND MAY VOID WARRANTY. • KEEP THIS MANUAL FOR FUTURE REFERENCE. • Products covered by this manual may vary in...
-
Page 2: Safety
RX540S Electric Pressure Washer Safety Safety messages are designed to alert you to possible dangers or hazards that could cause death, injury or equipment or property damage if not understood or followed. Safety messages have the following symbols: You WILL be KILLED or... - Page 3 RX540S Electric Pressure Washer General Electrical Safety General Electrical Safety General Service Information • Inspect electrical equipment, extension • Electrically grounded equipment must have • The equipment must be serviced or cords, power bars, and electrical fittings for an approved cord and plug and be repaired at authorised service centres by damage or wear before each use.
- Page 4 RX540S Electric Pressure Washer • CAUTION - The hoses, accessories and high-pressure couplings are important for the safety of the machine. Only use hoses, accessories and couplings recommended by the manufacturer. • WARNING: Inadequate extension cables may be dangerous. Cables and spools must always be completely unwound to avoid letting the cable overheat.
-
Page 5: Safety Symbols
RX540S Electric Pressure Washer Safety Symbols The product may have safety warning labels attached to it, explained below. Understand the symbols on your product and their meanings. If any stickers become unreadable, unattached etc., replace them. Flammable Material Hazard Read User Manual... - Page 6 RX540S Electric Pressure Washer Carbon-Monoxide Hazard Pull Hazard Slope / Fall Injury Hazard "Slam Dunk" Warning Do not use the product in Be aware that the product Be aware that using the product Do NOT attempt "slam dunk" confined areas or without...
-
Page 7: Table Of Contents
RX540S Electric Pressure Washer Table of Contents Safety ................................2 Safety Symbols ................................5 Parts Identification ............................8 First Time Instructions ..........................9 Safety Devices ................................9 Thermal Sensor ................................9 Assembly ..............................10 Operation ..............................13 Purpose ..................................13 Areas of Application .............................. -
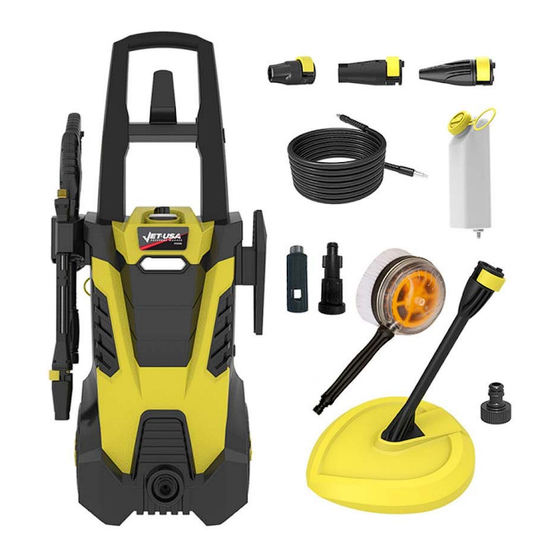
Page 8: Parts Identification
RX540S Electric Pressure Washer Parts Identification Name Name High-pressure hose Hose holder Trigger (with safety lock) Extension spray lance holder High-pressure hose connection Trigger gun holder Button (for high-pressure hose Plug connection) Trigger gun Extension spray lance Power cord holder... -
Page 9: First Time Instructions
RX540S Electric Pressure Washer First Time Instructions This section will explain in detail how to make high pressure washer ready for use. Safety Devices • The unloader valve can reduce pressure if it exceeds pre-set values. • Locking device on trigger gun: The trigger gun features a locking device. When the knob is activated, the trigger gun cannot be operated. -
Page 10: Assembly
RX540S Electric Pressure Washer Assembly 1. Position the washer as CLOSE as possible to the water supply. 2. The washer must be used on a secure and stable surface in a standing, upright position (Fig. 1). 3. Screw the transaction handle to the electric pressure washer unit (Fig. 2). - Page 11 RX540S Electric Pressure Washer 4. Insert the power cord holder (Fig. 3) and trigger gun holder (Fig. 4) into its position. 5. Screw the spray lance into the trigger gun and rotate it until the two parts are completely locked (Fig. 5).
- Page 12 RX540S Electric Pressure Washer WARNING! Keep hose away from sharp objects. Bursting hoses may cause injury. Examine hoses regularly and replace if damaged. Do not attempt to mend a damaged hose. 7. Make sure the motor switch is pushed to the OFF position before plugging the unit into the power outlet (Fig.7).
-
Page 13: Operation
RX540S Electric Pressure Washer Operation Purpose This high-pressure electric power washer is intended for residential use to clean vehicles, machines, buildings, facades, etc. Areas of Application • Never use the machine in potentially explosive areas under any circumstances! • The operating temperature must be between 32ºF (0ºC) and 104ºF (40ºC). -
Page 14: Using The Nozzles
RX540S Electric Pressure Washer 3. Turn the switch to the ON position to start the pressure washer (Fig. 10). Using the Nozzles Using detergent nozzle to spray soap and use adjustable nozzle to wash. CAUTION! NEVER change nozzles without locking the safety lock on the trigger handle. -
Page 15: Working With Detergents
RX540S Electric Pressure Washer 3. Snap the nozzle into the spray lance tight (Fig. 11). To disconnect a nozzle from the spray lance once the cleaning job is complete: 4. Turn off the pressure washer and shut off the water supply. Pull the trigger to release water pressure. -
Page 16: Connecting The Trigger Attachments
RX540S Electric Pressure Washer 3. Turn on the pressure washer. Pull the trigger to operate the unit. The liquid detergent will automatically mix with water and be discharged through the nozzle. 4. Apply detergent from the bottom to the top of the dry surface to be cleaned. -
Page 17: Mounting The Patio Cleaner
RX540S Electric Pressure Washer Mounting the Patio Cleaner 1. Insert the extension lance into to the housing. 2. Fix the extension lance with the two screws to the housing. 3. Insert the rotor arm into the extension lance. 4. Insert the U-pin to fix the rotor arm. -
Page 18: Rinsing With The Pressure Washer
RX540S Electric Pressure Washer Rinsing With the Pressure Washer 1. Turn off the pressure washer and shut off the water supply. 2. Pull the trigger to release water pressure. 3. Engage the safety lock on the trigger handle by pushing right on the safety lock (Fig.9) 4. -
Page 19: Storage
RX540S Electric Pressure Washer Storage General Storage 1. Store the trigger gun and spray lance on the holders (12). 2. Hang the power cord on (7) and high-pressure hose on (10). CAUTION! Always store your pressure washer in a location where the temperature will not fall below 32ºF (0ºC). -
Page 20: Maintenance
RX540S Electric Pressure Washer Maintenance CAUTION! Before working on the pressure washer, disconnect the plug from the power supply socket. 1. Clean the nozzle with the needle clean out tool provided (Fig. 14). Remove the spray lance from the gun;... -
Page 21: Specifications
RX540S Electric Pressure Washer Specifications Voltage 240V / 50Hz Maximum Pressure 2900PSI Max Flow Rate 6.8L/min Rated Flow Rate 5.8L/min Max Water Temp 50℃ Hose Length Power Cord Length Power Plug Australian Standard Certificates/Approvals GS/CE, RoHS, SAA (power plug) E&OE... - Page 22 Some experts believe that the incorrect or prolonged use of almost any product may cause serious injury or death. To help reduce your risk of serious injury or death, refer to the information below. For more information, see www.datastreamserver.com/safety Consult all documentation, packaging, The product has been supplied by a general merchandise ...
Need help?
Do you have a question about the RX540S and is the answer not in the manual?
Questions and answers