Advertisement
THULI TABLES
Table of Contents
Introduction . . . . . . . . . . . . . . . . . . . . . . . . . 2
Identification of Table Parts . . . . . . . . . 3 - 6
Table Set-Up . . . . . . . . . . . . . . . . . . . . . 7 - 11
Table Operation . . . . . . . . . . . . . . . . . .11 - 17
Tour Owner's Manual
office@ thulitab les.co m
youtube.com/thulit ables
facebook.com/thu litab les
Table Fold-Down . . . . . . . . . . . . . . . . 18 - 19
Accessories & Upgrades . . . . . . . . . . 20 - 21
Care & Maintenance . . . . . . . . . . . . . . 22 - 23
Warranty . . . . . . . . . . . . . . . . . . . . . . . . . . . 23
1-800-458-4854
www.thulitables.com
Videos & Manuals
Advertisement
Table of Contents

Related Manuals for Thuli Tables Tour


Summary of Contents for Thuli Tables Tour
-
Page 1: Table Of Contents
THULI TABLES youtube.com/thulit ables facebook.com/thu litab les Tour Owner's Manual Videos & Manuals Table of Contents Introduction ......2 Table Fold-Down . -
Page 2: Introduction
Introduction Thank you for your purchase of a Tour portable table. We are pleased to provide you with an adjusting table that is versatile, extremely durable and skillfully designed. It has been thoroughly inspected right down to the smallest detail before leaving our shop. -
Page 3: Identification Of Table Parts
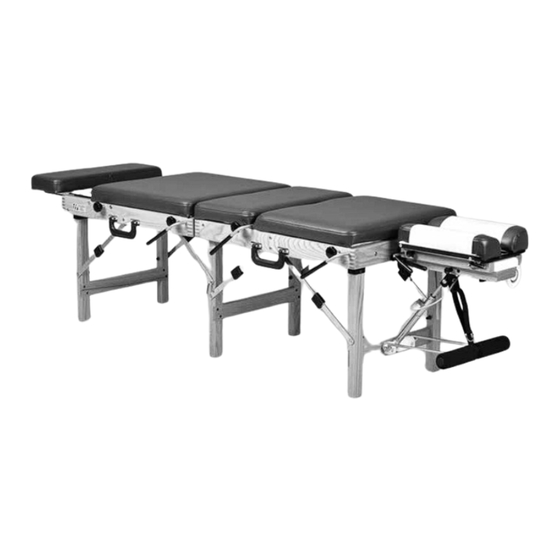
Identification of Table Parts Caudal Cocking Lever & Tension Control Ankle Rest Caudal Section Locking Knob Pin to close table and Pelvic Section attach headpiece Thoracic Section Folding Pelvic Cocking Lever Support Brace & Tension Control Closing Block Piston Prone Arm Rest Headpiece (adjustable) Bracket... - Page 4 Identification of Table Parts (folded position) Front Legs Remote Control Middle Legs Lever Folding Folding Brace Lock Support Brace Support Brace Thoracic Hold-Down Thoracic Slant Bar Headpiece Mount Bracket Thoracic Drop Piston Pin to close table and attach headpiece Prone Arm Rest Folding Pelvic Drop Support Brace...
- Page 5 Identification of Table Parts (folded position) Paper Tear-Off Bar Remote Control Slot Brace Folding Hinge Pin Lock Support Brace Paper Hanger Paper Slot for Piston Roll Closing Block Caudal Drop Headpiece Slide Block Headpiece Tension Control Caudal Cocking Lever Headpiece T-Bar Link &...
- Page 6 Identification of Headpiece Parts Tension Control Knob (other side) Paper Hold-Down Wire Paper Tear-Off Bar Pivot Block Straight Drop & Pivot Pin Forward Motion Knob Slide Block Cocking Lever Paper Hanger T-Bar Remote Control Lever Piston Pin Piston Head Lowering Lever Adjustable Buckle for Prone Arm Rest Headpiece Mounting...
- Page 7 Table Set-Up Quick Reference: Begin at the headpiece and progress toward the ankle rest (pgs 7- 9). 1. Open the table (pg 7). 4. Attach the piston to the headpiece (pg 8). 2. Remove the headpiece from storage, engage 5. Release the thoracic section (pg 9). the T-bar and attach the headpiece (pgs 7-8).
- Page 8 Table Set-Up HEADPIECE ATTACHMENT (cont) FRONT LEG SET-UP NEED PHOTO 6. Squeeze the remote control lever and retract the piston 7. Raise the front legs from their folded position using head from its storage position (in the hole in the table the horizontal crosspiece.
- Page 9 Table Set-Up REMOTE CONTROL LEVER THORACIC RELEASE & MID-LEG SET-UP 13. Release the Velcro on the thoracic section. 12. Install the remote control lever into the bottom of the 14. Raise the middle legs using the horizontal crosspiece. slide block by inserting the cable into the narrow slot Straighten the support braces and lock them into place and tilting the cable end of the lever into the slot until by sliding the brace lock over the brace joint.
- Page 10 Abdominal Swing-Away Set-Up (optional feature) Proceed to next page if your table does not have an Abdominal Swing-Away. GAS SPRING & CONTROL LEVER REMOVAL GAS SPRING INSTALLATION Remove the Abdominal Swing-Away gas spring and control Insert the base of the gas spring into the slot in the mount lever from its storage location.
- Page 11 Table Set-Up & Headpiece Operation CORRECT TABLE POSITIONING BEFORE SETTING UPRIGHT SET THE TABLE UPRIGHT: Tilt the table away from you and onto its feet. Make sure the brace locks are in their proper place over the brace joints. CRESCENT ARM REST Wood Legs: To attach the Crescent Arm Rest, slide both slotted ends of the bracket onto the rivets located on the inside of the front legs and push down until it snaps into place on top of the prone arm rest grips.
- Page 12 Headpiece Operation FLEXION AND EXTENSION Flex and extend the headpiece by operating the remote control lever on the underside of the headpiece with your fingertips. VERTICAL ELEVATION 2. Raise the front end of the headpiece 3. With practice, steps 1 & 2 can be 1.
- Page 13 Headpiece & Table Operation STRAIGHT DROP FORWARD MOTION DROP Knob pulled out BEFORE cocking Knob pushed in BEFORE cocking PRIOR to cocking the headpiece, set it for straight drop by PRIOR to cocking the headpiece, set it or forward motion pulling out the headpiece straight drop/forward motion knob drop by pushing in the headpiece straight drop/forward until you feel it is “set”...
- Page 14 Headpiece Operation HEADPIECE CUSHION ADJUSTABILITY The headpiece cushions are adjustable in width for patient comfort. Firmly pull up on the front end of each headpiece cushion and move in (one or two notches) or out (one or two notches) to the desired position. Secure cushions by engaging locating pins into notches provided.
- Page 15 Table Operation THORACIC SLANT SECTION Release the thoracic section by unfastening the Velcro. Swing down the metal slant bar and engage the ends into the holes in the leg blocks. Cervical palpation and adjusting. Anterior thoracic adjusting. PELVIC DROP Proper prone positioning on the pelvic Note: Release the thoracic section prior to raising or using the drop.
- Page 16 Table Operation CAUDAL DROP SIDE POSTURE POSITIONING With the thoracic section at a slant and the patient in a Postioning the patient in a side posture positon is ideal for supine position, the caudal drop can be used for anterior lumbo-pelvic or toggle recoil adjusting.
- Page 17 Abdominal Swing-Away Operation (optional feature) ABDOMINAL SWING-AWAY POSITIONING Activate the lever on the side of the table while depressing The Abdominal Swing-Away offers prone comfort to pregnant the abdominal section. This can be done with or without patients or to those with “a little extra around the middle.” the patient on the table.
- Page 18 3. Turn the table upside down onto its cushions. Tour Swing-Away: See page 19 for storing the gas spring and lever. Adjustable Legs: Adjust the table height to 24" or lower to allow the legs to fold into the table.
- Page 19 Tour Swing-Away only After Step 3 (on page 18): Detach the gas spring (first from the plywood and then from the front legs) and place it into the two spring clips, with the lever in an upright position. Make sure that there is no slack in the cable, as shown in the photo.
-
Page 20: Accessories & Upgrades
Accessories Full line of Accessories & Upgrades: www.thulitables.com PROTECTIVE COVER PULL CART The Protective Cover provides excellent protection when The strong, lightweight Pull Cart has large 5" rubber wheels traveling by car. To put the cover on, start with the folded and easily negotiates stairs, curbs and athetic fields. - Page 21 Wood Base Ingeniously converts the Tour portable table to an elevating table in minutes! Simply fold the legs inside and mount the Tour to the elevating Conversion Base using four hand-turn knobs. Detaches quickly when the need for a portable table arises.
-
Page 22: Care & Maintenance
Care & Maintenance DROPS: CLEANING & LUBRICATION Periodic lubrication of the drop mechanisms will ensure smooth, crisp drops. Apply 3-IN-ONE oil every month or 500 adjustments. If the drops have not been lubricated on a regular basis, first apply WD-40 to clean the plungers from dust &... -
Page 23: Warranty
Hydrogen Peroxide (3%): Available in spray bottle. Use undiluted and leave on for 5 minutes and rinse well with water. VINYL REPLACEMENT In the event of wear or damage, pre-sewn replacement vinyl is available from Thuli Tables. WARRANTY Our tables are designed and built to high standards. We are proud to offer a limited lifetime warranty against manufacturing defects, with the exception of the headpiece piston and the motor (on elevation tables), which are covered by a one year warranty. - Page 24 Junior Portable Sport Portable 300 Stationary Tour Portable 500 Stationary Elevation Tables Treatment Tables Portable Drops THULI TABLES...
Need help?
Do you have a question about the Tour and is the answer not in the manual?
Questions and answers