Dinstar UC350 Pro Quick Installation Manual
Hide thumbs
Also See for UC350 Pro:
- Quick installation manual (15 pages) ,
- Quick installation manual (14 pages)
Table of Contents

Subscribe to Our Youtube Channel
Related Manuals for Dinstar UC350 Pro


Summary of Contents for Dinstar UC350 Pro
- Page 1 Quick Installation Guide UC350 Pro THANKS FOR CHOOSING DINSTAR'S Products! Please read this guide carefully before installing the device. If you need any technical support, please contact us. Tel: +86 755 61919966 Email: support@dinstar.com Web: www.dinstar.com...
- Page 2 1 UC350 Pro Model and Interfaces User Board MCU Board (FXO, F XS , FX U, DT U ) FXS B oa rd: 2 *R J 45 w it h 8 F XS 4*Network Ports ⚫ FXO B oard: 2 *R J 45 w it h 8 F XO 2*USB 2.0 Ports...
-
Page 3: Installation Attentions
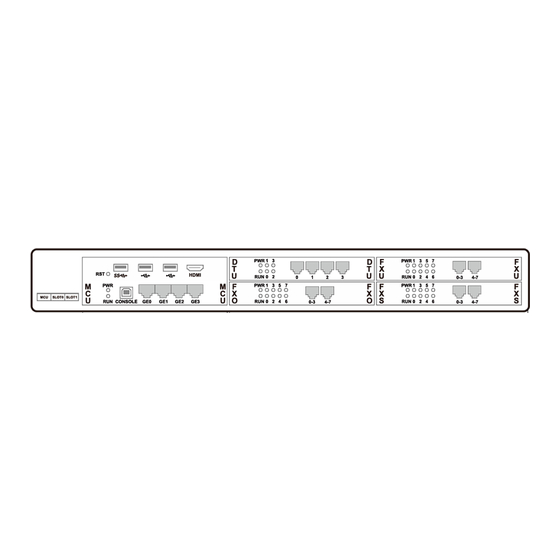
3 Indicators and Ports Front View: Back View: 4 Installation Attentions The adapter of the gateway accepts DC220V 10A dual power input. Please ensure ⚫ it is workable and safe. To reduce the interference to telephone calls, please separate power supply ⚫... -
Page 4: Login Web Gui
5 Hardware installation & network connection Connect the power adapter to the power jack. Connect telephone line to the FXS port and connect PSTN line to the FXO port. Connect network cable to the GE0 port, and the GE3 port is connected to the PC. 6 Login Web GUI Open a browser and enter the IP address of GE3 port (the default IP is 192.168.11.1). -
Page 5: Check Network Status
7 Check Network Status Check the network status on the "System->Network" page. - Page 6 9 Create SIP Extensions Click "Extension & Call Group->SIP Extension" to create the SIP extension: add/delete/disable/enable, etc. UC350 Pro supports batch add or import account files. Note: when add the extension, the profile should be chosen as the corresponding one.
- Page 7 After setting, you need to click "apply" to make the settings take effect.
-
Page 8: Add Trunk
The registration status of SIP extension can be checked on the "Extension & Call Group->SIP Extension->Status" page. If the status of a newly added SIP account is "registered", it means that the device accepts the registration of the extension. If the status of the SIP account is "unregistered", it means that the device rejects to register the extension. - Page 9 ⚫ You can also create Trunk/FXO. It is an alternative to support calls go through or from PSTN. E1/T1 ⚫ You can set up ISDN PRI/SS7 connections via digital E1/T1 ports. Please be sure that the E1/T1 physical connection is well connected, and PRI status is in up and active status before configuring the call routing.
- Page 11 11 Configure Inbound / Outbound Route On the "Trunk & Route->Route" interface, you can configure routes for incoming calls and outgoing calls, and select the call Source and Destination addresses for the route. When the configured route is activated, the system will match the route based on the priority index.
- Page 12 12 Regular Expression Caller/Called number prefix supports regular expression Regular Expression Syntax Matches the starting position in a number string. For example, ^134 matche s the numbers starting with 134. Matches the ending position of a string. For example, 2$ matches the numb ers ending with 2.
-
Page 13: Basic Operation
Examples of Regex Syntax: Matches the phone numbers with starting digits of 075 ^0755 Matches the phone numbers with starting digits of 075 ^07 55|^8899|^0110 5, 8899 or 0110. Matches the phone numbers with the first digit as 1, th e second digit as 3, 5 or 8, the left nine digits as any of ^ [1][358][0-9]{9}$ 0 to 9.
Need help?
Do you have a question about the UC350 Pro and is the answer not in the manual?
Questions and answers