Advertisement
EW-DP EK portable receiver
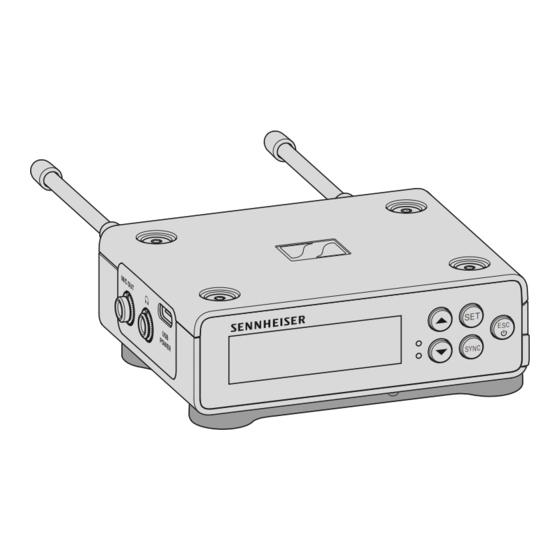
Product overview
Front
1
Display for status information and operating menu
• See "Displays on the receiver's display panel"
LINK and DATA LEDs to indicate connection status and
2
Bluetooth status
• See "Meaning of the LEDs"
UP/DOWN/SET menu buttons for navigating the operating
3
menu
• See "Making settings in the menu"
4
ESC/ON/OFF button for canceling an action in the menu or
switching the device on and off
• See "Making settings in the menu"
• See "Switching the receiver on and off"
SYNC button for synchronizing the transmitter and receiver
5
• See "Establishing a radio link | Synchronizing the receiver
and transmitter"
EW-DP EK portable receiver
201
Advertisement
Table of Contents

Related Manuals for Sennheiser EW-DP EK


Summary of Contents for Sennheiser EW-DP EK
- Page 1 EW-DP EK portable receiver EW-DP EK portable receiver Product overview Front Display for status information and operating menu • See "Displays on the receiver’s display panel" LINK and DATA LEDs to indicate connection status and Bluetooth status • See "Meaning of the LEDs"...
- Page 2 EW-DP EK portable receiver Side 3.5 mm jack socket for headphones • See "Outputting audio signals" USB-C connection socket for power supply • See "Power supply" 3.5 mm jack socket for connecting cable • See "Outputting audio signals"...
-
Page 3: Power Supply
EW-DP EK portable receiver Power supply The EW-DP EK can be powered in two different ways: Power supply via USB-C from a camera or power bank: USB-C Power S E T ES C SY NC Powerbank Connect the receiver to a camera or other power supply us- ▷... - Page 4 BA 70 rechargeable battery (included in scope of delivery) optional: 2 AA batteries Open the EW-DP EK unit’s battery compartment by press- ▷ ing in the two release buttons on the sides. Insert either a BA 70 rechargeable battery or 2 AA batter- ▷...
- Page 5 EW-DP EK portable receiver Outputting audio signals The EW-DP EK has an unbalanced 3.5 mm audio output and an unbalanced 3.5 mm headphone output. CAUTION Danger due to high volume levels Volume levels that are too high may damage your hearing.
- Page 6 EW-DP EK portable receiver Mounting the receiver / mounting options EW-DP EK mounting accessories:...
- Page 7 EW-DP EK portable receiver Combining the mounting plate and hot shoe adapt- hot shoe adapter can be fitted to the mounting plate in dif- ferent positions according to the mounting situation. To mount the hot shoe adapter on the mounting plate: Pre-assemble the hot shoe adapter by connecting the ▷...
- Page 8 EW-DP EK portable receiver Mounting plate and clip: As an alternative to the hot shoe adapter, a metal clip can be attached to the side of the mounting plate. To mount the clip on the mounting plate: Insert the clip into the side of the mounting plate as shown.
- Page 9 To mount the receiver on the mounting plate: Insert the receiver’s four magnetic feet into the recesses on ▷ the mounting plate. Two stacked receivers can be connected to one another us- ing a Y-cable. See "Cables for EW-DP EK"...
- Page 10 EW-DP EK portable receiver Mounting with the mounting plate in a rotated posi- tion: To mount the receiver with the mounting plate rotated by 90°: Turn the mounting plate by 90° and screw it to the bottom ▷ of the receiver in the desired position.
- Page 11 EW-DP EK portable receiver Example for mounting on a DSLR or video camera: To mount the mounting plate with hot shoe adapter on a DSLR or video camera: Slide the adapter into the camera’s hot shoe. ▷ Rotate the lever on the hot shoe adapter until the adapter is ▷...
- Page 12 EW-DP EK portable receiver Example for mounting on camera cages: To attach the mounting plate to a camera cage: Screw the mounting plate to the camera cage using one or ▷ two screws, depending on the mounting situation and posi- tion.
- Page 13 EW-DP EK portable receiver Example for attaching to pockets and belts: To fasten the receiver with mounting plate to pockets or belts: Attach the clip to the mounting plate. ▷ Attach the mounting plate to the receiver by inserting a ▷...
- Page 14 EW-DP EK portable receiver Example for mounting on tripods: To fasten the mounting plate to a tripod: Screw the mounting plate onto the tripod thread at the de- ▷ sired position. Now you can attach one or two receivers to the mounting...
-
Page 15: Switching The Receiver On And Off
EW-DP EK portable receiver Switching the receiver on and off To switch the receiver on: Short-press the ON/OFF button. ▷ The receiver switches on. To switch the receiver off: Press the ON/OFF button. ▷ The receiver switches off. ▷... -
Page 16: Meaning Of The Leds
EW-DP EK portable receiver Meaning of the LEDs The LINK and DATA LEDs on the front of the receiver can in- dicate the following information. LINK LED The LINK LED provides information about the status of the ra- dio link between the transmitter and receiver, as well as status information for the paired transmitter. - Page 17 EW-DP EK portable receiver The LED is continuously red: No link between the transmitter and receiver. ▷ The LED is flashing red: The battery/rechargeable battery in the paired transmitter ▷ is low. DATA LED The DATA LED provides information on the receiver’s Blue- tooth Low Energy link to the EW-D Smart Assist app and on the synchronization of transmitters and receivers.
- Page 18 EW-DP EK portable receiver Displays on the receiver’s display panel Status information such as frequency, reception quality, bat- tery status and audio level is shown on the display. The display also shows the operating menu, which you can use to configure all of the settings (see "Making settings in the menu").
- Page 19 EW-DP EK portable receiver Link name: Can be changed in the Smart Assist app. Receiver battery: "Power supply" Transmitter battery: SKM-S -> "Inserting and removing the batteries/rechargeable batteries" | SK -> "Inserting and removing the batteries/re- chargeable batteries" Frequency / channel: "AUTO SCAN menu item"...
- Page 20 EW-DP EK portable receiver Making settings in the menu Buttons for navigating the menu Use the following buttons to navigate through the receiver’s operating menu. ► Press the SET button • Open the menu • Save settings in a menu item Press the UP or DOWN button •...
- Page 21 EW-DP EK portable receiver Main view and advanced view After the device switches on, the display shows the main view. ► See "Displays on the receiver’s display panel" Press the UP button to access the advanced view. ▷ ► See "Displays on the receiver’s display panel"...
- Page 22 EW-DP EK portable receiver To open a menu item: Navigate to the desired menu item until it flashes. ▷ Press the SET button to open the selected menu item. ▷ GAIN menu item Under the GAIN menu item, you can set the level of the audio signal coming from the paired transmitter.
- Page 23 EW-DP EK portable receiver Headphone menu item Under the Headphone menu item, you can set the volume of the audio signal coming from the receiver’s headphone output. CAUTION Danger due to high volume levels Volume levels that are too high may damage your hearing.
- Page 24 EW-DP EK portable receiver MUTE switch menu item Under the MUTE switch menu item, you can disable the mute switch on the paired transmitter. The transmitter can then no longer be muted. Open the MUTE switch menu item. ▷ The display looks as follows.
- Page 25 EW-DP EK portable receiver AUTO SCAN menu item Under the AUTO SCAN menu item, you can perform an auto- matic frequency scan of your area. This enables you to easily find and assign free radio frequencies. The scan starts at the lowest frequency in the device’s fre- quency range.
- Page 26 EW-DP EK portable receiver CHANNEL menu item Under the CHANNEL menu item, you can set the radio fre- quency by selecting a preset channel. If you are not sure whether the selected frequency is free, we recommend performing a scan to detect all free fre- quencies: "AUTO SCAN menu item".
-
Page 27: Frequency Menu Item
EW-DP EK portable receiver Frequency menu item Under the FREQUENCY menu item, you can manually set the radio frequency independently of the preset channels. If you are not sure whether the selected frequency is free, we recommend performing a scan to detect all free fre- quencies: "AUTO SCAN menu item". - Page 28 EW-DP EK portable receiver BRIGHTNESS menu item Under the BRIGHTNESS menu item, you can set the bright- ness of the display. Open the BRIGHTNESS menu item. ▷ The display looks as follows. ► Press the UP or DOWN button to set the desired bright- ▷...
- Page 29 Some features may not be available. Conditions and restrictions for using frequencies There may be special conditions and restrictions for using fre- quencies in your country. Before putting the product into operation, find the information for your country at the following address: www.sennheiser.com/sifa...
- Page 30 Establishing a radio link | Synchronizing the receiver and transmitter Connecting to the EW-D EM receiver / synchronizing the EW-D EM To establish a radio link between the transmitter and receiver, we recommend the following procedure. In order to establish a connection between a receiver and transmitters of the EW-D series, the devices must always be synchronized with each other.
- Page 31 Establishing a radio link | Synchronizing the receiver and transmitter Connecting to the EW-DX EM 2 receiver / synchronizing the EW-DX EM 2 To establish a radio link between the transmitter and receiver, we recommend the following procedure. In order to establish a connection between a receiver and transmitters of the EW-D series, the devices do not necessar- ily have to be synchronized with each other.
- Page 32 Establishing a radio link | Synchronizing the receiver and transmitter The receiver’s display shows that the synchronization pro- cess has started. The LED for the selected receiving channel flashes blue. Short-press the SYNC button on the transmitter. ▷ The blue DATA LED flashes. ►...
- Page 33 To establish a radio link between the transmitter and receiver, we recommend the following procedure. In order to establish a connection between a receiver and transmitters of the EW-DP EK series, the devices must always be synchronized with each other. To successfully connect receivers and transmitters, both de- vices must have the same frequency range.
- Page 34 EW-DP EK portable receiver EW-DP EK portable receiver Input voltage ~ 1.8 – 4.35 V Input current Typically < 250 mA / max. < 400 mA / max. < 750 mA (2x AA batteries) < 300 mA @ 5 V (USB-C standalone) Power supply 2x AA batteries 1.5 V or USB-C PD (max.):...
Need help?
Do you have a question about the EW-DP EK and is the answer not in the manual?
Questions and answers