Advertisement
Advertisement
Table of Contents

Related Manuals for VTech 2-in-1 Map & Go Scooter


Summary of Contents for VTech 2-in-1 Map & Go Scooter
- Page 1 Instruction Manual 2-in-1 Map & Go Scooter ™...
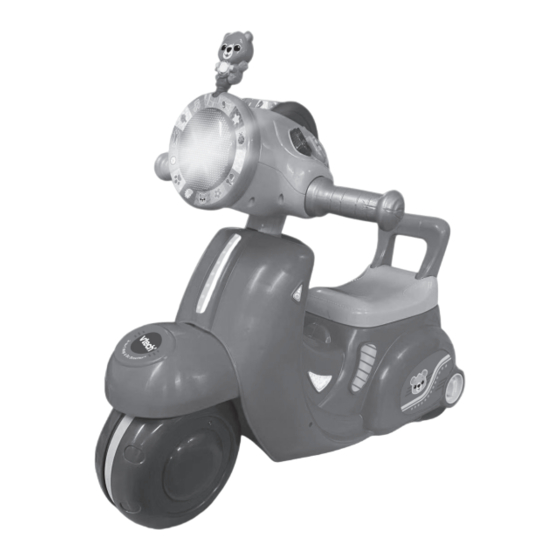
- Page 2 INTRODUCTION Thank you for purchasing the 2-in-1 Map & Go Scooter™! Ride through playtime with the scooter that grows with tiny travelers starting as a three-wheeled trike, then transforming into a two- wheeled scooter. Explore locations on the map, twist the headlight ring and add in traffic and road safety phrases to make the journey as delightful as the destination! On/Off/Volume Switch...
-
Page 3: Included In The Package
INCLUDED IN THE PACKAGE Short Axel Long Axel Two Back Wheels Seat Back Handle Front Wheel Front Wheel Cover Driving Panel Four Screws Two Handlebars Driving Panel Scooter Body Label Sheet Support Post • Quick Start Guide... - Page 4 WARNING All packing materials such as tape, plastic sheets, packaging locks, removable tags, cable ties, cords and packaging screws are not part of this toy, and should be discarded for your child’s safety. NOTE Please save this Instruction Manual as it contains important information.
-
Page 5: Label Application
LABEL APPLICATION Please securely stick the labels to the scooter as indicted below:... -
Page 6: Getting Started
GETTING STARTED Battery Removal and Installation 1. Make sure the unit is turned Off. 2. Find the battery cover located on the back of the Driving Panel, use a screwdriver to loosen the screw and then open the battery cover. 3. - Page 7 RECHARGEABLE BATTERIES: • Remove rechargeable batteries (if removable) from toy before charging. • Rechargeable batteries are only to be charged under adult supervision. • Do not charge non-rechargeable batteries. ASSEMBLY INSTRUCTIONS With the 2-in-1 Map & Go Scooter™ safety comes first. To ensure your child’s safety, adult assembly is required.
- Page 8 4. Attach the Driving Panel Support Post to the bottom of the Driving Panel, securing the pieces together with the four Small Screws. 5. Insert the Front Wheel into the bottom of the Scooter Body. Push until you hear the Front Wheel snap into place. 6.
- Page 9 7. To remove the Back Wheels, slide and hold the Wheel Lock while pulling out the Small Axel. Next, slide and hold the Wheel Lock and pull out the Long Axel, then remove and separate the two Wheels. 8. To assemble the Back Wheels in the Tricycle position, slide the Short Axel through the outside of one of the Wheels, then through the corresponding hole in one of the Scooter’s Wheel Supports.
-
Page 10: Product Features
9. Please check the Wheel Locks before using the scooter. The Wheel Locks will spring into the locked position when the Wheel Axels are properly installed. PRODUCT FEATURES 1. On/Off/Volume Switch To turn the unit On, turn the On/Off/ Volume Switch to the Low volume or High volume position. - Page 11 2. Rolling Map Turn the Rolling Map to one of the four positions to identify the locations through fun phrases and sounds associated with the locations. The lights will flash with the sound. 3. Twisting Headlight Ring Turn the Twisting Headlight Ring to hear a variety of fun sounds.
-
Page 12: Care And Maintenance
12. Skip to My Lou 13. Do You Know the Muffin Man? 14. Here We Go Round the Mulberry Bush 15. While Strolling Through the Park 16. The Alphabet Song SONG LYRICS Song 1 Are you ready? Are you ready? Time to ride, time to ride. -
Page 13: Troubleshooting
Canada, or by going to our website at vtechkids.com and filling out our Contact Us form located under the Customer Support link. Creating and developing VTech products is accompanied by a responsibility that we take very seriously. We make every effort to ensure the accuracy of the information, which forms the value of our products. - Page 14 Trade Name: VTech Model: 5723 Product Name: 2-in-1 Map & Go Scooter Responsible Party: VTech Electronics North America, L.L.C. Address: 1156 W. Shure Drive, Suite 200 Arlington Heights, IL 60004 Website: vtechkids.com THIS DEVICE COMPLIES WITH PART 15 OF THE FCC RULES.
- Page 15 Visit our website for more information about our products, downloads, resources and more. vtechkids.com vtechkids.ca Read our complete warranty policy online at vtechkids.com/warranty vtechkids.ca/warranty TM & © 2024 VTech Holdings Limited. All rights reserved. IM-572300-000 Version:0...
Need help?
Do you have a question about the 2-in-1 Map & Go Scooter and is the answer not in the manual?
Questions and answers
How does the driving panel attach to the body. It comes off with little effort
The Driving Panel attaches to the body of the VTech 2-in-1 Map & Go Scooter by securing the Driving Panel Support Post to the bottom of the Driving Panel using four Small Screws.
This answer is automatically generated
@Norma spurlock Same issue.
How to I get the driving panel to connect with the scooter
To connect the Driving Panel to the VTech 2-in-1 Map & Go Scooter, insert the Handlebars into either side of the Driving Panel. Push until you hear the Handlebars snap into place.
This answer is automatically generated
Trying to disconnect the front handle bars, it was put together wrong by another person.
The document does not provide instructions for disconnecting the front handlebars on the VTech 2-in-1 Map & Go Scooter.
This answer is automatically generated
I need help dissembling the front wheel and handles because I didn’t tighten the handle screws enough
The provided information does not include instructions for disassembling the front wheel or handles on the VTech 2-in-1 Map & Go Scooter. Therefore, disassembly steps cannot be determined from the context.
This answer is automatically generated
To connect the Driving Panel to the VTech 2-in-1 Map & Go Scooter, insert on the body of the scooter but it does not lock. Cannot go through