Table of Contents
Advertisement
Advertisement
Table of Contents

Related Manuals for Kodak CHERISH C225


Summary of Contents for Kodak CHERISH C225
- Page 1 CHERISH_EN_C220/C225_V13...
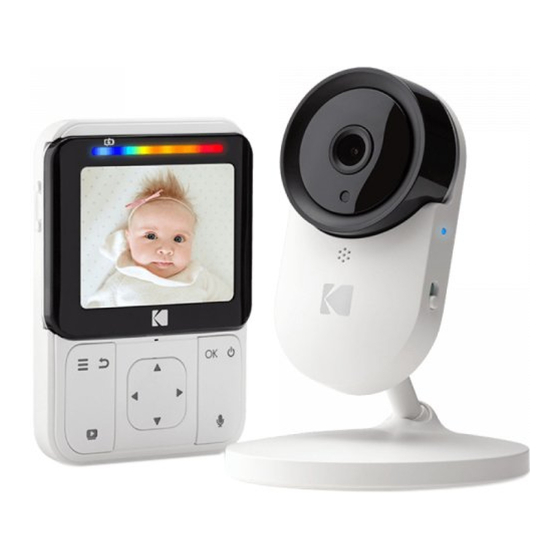
- Page 2 WELCOME ASSEMBLY Thank you for buying the KODAK CHERISH Check List: C220/C225 2.8” Wi-Fi Video Baby Monitor. With the Baby Monitor’s Parent Unit or your mobile device, now you can monitor your baby sleeping in another room anywhere, anytime! C220 C225 Please keep your original dated sales receipt.
- Page 3 PARENT UNIT OVERVIEW Keys : Press to return to the previous menu Volume Up Volume Down : Press to enter/exit the Menu mode Battery Status Indicator : Press to turn on/off the LCD display Display : Press to confirm (LCD Screen resolution : Press and hold to turn on/off the baby unit 320x240) Charging Socket...
- Page 4 LED BEHAVIORS FOR PARENT UNIT The first LED lights up in The first LED lights When the third and The first LED lights When it’s fully blue/ purple when the up in when it’s fourth LED light up up in when it’s charged and the in yellow, the baby...
- Page 5 BABY UNIT OVERVIEW KODAK CHERISH C220 Speaker Battery Door Camera Lens Lens Frame (resolution HD(720p)) Charging Socket Holes for wall LED Power Indicator IR Sensor Power ON/OFF Switch Ball Joint Arm mount Microphone Thermometer and Pair Button Humidity Sensor Micro-SD Card...
- Page 6 BABY UNIT OVERVIEW KODAK CHERISH C225 IR Sensor Charging Socket 13. Micro-SD Card Cover (Only up to 32GB - Class 10 Camera Lens Speaker (with memory card) resolution HD(720p)) Microphone 14. Thermometer and Lense Frame with 10. Pair Button Humidity...
- Page 7 INSTRUCTION OF HOW TO WALL MOUNT YOUR C220 CAMERA First, put the screws on the wall. The diame- Slide the base of the camera downwards so that the ter of the screws should be at least 5mm and screws lock towards the narrow side. maximum of 9mm.
- Page 8 INSTRUCTIONS OF HOW TO WALL MOUNT THE CAMERA (C225) INSTRUCTION OF HOW TO WALL MOUNT YOUR C225 CAMERA First, put the screws on the wall. The diame- Place and match the wider holes on the base ter of the screws should be at least 5mm and of the camera with the screws.
- Page 9 LED Behaviors for Baby Unit(C220) Camera is OFF, battery is charging: Solid Red Camera powering up: Solid Blue for first few seconds Camera locating router: Blue blinking every one second Camera connected to router: Solid Blue Camera in pair mode: Blinking Blue & Red Firmware upgrading.
- Page 10 ESSENTIAL GUIDELINES FOR THE INSTALLATION OF YOUR BABY MONITOR • Before using your Baby Unit and the Parent Unit • Insert one of the in-box batteries into the Parent Unit. together, you must first establish a radio link The battery should be inserted with the label facing between them.
-
Page 11: Table Of Contents
2.1 Baby Unit Power Supply 2.2 Parent Unit Power Supply Troubleshooting 2.3 Registration (Pairing) “KODAK Smart Home” In-App Setup Using the Baby Monitor 3.1 Setting Up Monitoring Your Baby Via the App 3.2 Power On or Off the Baby Unit Grant Access 3.3 Power On or Off the Parent Unit... -
Page 12: Safety Instructions
1. SAFETY INSTRUCTIONS • This product is not a toy. Never let children play with it. • This Baby Monitor is not and shall not be deemed to be a substitute for responsible adult supervision. WARNING: • Retain this User Manual for future reference. •... -
Page 13: Getting Started
2. GETTING STARTED 2.1 Baby Unit Power Supply 2.2 Parent Unit Power Supply The Baby Unit comes with a built-in Li-ion battery. The The Parent Unit comes with a built-in Li-ion battery should be charged for 6 hours. Charging C220 Baby Unit should be charged for 6 hours and the rechargeable battery pack fully before use is the C225 Baby Unit should be charged for 8 hours. -
Page 14: Registration (Pairing)
2.3 Registration (Pairing) The Baby Unit is pre-registered to your Parent Unit. The Parent Unit will auto detect and pair to the You do not need to register it again unless the Baby Baby Unit. Parent Unit will then display live stream Unit loses its link with the Parent Unit. -
Page 15: Using The Baby Monitor
3. USING THE BABY MONITOR Please read these instructions carefully, and be aware that this Baby Monitor is only intended as an aid. It is not a substitute for responsible adult supervision. 3.1 Setting Up 3.2 Power On or Off the Baby Unit •... -
Page 16: Talk Mode
3.4 Talk Mode • Press and hold the TALK button on the parent unit to talk to your baby through the Baby Unit’s loudspeaker. The “TALK” icon will be displayed at the top of the LCD screen. When finished talking release the TALK button to hear your baby again. -
Page 17: Parent Unit Menu Options
4. PARENT UNIT MENU OPTIONS Parent Unit Menu Keys Take Snapshot/ View Snapshot Set 12 or 24 hour Time Format Add / Delete / View Camera Set network connectivity between Camera and Parent Unit Select Melody to playback on Baby Unit Switch to router mode or direct mode automatically to extend range Set Temperature Scale &... - Page 18 Parent Unit Status Bar 12 13 18:30 °C Wi-Fi Signal Humidity Voice Activation Alert Device number Talk Key (VOX) (appears as you 12. Router Mode press on the talk back key on Baby Unit Battery Status the parent unit) 13. Direct Mode Parent Unit Local Time (available...
-
Page 19: Snapshot
4.1 Snapshot 4.2 Add (Pair) a Camera Prerequisite: This feature needs Class 10 Micro-SD card 4.2.1 Camera Registration to be inserted in the Baby Unit. (see page 28) When the camera pairing icon “ ” appears; Press “ ” on the Parent Unit for the menu bar. press and hold the pair button on the baby unit Press the “... - Page 20 4.2.2 Delete a Camera 4.2.3 View Camera Press the “ ” button of the Parent Unit for the Press “ ” on the Parent Unit for the menu bar. menu bar. Press “ ” or “ ” button to select (CAMERA) icon , and press “...
-
Page 21: Set Wi-Fi Network Connection Between The Camera And The Parent Unit
Camera and Parent Unit by using the Wi-Fi router as switches automatically to connect to the Wi-Fi router to a bridge. Please pair the camera via Wi-Fi with KODAK access the camera or connect directly to the camera Smart Home App to get the latest firmware version for based on best effort. - Page 22 4.3.2 Router Mode 4.3.3 Direct Mode Note Note In this mode, the Parent Unit will always connect via In this mode, the Parent Unit will always connect Wi-Fi router to access the camera. directly to the camera Press “ ” on the Parent Unit for the menu bar. Press “...
- Page 23 Suggested Set up to get the best range when using the Auto/Router Mode. Page | 44 Parent Unit Options Introduction...
- Page 24 Below Setup may not help to extend the range between Parent Unit and Baby Unit using Auto/Router mode. Direct mode is recommended in this case. Page | 46 Parent Unit Options Introduction...
-
Page 25: Set 12 Or 24 Hour Time Format
4.4 Set 12 or 24 hour Time Format 4.5 Melody Note Press “ ” on the Parent Unit for the menu bar. Please pair the camera via Wi-Fi with KODAK Smart Press “ ” or “ ” button to select (MELODY) , Home App to get the latest firmware version for this and press “... -
Page 26: Temperature
4.6 Temperature 4.7 Brightness Press “ ” on the Parent Unit for the menu bar. Press the “ ” for the menu bar. Press the “ ” button or “ ” until Press “ ” or “ ” button to select (TEMPERATURE) icon is highlighted. -
Page 27: Zoom
4.9 Zoom 4.11 Voice Activation Press “ ” for the menu bar. Normal audio will resume once the audio level is Press the “ ” or “ ” until (ZOOM) is higher than the VOX audio threshold set. You can highlighted. -
Page 28: Proper Disposal Of The Device
5. PROPER DISPOSAL OF THE DEVICE 6. CLEANING YOUR DEVICE When the product comes to the Wipe your Baby Monitor with a slightly moistened or end of its life cycle, you should not anti-static cloth. Refrain from using cleaning agents or dispose of it with normal household abrasive solvents. -
Page 29: Troubleshooting
7. TROUBLESHOOTING We suggest to pair the camera via Wi-Fi with the The Battery icon on the Parent Unit flashes KODAK Smart Home App to get the latest firmware • The Parent Unit maybe running low on battery. version for your devices... - Page 30 Battery life in the Parent Unit runs low quickly There is no transmission from the Baby Unit to the • The LCD brightness may be set too high. Try to Parent Unit • Switch on both the Baby and Parent Units. decrease the brightness level.
-
Page 31: Kodak Smart Home" In-App Setup
8. “KODAK SMART HOME” IN-APP SETUP You can also connect the Baby Unit with your mobile device. Read on for a step-by-step guide. Step 1: Download the “KODAK Smart Home” App To download the “KODAK Smart Home” app: • On your mobile device, visit the App Store (iOS) or Google Play (Android) •... - Page 32 Step 2: Create or Login to Your Account If this is your first KODAK Smart Home product, you will If you already have another KODAK Smart Home be asked to create an account. To set up an account: product installed, simply select LOGIN: •...
- Page 33 Baby Monitor near your wireless router with the KODAK Smart Home app: • Select Add new device… • Select Baby Series > KODAK CHERISH C220/C225 • The app will then walk you through the setup process KODAK CHERISH C220 KODAK CHERISH C225...
- Page 34 In the middle of the setup process, you will be For IOS devices, you will have to connect to the required to get your KODAK CHERISH C220/C225 camera’s Wi-Fi through your Wi-Fi settings of your Wi-Fi Baby Monitor into the setup mode. To do this: phone.
- Page 35 Your Baby Monitor should now start pairing with your mobile device automatically: • You will hear Setup Completed when the Baby Monitor is successfully paired • You may choose one of the recommended names or rename your Baby Monitor by selecting Custom. Page | 68 KODAK Smart Home...
- Page 36 The Baby Monitor is now added to the Dashboard of • When you monitor remotely via the app (using the KODAK Smart Home app: your mobile data or another WiFi ) the live • You may now run a test by clicking on the...
-
Page 37: Monitoring Your Baby Via The App
After you have created an account and installed • You can pinch outwards to zoom in on the video a baby unit, simply click on the KODAK Smart image, or pinch inwards to zoom out. Home app icon to monitor your baby by visiting •... - Page 38 KODAK Smart Home Icons You may also perform one or more of the following actions by clicking on the MENU icon: Dashboard Menu Tap here to return to the Click to open/close menu “Home” screen Mute Video Gallery Press this button to toggle...
-
Page 39: Grant Access
Click on “ Simply follow ” which Access which is the instructions is located under located on on the app and click Save to on the Devices the top right Dashboard add a friend Page | 76 KODAK Smart Home... - Page 40 QR code to camera you friend scan generate a want to share the QR code QR code to and turn on or from your add friend off the Access device rights Page | 78 KODAK Smart Home KODAK Smart Home...
- Page 41 10.2.2 Add a Friend-via Email Click on via Add an email Email and select the camera(s) that you want to give access to Page | 80 KODAK Smart Home Introduction...
- Page 42 Click Save Click on “ ” Click Remove to email of the to save to remove person that changes friend confirm you would like to make changes to Page | 82 KODAK Smart Home KODAK Smart Home KODAK Smart Home Introduction...
-
Page 43: Zone Detection
Press “ ” located at Detection ,click located at when finished and click the right Define Zone to the middle of on Update Zone to Detect Motion Camera to save bottom your screen corner Page | 84 KODAK Smart Home... -
Page 44: Timeline
Choose the timeline will monitor “ “which is date range not have any detects motion, located on you want to video clips the timeline the Timeline review the function will video clips record it Page | 86 KODAK Smart Home... -
Page 45: Further Information
13. FURTHER INFORMATION Consumer Products and Accessories Limited If your product is not functioning properly: Warranty (“Warranty”) • Consult this User Manual or the Quick Start Guide. • Check out our support website at www. What does this warranty cover? kodaksmarthome.com/support •... - Page 46 What other limitations are there? • Some jurisdictions do not allow the limitation or exclusion of incidental or consequential damages, • ANY IMPLIED WARRANTIES, INCLUDING or limitation on the length of an implied warranty, WITHOUT LIMITATION THE IMPLIED WARRANTIES so the above limitations or exclusions may not OF MERCHANTABILITY AND FITNESS FOR A apply to you.
-
Page 47: Exclusions From Coverage
EXCLUSIONS FROM COVERAGE • Use of Non-eBuyNow branded Products and Accessories: Defects or damage due to the use of non-eBuyNow branded or certified Products or Accessories or other peripheral equipment are not • Normal Wear and Tear: Regular maintenance, covered. repair and replacement of parts and components •... -
Page 48: How To Obtain Warranty Service Or
HOW TO OBTAIN WARRANTY SERVICE OR OTHER INFORMATION? To obtain service or information, please email to These Terms and Conditions constitute the complete support@kodaksmarthome.com. warranty agreement between you and eBuyNow regarding the Products or Accessories purchased You will receive instructions on how to ship the by you, and supersede any prior agreement or Products or Accessories at your expense and risk, to representations, including representations made in... -
Page 49: Fcc, Ic And Ce Regulations
Reorient or relocate the receiving antenna. FCC, IC AND CE REGULATIONS • Increase the distance between the equipment and receiver. Trade Name: KODAK • Connect the equipment into an outlet on a Model: C220 / C225 circuit different from that to which the receiver is... -
Page 50: Warning
WARNING Changes or modifications, to this equipment not Le présent appareil est conforme aux CNR d’Industrie expressively approved by the party responsible for Canada applicables aux appareils radio exempts compliance could void the user’s authority to operate de licence. L’exploitation est autorisée aux deux the equipment. -
Page 51: Ec Declaration Of Conformity
Radio Spectrum: EN300328 V2.1.1 Type of equipment: Smart Baby Monitor EMC: EN301489-17 V3.2.0 Model Name: C220/C225 EN301489-1 V2.2.2 Brand: KODAK Electrical Safety: EN60950-2006+A11+A1+A12+A2 RF Safety: EN62311:2008 complies with the essential protection requirements ErP: EN50564:2011 of RED Directive 2014/53/EU on the approximation... -
Page 52: Technical Specifications
14. TECHNICAL SPECIFICATIONS Baby Unit Parent Unit Camera Sensor color CMOS 1Mpixel Display 2.8” TFT LCD: 320 x 240 720p sensor resolution M12 4G lens FOV 70 5 levels Default: 3 Lens Viewing Angle Brightness Control degrees Volume Control 5 levels Default: 3 Power Adapter Input: 100-240V AC, Temperature and... - Page 53 Page | 104 CHERISH_EN_C220/C225_V13...
Need help?
Do you have a question about the CHERISH C225 and is the answer not in the manual?
Questions and answers