Table of Contents
Advertisement
Quick Links
PERSONAL
PORTABLE AIR CONDITIONER
INSTRUCTION MANUAL
CATALOG NUMBER
BP01PT
Thank you for choosing BLACK+DECKER!
PLEASE READ BEFORE RETURNING THIS PRODUCT FOR
ANY REASON.
If you have a question or experience a problem with your BLACK+DECKER
purchase, go to www.blackanddecker.com/instantanswers
If you can't find the answer or do not have access to the Internet, call
844-299-0879 from 10:30 a.m. to 6:30 p.m. EST Mon. - Fri. to speak with an
agent. Please have the catalog number available when you call.
SAVE THIS MANUAL FOR FUTURE REFERENCE.
Page 1
Advertisement
Table of Contents
Troubleshooting

Subscribe to Our Youtube Channel
Related Manuals for Black & Decker BP01PT


Summary of Contents for Black & Decker BP01PT
- Page 1 PERSONAL PORTABLE AIR CONDITIONER INSTRUCTION MANUAL CATALOG NUMBER BP01PT Thank you for choosing BLACK+DECKER! PLEASE READ BEFORE RETURNING THIS PRODUCT FOR ANY REASON. If you have a question or experience a problem with your BLACK+DECKER purchase, go to www.blackanddecker.com/instantanswers If you can’t find the answer or do not have access to the Internet, call 844-299-0879 from 10:30 a.m.
-
Page 2: Table Of Contents
CONTENTS SAFETY INFORMATION Important Safety Instructions .............................. 3 Grounding Instructions ................................4 LCDI Power Cord and Plug ..............................5 Tip-over Safety Feature .................................6 Safety Guidelines ..............................7 Operating Condition .............................. 8 SET UP & USE Parts & Features ..................................9 Installation Guide Location ............................10-11 Control Panel ....................................12 Operating from the Control Panel..........................12-13 Draining the Water Tank .............................. -
Page 3: Safety Information
SAFETY INFORMATION DANGER WARNING CAUTION DANGER - Immediate hazards WARNING - Hazards or unsafe CAUTION - Hazards or unsafe which WILL result in severe practices which COULD result in practices which COULD result in personal injury or death severe personal injury or death minor personal injury IMPORTANT SAFETY INSTRUCTIONS WARNING... -
Page 4: Grounding Instructions
SAFETY INFORMATION GROUNDING INSTRUCTIONS ELECTRICAL REQUIREMENTS In the event of malfunction or breakdown, grounding provides a path of least resistance for electric current to reduce the risk of electric shock. The appliance must be connected to a cord having an equipment-grounding conductor and a grounding plug. -
Page 5: Lcdi Power Cord And Plug
SAFETY INFORMATION LCDI POWER CORD AND PLUG This air conditioner is equipped with an LCDI (Leakage Current Detection and Interruption) power cord that is required by UL. This power supply cord contains state-of-the-art electronics that sense leakage current. If the cord is damaged and leakage occurs, power will be disconnected from the unit. -
Page 6: Tip-Over Safety Feature
SAFETY INFORMATION TIP-OVER SAFETY FEATURE Never transport or store the unit upside down or on its side. If this oc- curs wait at least 6 hours before turning on the unit 24 hours is recom- mended. After the unit has been turned on its side, oil needs to return to the compressor, to ensure proper function. -
Page 7: Safety Guidelines
SAFETY INFORMATION SAFETY GUIDELINES To prevent injury to the user or other people and property damage, the following instructions must be followed. Incorrect operation due to ignoring of instructions may cause harm or damage. ALWAYS DO THIS NEVER DO THIS ENERGY SAVE •... -
Page 8: Operating Condition
SAFETY INFORMATION OPERATING CONDITION The air conditioner must be operated within the temperature range indicated below: NOTE: Unit performance may be affected when in use outside of these operating temperatures. MODE ROOM TEMPERATURE COOL 64˚F (18˚C) ~ 95˚F (35˚C) DEHUMIDIFY 64˚F (18˚C) ~ 95˚F (35˚C) Page 8... -
Page 9: Set Up & Use
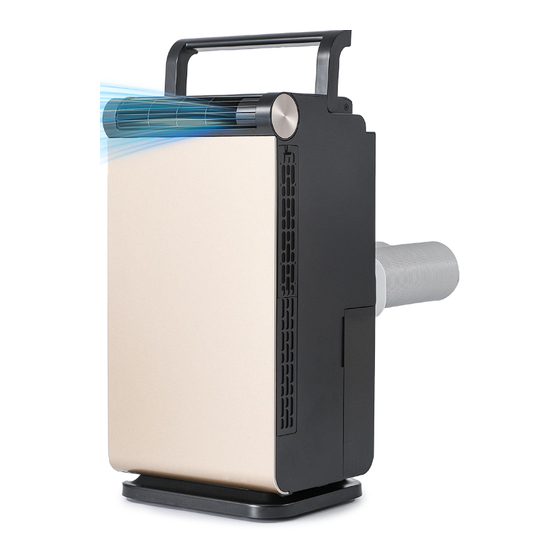
SET UP & USE PARTS & FEATURES Hose Inlet Control Panel Air Outlet Air Exhaust Hoses 4 Casters (not shown) Handle Filter access Water Tank Power Cord Page 9... -
Page 10: Installation Guide Location
SET UP & USE INSTALLATION GUIDE LOCATION • The air conditioner should be placed on a stable, secure flat surface such as a floor or tabletop to minimize noise and vibration. For safe and secure positioning, place the unit on a flat, level surface. •... - Page 11 SET UP & USE Insert the 2 exhaust hoses into the inlet by turning them counterclockwise, as shown. Line up the tabs on the hose inlet and insert in the back of the unit as shown in the diagram. This will ensure that the warm air gets vented into the hoses.
-
Page 12: Control Panel
SET UP & USE CONTROL PANEL Fan Speed Indicator Lights Cooling Speed Timer Indicator Indicator Lights Lights Full Tank Swing Timer Fan Speed Dehumidify Cooling Power Indicator Button Light Pictures are for illustration purpose only. OPERATING FROM THE CONTROL PANEL The Control Panel enables you to manage all the main functions of the appliance, but to fully exploit its potential, you must use the remote control. - Page 13 SET UP & USE Cool Select to COOL the room and choose between HIGH and LOW speeds. Dehumidify Under this mode, you cannot select a fan speed. The fan motor operates at LOW speed. Fan Speed Press the speed button to select HIGH, MEDIUM or LOW fan speed. Timer To set the AUTO STOP press the TIMER and select 1H, 2H, 4H and 8H to choose the amount of hours for the unit to turn OFF.
-
Page 14: Draining The Water Tank
SET UP & USE DRAINING THE WATER TANK The portable air conditioner has a water tank that will need to be drained when it is operating in dehumidification mode, or in cooling mode. When the Water Full Indicator Light turns on, and the audible alert sounds, the unit will shut off. -
Page 15: Cleaning & Care
CLEANING & CARE CLEANING WARNING: Before cleaning or maintenance, turn the appliance off by pressing the button on the control panel. Unplug from the electrical outlet. CLEANING THE CABINET You should clean the appliance with a slightly damp cloth then dry with a dry cloth. -
Page 16: Troubleshooting & Warranty
TROUBLESHOOTING & WARRANTY BEFORE YOU CALL FOR SERVICE IF THE AIR CONDITIONER FAILS TO OPERATE: A) Check to make sure that the air conditioner is plugged in securely. If it is not, remove the plug from the outlet, wait 10 seconds and plug it in again securely. -
Page 17: Troubleshooting
TROUBLESHOOTING & WARRANTY Troubleshoot your problem by using the chart below. If the air conditioner still does not work properly, contact BLACK+DECKER customer service center or the nearest authorized service center. Customers must never troubleshoot internal components. TROUBLE POSSIBLE CAUSE POSSIBLE REMEDY A. -
Page 18: Limited Warranty
TROUBLESHOOTING & WARRANTY LIMITED WARRANTY Any repair, replacement, or warranty service, REPAIR OR REPLACEMENT AS PROVIDED UNDER THIS WARRANTY IS THE EXCLUSIVE REMEDY OF and all questions about this product should be THE CUSTOMER; BLACK+DECKER. SHALL NOT BE directed to BLACK+DECKER at 844-299-0879 LIABLE FOR ANY INCIDENTAL OR CONSEQUENTIAL from the USA or Puerto Rico. - Page 19 This device complies with part 15 of the FCC rules. Operation is subject to the following two conditions: 1) This device may not cause harmful interference, and 2) This device must accept any interference received, including interference that may cause undesired operation. This equipment has been tested and found to comply with the limits for a Class B digital device, pursuant to Part 15 of the FCC rules.
Need help?
Do you have a question about the BP01PT and is the answer not in the manual?
Questions and answers