Advertisement
Quick Links
Advertisement

Related Manuals for System Loco LocoTag C2PL


Summary of Contents for System Loco LocoTag C2PL
- Page 1 Quick Start Guide LocoTag C2PL. Document Version: 0.0.2 04/18/2024...
- Page 2 © Copyright System Loco Ltd 2024 Introduction. How the System Works The LocoTag C2PL has been developed to work alongside System Loco tracking and monitoring devices. The LocoTag C2PL can accurately log thermocouple readings and communicate these readings to LocoAware via LocoTrack devices.
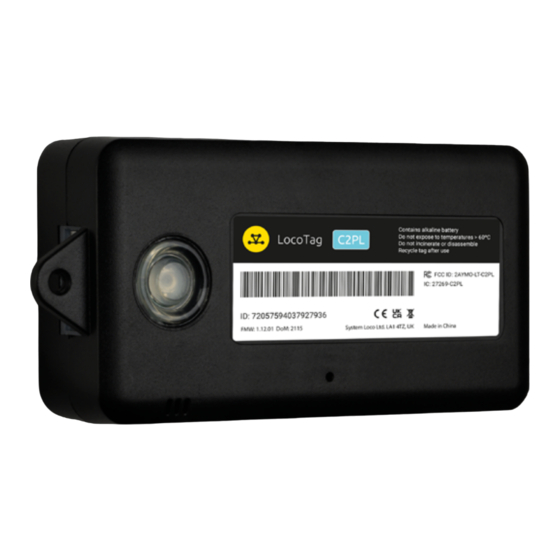
- Page 3 Quick Start Guide | LocoTag C2PL © Copyright System Loco Ltd 2024 Device Characteristics. LED Indicator Device ID / Barcode Thermocouple Power button securing point Temperature / Humidity Sensor T-Type connector www.systemloco.com Document Version: 0.0.2 04/18/2024...
- Page 4 Quick Start Guide | LocoTag C2PL © Copyright System Loco Ltd 2024 Step 1 Turn on the LocoTag C2PL The Power Button can be found in the middle of the device as seen above. To initiate power on/off functions, apply sustained pressure (>2 seconds) using a paper clip or pin into the designated aperture.
- Page 5 Each LocoTag C2PL has a unique identifier that is presented as a number and a barcode on its label. Fig 1. An image of the LocoTag C2PL with the device ID and barcode highlighted. Association is completed by scanning this barcode and entering a name for the asset on the LocoAware platform.
- Page 6 Getting Started - in the Field. Step 1 Activation After activating the C2PL, establishing association between the LocoTag C2PL and a hub/reader completes the setup process. Step 2 Bring the device within range of a LocoTrack enabled device A LocoTrack device can be enabled as a hub depending on its device profile setting / use case.
- Page 7 Quick Start Guide | LocoTag C2PL © Copyright System Loco Ltd 2024 Step 3 Taking a reading To obtain a temperature reading, simply insert the T-Type thermocouple probe into the designated T-Type connector. For added stability, utilize the small lug available to securely fasten the probe to the C2PL using either a screw or a cable tie.
- Page 8 Quick Start Guide | LocoTag C2PL © Copyright System Loco Ltd 2024 Step 4 Confirm on LocoAware that the device has reported to the server Find your device on www.locoaware.com by entering the Device ID / Barcode number into the search field.
- Page 9 Quick Start Guide | LocoTag C2PL © Copyright System Loco Ltd 2024 Select the device from the list of search results. Confirm that the last report time is current with the device’s details page. www.systemloco.com Document Version: 0.0.2 04/18/2024...
- Page 10 Quick Start Guide | LocoTag C2PL © Copyright System Loco Ltd 2024 Step 5 Monitor the device Monitor the device from within the LocoAware platform or via the API if integration has been completed. The device will report back to the LocoAware platform whenever it comes into range of an enabled LocoTrack device.
- Page 11 Quick Start Guide | LocoTag C2PL © Copyright System Loco Ltd 2024 Batteries. The unit uses a 3x AAA Alkaline Batteries (non-rechargeable) • Do not expose to temperatures >55°C (131°F) • Do not incinerate or disassemble • Recycle after use Certifications.
Need help?
Do you have a question about the LocoTag C2PL and is the answer not in the manual?
Questions and answers