Advertisement
Quick Links
Thank you for purchasing a Sealey product. Manufactured to a high standard, this product will, if used according to these instructions,
and properly maintained, give you years of trouble free performance.
IMPORTANT: PLEASE READ THESE INSTRUCTIONS CAREFULLY. NOTE THE SAFE OPERATIONAL REQUIREMENTS, WARNINGS & CAUTIONS. USE
THE PRODUCT CORRECTLY AND WITH CARE FOR THE PURPOSE FOR WHICH IT IS INTENDED. FAILURE TO DO SO MAY CAUSE DAMAGE AND/OR
PERSONAL INJURY AND WILL INVALIDATE THE WARRANTY. KEEP THESE INSTRUCTIONS SAFE FOR FUTURE USE.
Wear eye
Refer to
protection
instruction
manual
1. SAFETY
‰
WARNING! Ensure that Health and Safety, local authority and general workshop practice regulations are adhered to when using this
product.
8
DO NOT use this product if damaged.
9
Maintain product in good and clean condition for best and safest performance.
9
If the vehicle to be worked on is raised, ensure that it is adequately supported with axle stands or ramps and chocks.
9
Wear approved eye protection. A full range of personal safety equipment is available from your Sealey stockist.
9
Wear suitable clothing to avoid snagging. DO NOT wear loose jewellery and tie back long hair.
9
Account for all tools and parts being used.
9
If working off the vehicle, secure the work piece in a vice or clamp it to a work bench.
8
DO NOT operate spreader if you are tired or under the influence of alcohol, drugs or intoxicating medication.
IMPORTANT: Always refer to the vehicle manufacturer's service instructions, or a proprietary manual, to establish the current procedure
and data. These instructions are provided as a guide only.
2. INTRODUCTION
Suitable for removal and installation of spring and shock strut from steering knuckle. Prevents expensive damage to aluminium or cast iron
steering hubs. Excellent also for spreading the clamp on lower ball joints. Wide range of vehicle applications.
3. APPLICATIONS
Audi, BMW, Citroen, Ford, Peugeot, Renault, Seat, Skoda, VW
4. OPERATION
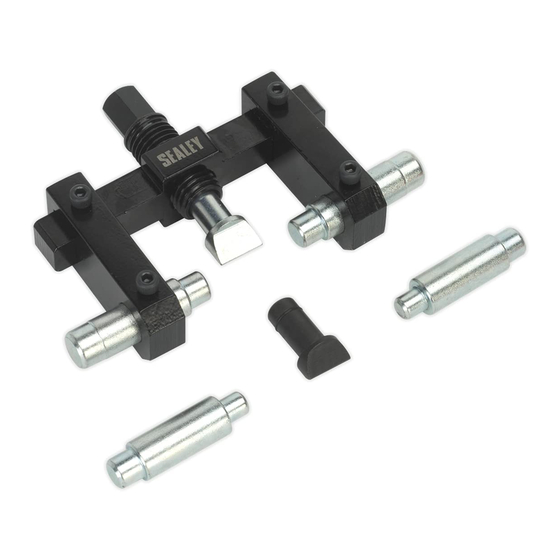
4.1.
Set up the spreader as in fig.1, Choose the correct size guide and spreader tip for the task. Slide the guides through the spreader
arms and into the bore / bolt hole.
4.2.
Move the arms along the main beam keeping a generous distance apart for the operation. Tighten grub screws in to lock the arms in
place.
4.3.
Slide the guides into the bolt hole, leave at least a 1mm gap between the shoulder of the guides and the surface of the hub clamp,
secure them with grub screws.
4.4.
Tighten the force screw ensuring that the wedge on the spreader tip sits in the clamp on the hub (fig.2).
4.5.
Using a spanner or socket and wrench screw Tighten the force screw until the clamp separates and allows movement of the ball joint
or strut.
© Jack Sealey Limited
HUB CLAMP SPREADER TOOL -
BALL JOINT/STRUT
VS390
MODEL NO:
fig.1
Original Language Version
fig.2
VS390 Issue:2 (H,F) 16/11/20
Advertisement

Related Manuals for Sealey VS390


Summary of Contents for Sealey VS390
- Page 1 VS390 MODEL NO: Thank you for purchasing a Sealey product. Manufactured to a high standard, this product will, if used according to these instructions, and properly maintained, give you years of trouble free performance. IMPORTANT: PLEASE READ THESE INSTRUCTIONS CAREFULLY. NOTE THE SAFE OPERATIONAL REQUIREMENTS, WARNINGS & CAUTIONS. USE THE PRODUCT CORRECTLY AND WITH CARE FOR THE PURPOSE FOR WHICH IT IS INTENDED.
- Page 2 Note: It is our policy to continually improve products and as such we reserve the right to alter data, specifications and component parts without prior notice. Important: No Liability is accepted for incorrect use of this product. Warranty: Guarantee is 12 months from purchase date, proof of which is required for any claim. Sealey Group, Kempson Way, Suffolk Business Park, Bury St Edmunds, Suffolk. IP32 7AR 01284 757500 01284 703534 sales@sealey.co.uk www.sealey.co.uk...
Need help?
Do you have a question about the VS390 and is the answer not in the manual?
Questions and answers