Table of Contents
Advertisement
Quick Links
Advertisement
Table of Contents

Related Manuals for Airlink101 AWLH5075


Summary of Contents for Airlink101 AWLH5075
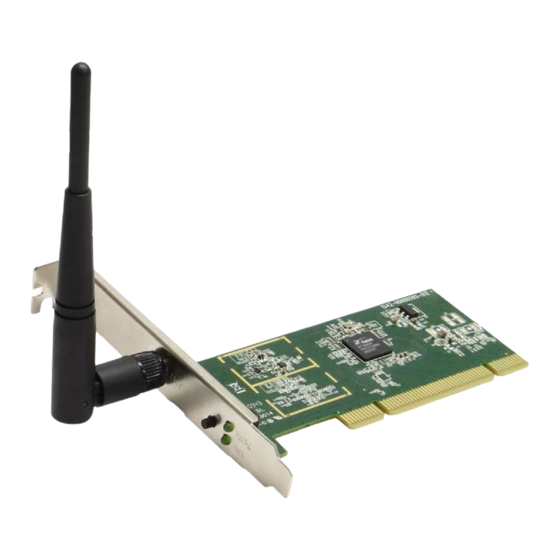
- Page 1 Wireless N 150 PCI Adapter Model # AWLH5075 User’s Manual Rev. 1.0...
-
Page 2: Table Of Contents
4.2 Network ..........................14 4.3 Advanced ..........................17 4.4 Statistics..........................18 4.5 WMM ..........................18 4.6 WPS (Easy Setup Button) ....................20 4.7 CCX ..........................24 4.8 About ..........................25 Troubleshooting..........................26 Appendix A - Specification ......................27 Appendix B - Federal Communication Commission Interference Statement ......28 Technical Support........................29... -
Page 3: Introduction
The bundled Wireless Monitor utility allows you to set up the adapter with an easy-to-use user interface. Best of all the Wireless N 150 PCI Adapter works with other 802.11 b /g / n network devices which ensures the compatibility with your existing wireless products. -
Page 4: Install The Wireless Pci Adapter
SWITCH THE COMPUTER OFF, remove the cover and insert the wireless Step 1.1 PCI adapter into an available PCI slot of your computer. Fasten the provided antenna to the antenna connector on the wireless PCI Step 1.2 adapter. Switch on the computer. - Page 5 Insert the Installation CD in the CD drive. When the autorun screen pops up, Step 1.5 click Install Utility and Driver. Users: When you get warning message(s), make sure that you Windows 7 and Vista click Allow to continue with the installation of the driver software.
- Page 6 Click Next. Step 1.6 Click Next to start installing the software. Step 1.7...
- Page 7 Click Install this driver software anyway. For Windows 7 and Vista users: click Continue Anyway at the Windows Logo. For Windows XP users:...
- Page 8 Click Finish. Step 1.8...
- Page 9 You will see the Airlink101 Wireless Monitor pops up. Step 1.9 Congratulations! The Wireless N 150 PCI Adapter has now been successfully installed on your computer.
-
Page 10: Connect To Wireless Network
Airlink101 Wireless Monitor utility by double clicking on the Airlink101 Wireless Monitor Utility icon in the system tray at the bottom right-hand corner of your screen. If the icon does not appear in the system tray, go to Start → Programs → Airlink101 → Airlink101 Wireless Monitor. - Page 11 After the adapter connects to the wireless network successfully, a blue triangle Step 3 will appear at the front of your wireless network.
-
Page 12: Configure Wireless Monitor
RF ON/OFF: Click on RF ON/OFF to switch on/off the wireless connection. Click on the down/up arrow on the right hand side to display or hide the Status. Status: Display the SSID and BSSID of connected wireless access point or wireless device (displayed as SSID<->... - Page 13 Extra Info: Displays the link status (‘Link is up’ or Link is down’, and the radio transmitting power of your network card. Channel: Displays the radio channel being used now. Authentication: Shows the authentication mode that access point or wireless device uses.
-
Page 14: Profile
The Profile List box lists all the profiles that you’ve created for your networks. You can create a profile for a wireless network you use very often at certain area, such as the wireless network at your home or office so that you can interchange connections more easily. -
Page 15: Network
Rescan: Clicking Rescan will refresh the network list. Connect: To connect to a wireless network, please refer to Step 1 to 3 in Chapter 3. Add to Profile: To add a network to profile, please follow the instructions below. - Page 16 TX Power: You can select the radio output power of wireless network card. You may not need full radio power if you’re not far from wireless access point, and only use a high setting here if you found that radio reception is bad. If you don’t know which one to use, select ‘Auto’.
- Page 17 Select the profile you just created and click Activate. Step 4...
-
Page 18: Advanced
Wireless mode: Select wireless mode, only 2.4G (single bandwidth) is available here. Enable TX Burst: Check this box to accelerate the data transmit rate. It may not work with all wireless access points and wireless devices. -
Page 19: Statistics
/ video streaming, network telephony (VoIP), and others. When you enable WMM (Wi-Fi MultiMedia) function of this network card, you can define the priority of different kinds of data, to give higher priority to applications which require instant responding. - Page 20 DLS enabled. MAC Address: Input the MAC address of another WMM-enabled wireless device you wish to establish a direct link here, then click ‘Apply’ to add this MAC address to DLS address table. Timeout Value: Input the timeout value of this WMM-enabled direct link wireless device.
-
Page 21: Wps (Easy Setup Button)
WPS is a new and easy way to configure the encryption for your wireless network clients. In order to use it, you need to have a router that supports this feature, like the AR675W Airlink101 Wireless N 300 Green Router or AR570W Wireless N 150 Router. - Page 22 Wireless Router. Open the browser; enter http://192.168.2.1 into the URL address bar. Note: 192.168.2.1 is the default IP address of AR675W Wireless N Router; you might have a different one for your residential gateway. Please contact your ISP / router’s manufacture for more information.
- Page 23 If you selected PBC method, click the Reset/WPS button on the back of the Step 3a router for 3 seconds. (The WLAN LED will stop blinking while WPS mode is triggered.) The Router will now start the handshake with the wireless adapter which will Step 4 take about 2 minutes.
- Page 24 If you cannot connect successfully with WPS, you need to log in to your router’s Note: configuration page and click on Wireless. Then click WPS. Make sure that Disable WPS box is unchecked, refer to Step 2c.
-
Page 25: Ccx
Network EAP function if you need to use this feature. Roaming with RF Parameters: A default set of RF Parameters defined by Cisco are used to set the RF thresholds adopted by the client to decide when to roam. Check this box to enable Roaming with RF Parameters function. -
Page 26: About
4.8 About The About window provides the information about the Wireless Monitor Utility version and the current driver version. -
Page 27: Troubleshooting
Troubleshooting 1. If you cannot open the wireless monitor utility, make sure that the PCI adapter is inserted firmly into the PCI slot. 2. If you cannot connect to the wireless router, you may want to double check the wireless security settings on the router. The security key you entered into the Wireless Monitor utility must match with the settings on the wireless router. -
Page 28: Appendix A - Specification
• IEEE 802.11b / g / n Weight • 63.5 g Interface • 32-bit PCI Dimensions • 120 x 50 mm (L x W) Data Rate* • Downlink: 150Mbps Temperature • Uplink: 150Mbps • Operating: 0ºC to 55ºC • Storage: -20ºC to 70ºC Antenna type •... -
Page 29: Appendix B - Federal Communication Commission Interference Statement
Appendix B - Federal Communication Commission Interference Statement This equipment has been tested and found to comply with the limits for a Class B digital device, pursuant to Part 15 of FCC Rules. These limits are designed to provide reasonable protection against harmful interference in a residential installation. This... -
Page 30: Technical Support
(e.g., cordless telephones and microwaves) as well as network overhead lower actual data throughput rate. Compatibility with 802.11n devices from other manufactures is not guaranteed. Specifications are subject to change without notice. Photo of product may not reflect actual content.
Need help?
Do you have a question about the AWLH5075 and is the answer not in the manual?
Questions and answers