Einhell TE-CL 18/2000 LiAC (45.141.14) - Battery-Powered Lamp Manual
- Original operating instructions (129 pages) ,
- Operating instructions manual (35 pages) ,
- Original operating instructions (108 pages)
Advertisement
Layout and items supplied
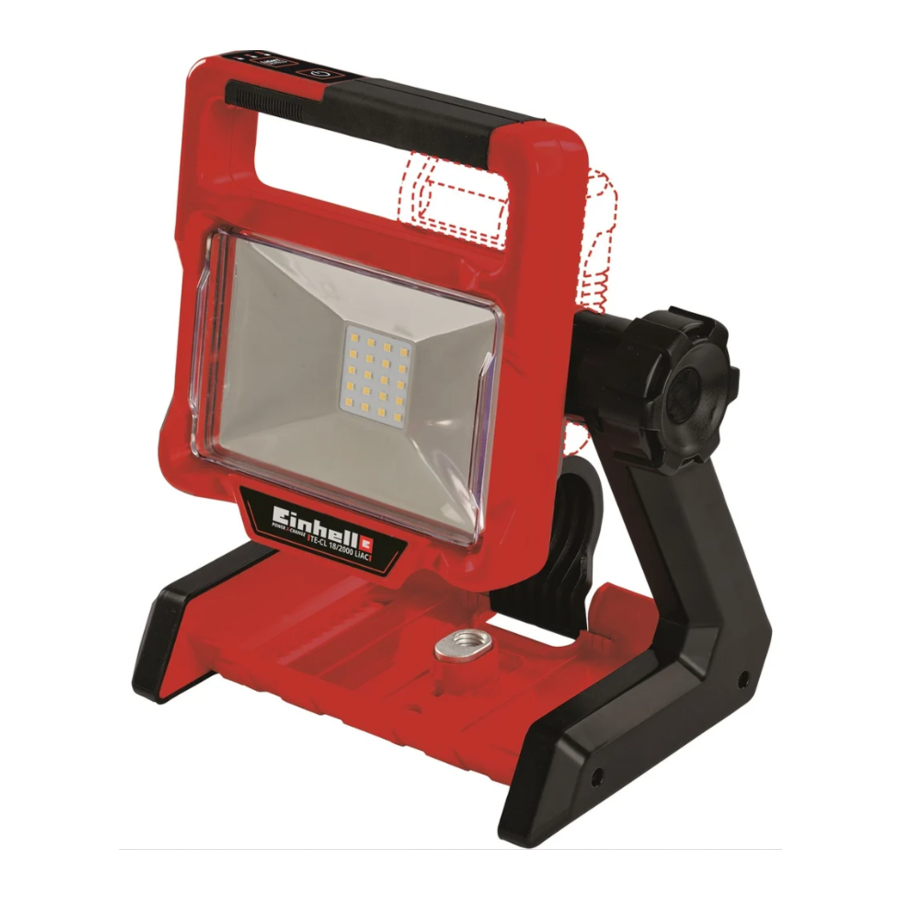
Layout

Fig.1
- Carry handle
- Lamp head

- ON/OFF switch
- Brightness control
- Brightness indicator

- Fixing screw
- Mains connection:
- Battery mount
- Power supply unit
- Battery pack
- Push/lock button
- Charger
- Base
- Hook
- Sawtooth cutout
- Fastening eyelet
- Threaded bushes, ¼" and ⅝"


Items supplied
Please check that the article is complete as specified in the scope of delivery. If parts are missing, please contact our service center or the sales outlet where you made your purchase at the latest within 5 working days after purchasing the product and upon presentation of a valid bill of purchase. Also, refer to the warranty table in the service information at the end of the operating instructions.
- Open the packaging and take out the equipment with care.
- Remove the packaging material and any packaging and/or transportation braces (if available).
- Check to see if all items are supplied.
- Inspect the equipment and accessories for transport damage.
- If possible, please keep the packaging until the end of the guarantee period.

The equipment and packaging material are not toys. Do not let children play with plastic bags, foils or small parts. There is a danger of swallowing or suffocating!
- Cordless lamp
- Original operating instructions
Technical data
Power supply unit input: 100-240 V~ 50-60 Hz
Power supply unit output: 18V  ; 1500 mA
Power supply unit barrel connector dimensions: 5.5 x 2.5 mm
Power supply unit barrel connector terminals: 
Power supply for lamp: 18 V
Number of LEDs: 20
Light fl ux: 2000 lm
Cold white: 5300 K
Wide beam angle: 120°
Color reproduction: 80 CRI
Service life: 20000 h
Power: 20 W
Weight: 1.3 kg

The equipment is supplied without batteries and without a charger. It must only be used with the lithium-ion batteries in the Power X-Change series.
The lithium-ion batteries of the Power X-Change series must only be charged only with the Power X-charger.
Operation
Installing the battery

Fig. 4
Press the push/lock button of the battery pack as shown in Fig.4 and slide the battery pack into the mount provided. Make sure that the push/lock button engages properly. To remove the battery pack, follow the steps in reverse order.
Charging the lithium battery pack
(Fig. 4/5)

Fig. 5
- Remove the battery pack (10) from the battery mount (8), pressing the push/lock button (11) downward to do so.
- Check that your mains voltage is the same as that marked on the rating plate of the battery charger. Insert the power plug of the charger into the socket outlet. The green LED will then begin to fl ash.
- Push the battery pack onto the battery charger.
In "Charger indicator" section you will find a table with an explanation of the LED indicator on the charger.
If the battery pack fails to charge, check for the following:
- whether there is a voltage at the mains power socket;
- whether there is good contact at the charging contacts of the charging unit
If the battery pack still fails to charge, please send
- the charging unit
- and the battery pack to our customer service center.
To ensure that items are properly packaged and delivered when you send them to us, please contact our customer service or the point of sale at which the equipment was purchased.
When shipping or disposing of batteries and cordless tools, always ensure that they are packed individually in plastic bags to prevent short circuits and fi res.
To ensure that the battery pack provides long service, you should take care to recharge it promptly. You must recharge the battery pack when you notice that the performance of the device drops. Never allow the battery pack to become fully discharged. This will cause it to develop a defect.
ON/OFF switch
(Fig. 3 / item 3)

Do not look into the light beam.
Switching on:
- Press the ON/OFF switch (3).
- For safety reasons, the lamp will always come on in its lowest brightness setting.
Switching off:
- Press the ON/OFF switch (3) again.
Adjusting the brightness
(Fig. 3/ item 4)
Do not look into the light beam.
- Three different brightness settings are available so that the lamp can be adjusted to the particular lighting conditions.
- For safety reasons, the lamp will always come on in its lowest brightness setting.
- To increase the brightness, press the brightness control (4).
- The brightness increases to the next level every time you press the button.
- The current brightness setting is displayed by the brightness indicator (5).
Adjusting the lamp position
- You can set the lamp to any position by rotating the lamp head.
- To do this, undo the fixing screw (6) on the right-hand side of the lamp.
- Then adjust the lamp to the required position and retighten the fixing screw (6).
Operation with a power supply unit (9)
- The lamp can also be used in conventional fashion with the enclosed power supply unit (9).
- Check that your mains voltage is the same as the one marked on the rating plate.
- Plug the mains plug (9a) of the power supply unit into the socket outlet.
- Then connect the plug (9b) into the power connection (7) of the lamp.
 Note: You do not need to take out the battery when you are operating the lamp with the power supply unit.
Note: The battery will not be charged when you are operating the lamp with the power supply unit.
Fastening the lamp
The lamp can be fastened quickly and easily in various ways via the different cutouts on the bottom of the foot.
- Hook (Fig. 6 / item 14): The hook can be used for quick and easy attachment of the lamp to e.g. a railing or scaffolding.

- Sawtooth (Fig. 7 / item 15): The sawtooth cutout can be used to hang the lamp to a nail or similar. The fine tooth spacing allows the lamp to be perfectly balanced.

- Fastening eyelet (Fig. 8 / item 16): The fastening eyelet can be used to attach the lamp to the wall with a suitable pan head screw.

- Threaded bushes, ¼" and ⅝" (Fig. 9 / item 17): The threaded bushes can be used to mount the lamp on a stand.


Battery capacity indicator

Fig. 10
Press the battery capacity indicator switch (a)
The battery capacity indicator (b) shows the charge status of the battery using 3 LEDs.
All 3 LEDs lit:
The battery is fully charged.
2 or 1 LED(s) lit:
The battery has an adequate remaining charge.
1 LED fl ashing:
The battery is empty, recharge the battery.
All LEDs fl ashing:
The battery temperature is too high. Remove the battery from the unit and keep it at room temperature for one day. If the fault occurs again, the battery has been deep-discharged and is defective. Remove the battery from the unit. Never use or charge a defective battery.
Cleaning, maintenance and ordering of spare parts
Always remove the battery pack before starting any cleaning work.
Cleaning
- Keep all safety devices, air vents and the motor housing free of dirt and dust as far as possible. Wipe the equipment with a clean cloth or blow it with compressed air at low pressure.
- We recommend that you clean the device immediately each time you have finished using it.
- Clean the equipment regularly with a moist cloth and some soft soap. Do not use cleaning agents or solvents; these could attack the plastic parts of the equipment. Ensure that no water can seep into the device. The ingress of water into an electric tool increases the risk of an electric shock.
Maintenance
There are no parts inside the equipment which require additional maintenance.
Ordering replacement parts
Please quote the following data when ordering replacement parts:
- Type of machine
- Article number of the machine
- Identification number of the machine
- Replacement part number of the part required For our latest prices and information please go to www.Einhell-Service.com
Storage
Store the equipment and accessories in a dark and dry place at above freezing temperature. The ideal storage temperature is between 5 and 30°C. Store the electric tool in its original packaging.
Charger indicator
| Indicator status | Explanations and actions | |
| Red LED | Green LED | |
| Off | Flashing | Ready for use The charger is connected to the mains and is ready for use; there is no battery pack in the charger |
| On | Off | Charging The charger is charging the battery pack in quick charge mode. The charging times are shown directly on the charger.  The actual charging times may vary slightly from the stated charging times depending on the existing battery charge. |
| Off | On | The battery is charged and ready for use. (READY TO GO) Action: |
| Flashing | Off | Adapted charging
Action: |
| Flashing | Flashing | Fault Action: |
| On | On | Temperature fault Action: |
Safety regulations
When using the equipment, a few safety precautions must be observed to avoid injuries and damage. Please read the complete operating instructions and safety regulations with due care. Keep this manual in a safe place, so that the information is available at all times. If you give the equipment to any other person, hand over these operating instructions and safety regulations as well. We cannot accept any liability for damage or accidents which arise due to a failure to follow these instructions and the safety instructions.
Explanation of the symbols used (see Fig. 11)

![]()
Read the operating instructions to reduce the risk of injury.![]()
Caution: Do not look into the light beam.![burn hazard]() Beware of hot parts!
Beware of hot parts!
 Beware of hot parts!
Read all safety regulations and instructions. Any errors made in following the safety regulations and instructions may result in an electric shock, fi re and/or serious injury.
Keep all safety regulations and instructions in a safe place for future use.
Documents / Resources
References
Download manual
Here you can download full pdf version of manual, it may contain additional safety instructions, warranty information, FCC rules, etc.
Download Einhell TE-CL 18/2000 LiAC (45.141.14) - Battery-Powered Lamp Manual
Advertisement


Need help?
Do you have a question about the TE-CL 18/2000 LiAC and is the answer not in the manual?
Questions and answers