Aprilaire S84N 1H1C, S84N SU - Thermostat Manual
- Owner's manual (11 pages) ,
- Safety & installation instructions (17 pages)
Advertisement
PRODUCT FEATURES
- Heat Blast raises the room temperature 3°F to 5°F
- Easy to read, color display
- 7 day programmability
- Displays room temperature and temperature setting
- Air filter and HVAC service reminders.
- Programmable fan control with fan circulation mode
- Easy to use temperature control can override program schedule at any time
- Progressive recovery ensures proper temperature at the start of a program event
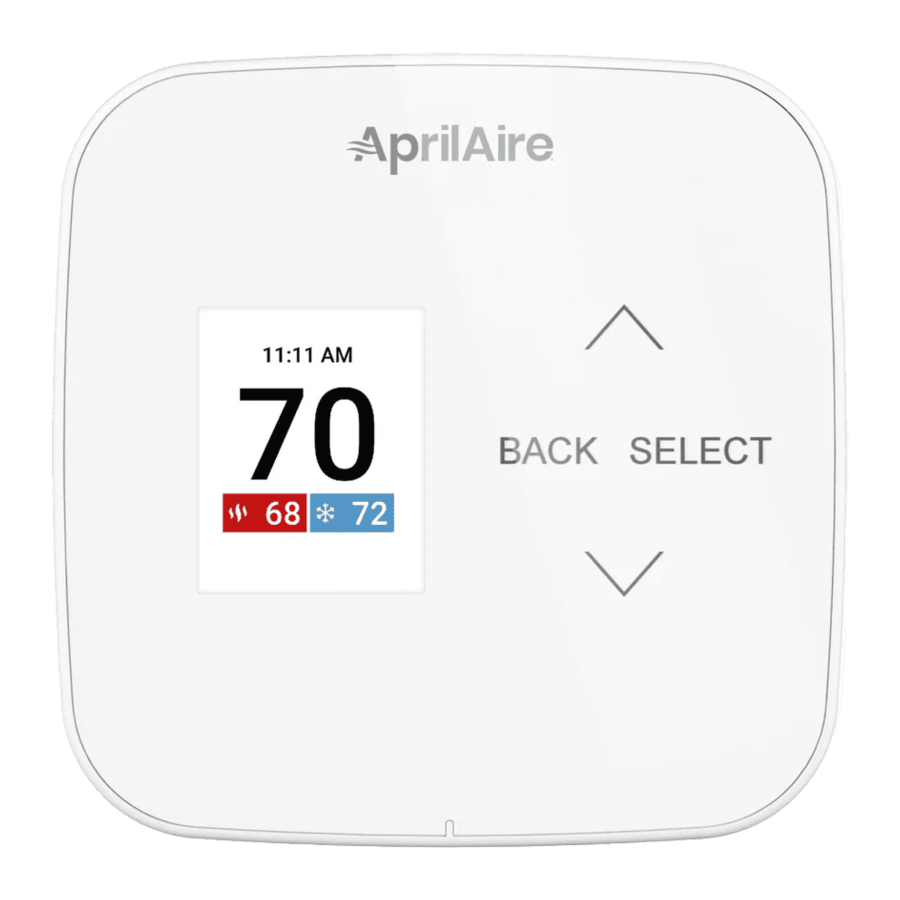
QUICK REFERENCE TO CONTROLS & DISPLAY
HOME SCREEN

MAIN MENU

SCREEN SAVER
Starts 45 seconds after inactivity, press any button to wake the screen. NOTE: Screen saver is not available on thermostat installations that are not connected to C wire and run on battery power only.

POWER OPTIONS
The thermostat is dual power. It can either use 24 VAC, 2 "AA" batteries or both (to provide backup power for the clock). Batteries are optional if the thermostat was connected to AC power when installed. For model S84N SU, 24 VAC must be connected in order for the system fault to operate. The thermostat has a memory backup that saves the thermostat's settings in case of a power interruption
OPERATION
SELECT SYSTEM MODE

(EM HEAT / HEAT / COOL / AUTO / OFF)
- Press SELECT to enter Main Menu
- Use
![]() or
or ![]() to select the Mode option
to select the Mode option - Press SELECT to enter Mode menu:
- Use
![]() or
or ![]() to select the desired mode
to select the desired mode
Heat: Thermostat controls only the heating system
Cool: Thermostat controls only the cooling system
Auto: (if enabled in installer setup) Thermostat automatically selects heating or cooling depending on the indoor temperature
Emergency Heat: (only for heat pumps with auxiliary heat) Thermostat controls auxiliary heat Heat pump will not operate in Em Heat mode
Off: Heating and cooling systems are off - Press SELECT to save the mode and return to the home screen, or BACK to exit without saving
 or
or  to select the Mode option
CHANGE TEMPERATURE SETTING

- From the Home screen press
![]() or
or ![]() to adjust the current temperature setting
to adjust the current temperature setting - The temperature setting will enlarge during adjustment
- The temperature setting will take effect 3 seconds after the last adjustment or press SELECT to save and return to the home screen
See HOW TO MODIFY PROGRAM SCHEDULES for more information
SELECT FAN SETTING
(AUTO/ON/CIRCULATE)
When the fan mode is changed during a program event, it remains in that mode until the next event starts. The fan must be programmed to Fan On in the schedule to run continuously through all events.

- Press SELECT to enter Main Menu
- Use
![]() or
or ![]() to select the Fan option
to select the Fan option - Press SELECT to enter Fan menu:
- Use
![]() or
or ![]() to select the desired fan mode
to select the desired fan mode
On: Fan runs continuously. Use this mode for maximum air circulation/filtering.
Auto: Fan runs only when the heating or cooling system is on
Circulate: Same as Auto, but ensures the fan is on for at least 30 minutes per hour Use this mode for a balance of energy savings and air circulation/cleaning - Press SELECT to save the fan mode and return to the home screen, or BACK to exit without saving
MAINTENANCE REMINDERS
Maintenance reminders are set up by the installer to indicate when the equipment is due for service. If a maintenance reminder is displayed, call your HVAC dealer for service. They can be reset by selecting the Reset option on the reminder message or in the Reset Service Reminders option found in the Settings menu
EVENT-BASED AIR CLEANING
(IF INSTALLED)
- Select Air Cleaning from the Main Menu. Air Cleaning has two temporary events and three persistent modes that can be set Air cleaning will activate the fan for the purpose of air cleaning.

- Events (temporary)
3 Hrs: When selected, the air cleaner will run for 3 hours continuously and then return to the most recent mode of Auto, Continuous, or Off. This option only cleans the air when needed; an example would be after vacuuming
24 Hrs: When seasonal allergies spike and outside air quality is at its worst, choose this option. Your air cleaner will run continuously for 24 hours, then return to the most recent mode of Auto, Continuous, or Off
NOTE: The thermostat will manage fan and air cleaning selections when the selections overlap

- Modes (persistent)
Auto: The air cleaner will run a minimum of 30 minutes every hour. The air cleaner will monitor the amount of time your heating and cooling system runs; if 30 minutes is not reached the air cleaner will automatically turn on. This will maximize the amount of air cleaning while minimizing energy consumption.
Continuous: This option will provide the maximum amount of air cleaning available
The air cleaner will be active for 24 hours a day, seven days a week
Off: The air cleaner will not run the fan for the sole purpose of air cleaning.


NOTE: If air cleaning is installed, air cleaning will still occur during normal fan operation during heating, cooling or other indoor air quality events.
PROGRAM SCHEDULE AND HOLDS
SET TIME AND DATE
- Select Settings from the Main Menu.

- From the Settings menu, select Clock the to set the time, or Date to set the date.


UNDERSTANDING PROGRAM SCHEDULES
The daily schedule is split into four sections:
Wake: Temperature you would prefer to wake up to.
Leave: Temperature when you are away from the house.
Return: Temperature you would prefer to return home to.
Sleep: Temperature you would prefer while sleeping.
The times and temperatures shown in TABLE 1 are the defaults The start time and temperature of each section can be changed to fit your schedule. We recommend these settings, since they can reduce your heating/cooling expenses The fan program is pre-set to Auto for all events
| TABLE 1 – DEFAULT SCHEDULE | ||||
| Event Designator | Start Time | Set Temperature | Fan | |
| Heat | Cool | |||
| Wake | 6:00 AM | 70°F (21°C) | 78°F (255°C) | Auto |
| Leave | 8:00 AM | 62°F (165°C) | 85°F (295°C) | Auto |
| Return | 5:00 PM | 70°F (21°C) | 78°F (255°C) | Auto |
| Sleep | 10:00 PM | 62°F (165°C) | 82°F (275°C) | Auto |
PROGRESSIVE RECOVERY
The Progressive Recovery feature allows Pre-Heating or Pre-Cooling PRIOR to a scheduled event in order to reach the desired temperature at the start of that scheduled event Example: According to TABLE 1, the Wake time is 6:00 am, the Wake heat set point is 70°F and the Sleep set point is 62°F The heat will turn on prior to 6:00 am so that the temperature reaches 70°F by the time the Wake event begins
HOW TO MODIFY PROGRAM SCHEDULES
- From the Schedule option in the Main Menu, you can turn the schedule On or Off, and make changes to the schedule.
Modify: The event start time, temperature, and fan mode can be adjusted for each event of each day.
On/Off: When the Schedule is turned Off the thermostat will continue to control at the current temperature setting until adjusted with![]() and
and ![]() .
.

- Select Modify to change default schedule settings
![]()
- Select the group of days or day you would like to modify
![]()
- Adjust Wake details (Start, Heat, Cool, Fan, and/or select Next to proceed
![]()
- Adjust Leave details and/or select Next to proceed
![]()
- Adjust Return details and/or select Next to proceed
![]()
- Adjust Sleep details and/or select Next to proceed
![]()
-
- If you modified a group of days you can Save & Exit back to the Home screen.
![]()
- Or if you modified a single day you can copy the settings to another day or group of days.
![]()
- If you modified a group of days you can Save & Exit back to the Home screen.
- If you choose to copy, you will see this confirmation message, then you can return to the Modify menu to make changes to another day by selecting Edit More Days or return to the Home screen by selecting Save and Exit.
![]()


HEAT BLAST
(IF INSTALLED)
Heat Blast will raise the current room temperature 3°F to 5°F based on the installer set-up, and then resume normal operation
To activate Heat Blast, select Heat Blast from the Menu, and use the Select button to set the toggle to ON
NOTE: Heat Blast button is only available if it is enabled in the Installer Setup and the thermostat is in Heat or Emergency Heat mode
To cancel Heat Blast, select Heat Blast from the Menu, and use the Select button to set the toggle to OFF
PROGRAM SCHEDULE HOLDS
TEMPORARY HOLD
Press  or
or  to immediately adjust the temperature when the schedule is running. This will temporarily hold the temperature setting until the next scheduled event.
A temporary hold can also be set from the Hold option in the Menu. The end time of the hold can also be adjusted from here.
The temporary hold can be canceled from the Hold option in the Menu, or by adjusting the temperature back to the scheduled temperature.

SETUP MENU
| TABLE 2 – USER SYSTEM SETTINGS TABLE | |
| Clock | Set time |
| Date | Set date |
| Display | Display can be disabled during sleep for light sensitive locations (Not available when battery only powered) |
| Scale | Change temperature scale from Fahrenheit to Celsius |
| About | Contains thermostat model number and software/hardware version |
| Reset Reminder | Reset expired service reminders |
WARRANTY REGISTRATION
Visit us online at www.aprilaire.com to register your AprilAire product If you do not have online access, please mail a postcard with your name, address, phone number, email address, product purchased, model number, date of purchase, and dealer name and address to:
Research Products Corporation, PO Box 1467, Madison, WI 53701
Your warranty registration information will not be sold or shared outside of this company.
aprilaire.com | 800.334.6011
Documents / Resources
References
Download manual
Here you can download full pdf version of manual, it may contain additional safety instructions, warranty information, FCC rules, etc.
Advertisement


Need help?
Do you have a question about the S84N 1H1C and is the answer not in the manual?
Questions and answers