
Related Manuals for Oase AquaMax Eco Premium


Summary of Contents for Oase AquaMax Eco Premium
- Page 1 AquaMax Eco Premium 5000, 7000, 9000, 13000, 17000, 21000 Operating instructions...
- Page 2 Original manual. WARNING WARNING Disconnect all electrical devices in the water from the power supply before reaching into the water. Otherwise there is a risk of severe in- juries or death by electrocution. This unit can be used by children aged 8 and above and by persons with reduced physical, sensory or mental capabilities or lack of expe- rience and knowledge if they are supervised or have been instructed on how to use the unit in a safe way and they understand the hazards...
-
Page 3: Safety Information
• Never carry out technical changes to the unit. • Only carry out work on the unit that is described in this manual. • Only use original spare parts and accessories. • Should problems occur, please contact the authorised customer service or OASE. -
Page 4: Intended Use
Intended use Only use the product described in this manual as follows: • For pumping normal pond water for filter systems, waterfall systems and water course sys- tems. • While adhering to the technical specifications. (→ Technical data) • Adherence to the permissible water quality. (→ Permissible water quality) The following restrictions apply to the unit: •... -
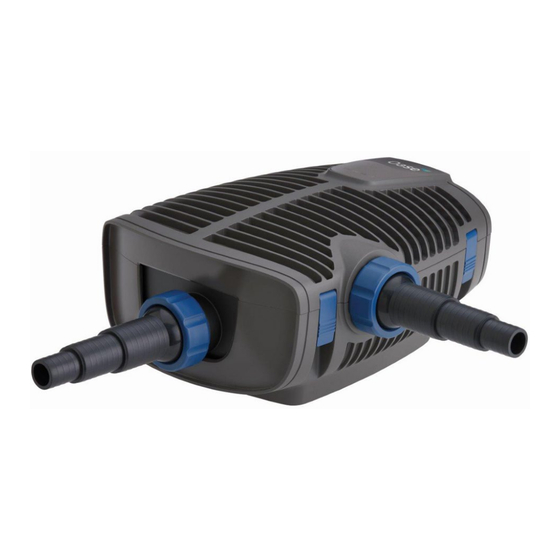
Page 5: Product Description
Product Description Overview AMX0182 Inlet 1 (suction side) • Filter housing Inlet 2 (suction side) • Connection of a satellite filter or skimmer. • The flow rate at inlet 2 and with it the flow ratio of inlet 1 to inlet 2 is adjustable. To do so, re- lease the locking mechanism and push the connection to one of the following positions: −... -
Page 6: Symbols On The Unit
Symbols on the unit The unit is dust-tight and water-tight down to 4 m. Possible danger for persons with pacemakers. Protect the unit from direct sunlight. Do not dispose of the unit with normal household waste. Read the operating instructions. Installation variants AMX0200 •... -
Page 7: Seasonal Flow Control (Sfc)
– transition mode (water temperature +10 ... +17 °C) – summer mode (water temperature greater than +17 °C) You can find the specific parameters at www.oase.com in the product section “Pond pumps”. • The SFC function may only be activated if the pump is submersed! •... -
Page 8: Installation And Connection
• Eco Control Intelligent control system for one pump. • Incenio FM-Master Home/Cloud Garden Controller Home/Cloud Up to 10 OASE Control-compatible units (pumps, filters, lights) can be controlled using the "OASE Control" app. For information on this topic, visit www.oase.com and navigate to the section “Smart garden... - Page 9 AMX0194 • An OASE Control network (variant C) must end with a terminal resistor R. The terminal resistor is included with the InSenio FM-Master or Garden Controller. In this case you will need the ac- cessory OASE Control adapter (article number 88443).
- Page 10 AMX0193 PLX0004 NOTE The unit will be damaged, if water enters the plug connector. Connect the plug connector or place the protective cap on it. Ensure that the rubber seal is clean and fits exactly. If the rubber seal is damaged, it must be replaced. When the plug connector is disconnected, ...
-
Page 11: Submerged Installation Of The Pump
Submerged installation of the pump Connecting Connect the pump according to the desired installation variant. (→ Installation variants) • Ensure that the intake-side hose (IN) does not have a smaller diameter than the pressure-side hose (OUT). • The larger the hose diameter, the smaller the friction losses in the lines and the better the flow rate. - Page 12 Installation • Place the pump horizontally on a stable surface. • Ensure secure and stable positioning of the pump. • For muddy or soiled water, we recommend installing the pump or intake-side components (skimmer, satellite filter, base outlet, etc.) above ground level. This decreases intake of parti- cles and increases the service life of the impeller unit.
-
Page 13: Install The Unit At A Dry Place
Install the unit at a dry place Dry installation requires the pump to be installed without a filter housing. Conversion AMX0185... - Page 14 Connecting • Hoses or pipes can be connected to the inlet (IN) and outlet (OUT). – Connections for hoses are part of the scope of delivery. Instructions for their installation can be found below. – An adapter for pipes with DN75/DN110 is available as an accessory (article number 35578). •...
- Page 15 Installation • Place the pump horizontally on a stable surface. • Ensure secure and stable positioning of the pump. • Do not expose the pump to direct sunlight. • Ensure that the installation site is sufficiently ventilated to prevent overheating of the pump. Permissible ambient temperatures (→ Technical data) AMX0153...
-
Page 16: Switching On/Off
Commissioning/start-up NOTE The unit will be destroyed if it is operated with a dimmer. It contains sensitive electrical compo- nents. Do not connect the unit to a dimmable power supply. NOTE Never allow the pump to run dry. Otherwise the pump may be destroyed. ... -
Page 17: Dismantling The Unit
− When cleaning the pump, pay particular attention to the impeller unit and the pump housing. • Recommended cleaning agent for removing stubborn limescale deposits: – Pump cleaning agent PumpClean from OASE. – Vinegar- and chlorine-free household cleaning agent. • After cleaning, thoroughly rinse all parts in clean water. -
Page 18: Replacing The Impeller Unit
Changing the bearing requires specialist knowledge and tools. Have the bearing changed by the OASE specialist dealer or send the pump to OASE. NOTE The impeller unit contains strong magnets that attract magnetic particles (e.g. iron filings). Any remaining particles can cause irreparable damage to the impeller unit and motor block. - Page 19 Pump does not start No mains voltage Check the mains voltage. No control voltage (only with Check connection to OASE Eco Control or optional external controls) OASE Control network; if necessary switch on pump via these networks Supply lines kinked Route the supply lines without kinks Supply lines blocked.
-
Page 20: Technical Data
Technical data Unit data AquaMax Eco Premium 5000 7000 9000 Connection voltage V AC 220 … 240 220 … 240 220 … 240 Mains frequency 50/60 50/60 50/60 Power consumption 10 ... 35 12 ... 45 14 ... 60 Max. pump capacity... - Page 21 AquaMax Eco Premium 13000 17000 21000 Connection voltage V AC 220 … 240 220 … 240 220 … 240 Mains frequency 50/60 50/60 50/60 Power consumption 16 ... 100 18 ... 140 20 ... 180 Max. pump capacity 13000 17000 21000 Max.
-
Page 22: Wear Parts
Permissible water quality Type Fresh water Pool water Salt water pH value 6.8 … 8.5 7.2 … 8.3 7.5 … 8.5 Hardness 8 … 15 8 … 15 20 … 30 Free chlorine mg/l <0.3 <0.6 <0.3 Chloride content mg/l <250 <250 <22000... - Page 23 AMX0190 AquaMax Eco Premium Pos. 5000 7000 9000 13000 17000 21000 17963 17963 17963 17963 17963 17963 30983 30983 30983 30983 30983 30983 92640 92640 92640 92641 92641 92641 16859 16859 16859 16859 16859 16859 17064 17064 – – –...
- Page 24 AquaMax Eco Premium 73312 73312 73312 75487 75487 75487 92638 92638 92638 92638 92638 92638 92639 92639 92639 92639 92639 92639 AMX0191 AquaMax Eco Premium Pos. 5000 7000 9000 13000 17000 21000 40509 40509 40509 40509 40509 40509 92644 92644...
- Page 25 OASE GmbH Tecklenburger Straße 161 48477 Hörstel | Germany +49 (0) 5454 80-0 +49 (0) 5454 80-9353 info@oase.com 87320/03-23...
Need help?
Do you have a question about the AquaMax Eco Premium and is the answer not in the manual?
Questions and answers