Advertisement
Advertisement
Table of Contents

Related Manuals for VTech Toot-Toot Drivers Criss-Cross Raceway


Summary of Contents for VTech Toot-Toot Drivers Criss-Cross Raceway
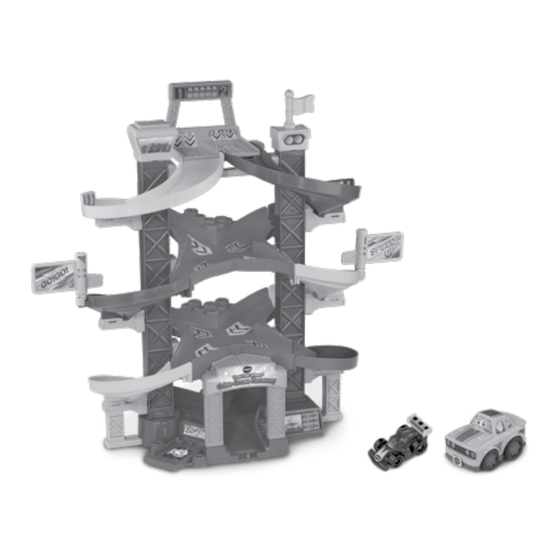
- Page 1 Instruction Manual Criss-Cross Raceway...
- Page 3 INTRODUCTION Thank you for purchasing the VTech Toot-Toot Drivers Criss- ® ® Cross Raceway. Little ones will love exploring the Criss-Cross Raceway, zoom to the finish line with the SmartPoint Racer, and mini race car. It’s time to have a race!
-
Page 4: Included In The Package
INCLUDED IN THE PACKAGE One SmartPoint Mini Race Car Racer One Base M1(You can find piece numbers engraved on the bottom) with one SmartPoint Winner’s Podium ™ Two Cross tracks M2, M3... - Page 5 Six Slide tracks A,B,C,D,E,F Two Major Pillars Three Double brackets M Two Base brackets L1,R1...
- Page 6 Two Left Tower brackets L2 Two Right Tower brackets R2 Small bracket Big bracket...
- Page 7 Launcher handle Finish line Two Flipping flags One 2-in-1 Launcher One Tower top One Tower flag Five screws • Sticker Sheet • Quick Start Guide...
- Page 8 WARNING All packing materials such as tape, plastic sheets, packaging locks, removable tags, cable ties, cords and packaging screws are not part of this toy, and should be discarded for your child’s safety. NOTE Please save this Instruction Manual as it contains important information. CAUTION This package contains small screws.
- Page 9 INSTRUCTIONS Battery Removal And Installation - Racer 1. Make sure the unit is turned OFF. 2. Find the battery cover located on the bottom of the Racer, use a screwdriver to loosen the screw and then open the battery cover. 3.
- Page 10 In the UK, give this toy a second life by disposing of it at a small electricals collection point* so all of its materials can be recycled. Learn more at: www.vtech.co.uk/recycle www.vtech.com.au/sustainability * Visit www.recyclenow.com to see a list of collection points near you.
-
Page 11: Label Application
LABEL APPLICATION Please stick the labels to the play set as shown below:... - Page 13 ASSEMBLY INSTRUCTIONS With the Toot-Toot Drivers Criss-Cross Raceway, safety comes ® first. To ensure your child’s safety, adult assembly is required. 1. Assemble and attach the Base M1 with the SmartPoint winner’s ™ podium and two major pillars following the steps below: A: Insert the major pillars into the slots on the tower base M1.A clicking sound will confirm they are firmly connected.
- Page 14 B: Insert three double brackets M to connect the pillars. Starting at the back of the pillars, insert each bracket M into the slot (shown below). A clicking sound will confirm they are firmly connected. BACK C: Use the same method to insert the base brackets L1 & R1, two left tower brackets L2, and two right tower brackets R2.
- Page 15 2. Assemble and attach the tracks on the ground floor following the steps below: A. Attach track A to the Base M1: Insert track A into the slot of the base bracket L1, then connect the track with the base. A clicking sound will confirm they are firmly connected.
- Page 16 3. Assemble and attach the tracks on the second floor following the steps below: A. Insert cross track M2 (the screw-hole on M2 should face forward) into the 1st bracket M: Pass the cross track M2 between the pillars and insert it into the slots of the 1st bracket M. A clicking sound will confirm they are firmly connected.
- Page 17 4. Assemble and attach the tracks on the third floor following the steps below: A. Insert the cross track M3 into the 2nd bracket M: Pass the cross track M2 between the pillars and insert it into the slots of the 2nd bracket M.
- Page 18 C. Connect the track D with cross track M2&M3: Connect track D to right tower bracket R2. Then connect track D to the right rear of M2 and the right front of M3. A clicking sound will confirm they are firmly connected.
- Page 19 B. Connect the track F with cross track M3: Connect track F to left tower bracket R2. Then connect track E to the left rear of M3 and the left front of M. A clicking sound will confirm they are firmly connected.
- Page 20 6. Assemble and attach the small & big brackets to the tower base M1 following the steps below: A. After above steps, flip the unit to show the bottom of the base and locate 2 slots beside the screws. B. Insert the small bracket into the left slot of the base. C.
- Page 21 7. Assemble and attach the Finish line to tower base M1 following the steps below: A. Before inserting the Finish line, make sure the label side is facing forward. B. Connect and insert the top of the door into the slots of M2. B.
- Page 22 8. Assemble and attach the launcher following the steps below: A. Insert the launcher handle into the slots of the 2-in-1 launcher. B. Insert the launcher on the top of the raceway. A clicking sound to confirm they are firmly connected. 9.
- Page 23 B. Assemble the spinning flags. Once you’ve completed the above steps, you are ready to play! You can also connect the Criss-Cross Raceway to other Toot-Toot Drivers track sets (each sold separately). ®...
-
Page 24: Product Features
PRODUCT FEATURES Racer 1. On/Off Switch To turn the unit On, slide the On/Off Switch to the On ( ) position. To turn the unit Off, slide the On/Off Switch to the Off ( ) position. 2. Automatic Shut-Off To preserve battery life, the SmartPoint™ Racer will automatically power-down after approximately 60 seconds without input . - Page 25 ACTIVITIES Mini Race Car 1. Press the Light Up Button to hear fun phrases, songs, sounds and melodies. While a melody is playing, continue pushing the SmartPoint Racer to add fun sounds on top of the melody. The light up face button will flash with sounds.
- Page 26 ACTIVITIES Criss-Cross Raceway Play Set 1. Place the SmartPoint Racer or any SmartPoint vehicle (each sold separately) on any of the three SmartPoint locations to trigger fun sounds, songs or phrases. 2. Put the SmartPoint Racer and Mini Race Car on the SmartPoint Launcher, then pull the handle to launch and race.
-
Page 27: Melody List
MELODY LIST 1. Yankee Doodle 2. A-Tisket A-Tasket 3. Do You Know the Muffin Man 4. Skip to My Lou 5. Three Little Kittens 6. Bicycle Built for Two SONG Song 1 Got to go fast, to be first to hit the finish line. I’m first! Oh yes, I’m first because I’m fast! Yes, I’m fast! Yes, I’m super, duper speedy fast. -
Page 28: Care And Maintenance
CARE & MAINTENANCE 1. Keep the unit clean by wiping it with a slightly damp cloth. 2. Keep the unit out of direct sunlight and away from any direct heat sources. 3. Remove the batteries if the unit will not be in use for an extended period of time. -
Page 29: Consumer Services
Australian Customers: VTECH ELECTRONICS (AUSTRALIA) PTY LIMITED – CONSUMER GUARANTEES Under the Australian Consumer Law, a number of consumer guarantees apply to goods and services supplied by VTech Electronics (Australia) Pty Limited. Please refer to vtech.com.au/ consumerguarantees for further information. - Page 30 Visit our website for more information about our products, downloads, resources and more. www.vtech.co.uk www.vtech.com.au © 2024 VTech Holdings Limited. All rights reserved. IM-570200-002 Version:0...
Need help?
Do you have a question about the Toot-Toot Drivers Criss-Cross Raceway and is the answer not in the manual?
Questions and answers