Table of Contents
Advertisement
Quick Links
Advertisement
Table of Contents

Related Manuals for Rinnai Demand Duo 2 H Series


Summary of Contents for Rinnai Demand Duo 2 H Series
- Page 2 Installation and service must be performed by a trained and qualified professional, service agency or the gas supplier. Copyright 2024 Rinnai America Corporation. Rinnai® is a registered trademark of Rinnai Corporation used under license by Rinnai America Corporation. Rinnai America Corporation continually updates materials, and as such, content is subject to change without notice.
-
Page 3: Table Of Contents
1. Welcome ........................... 4 1.1 To The Installer ......................4 1.2 To The Owner ......................4 2. Safety ..........................5 2.1 Safety Symbols ......................5 2.2 Safety Precautions ...................... 5 3. About ..........................7 3.1 Components ........................ 7 3.2 Specifications ......................8 3.3 Dimensions ......................... - Page 4 Thank you for purchasing Rinnai’s Demand Commercial Hybrid Water Heating System. • You must read the entire manual to This manual provides information on the properly operate the water heater and to installation, operation, and maintenance of the have regular maintenance performed.
-
Page 5: Safety Symbols
• Always check the water temperature before entering a shower or bath. Topics in this section • To protect yourself from harm, before • Safety Symbols performing maintenance: • Safety Precautions − Turn off the electrical power supply by unplugging the power cord or by turning off the electricity at the circuit breaker. - Page 6 Test the temperature of the water before placing damage. a child in the bath or shower. • Rinnai recommends that every home have a Do not leave a child or an infirm person in the carbon monoxide (CO) alarm in the hallway near bedrooms in each sleeping area.
-
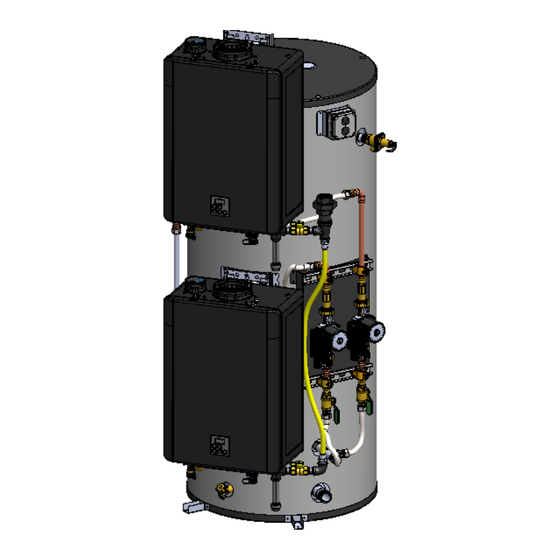
Page 7: Components
Topics in this section • Components • Specifications • Dimensions Anode Rod Locations (left and right side) Horizontal Models Vertical Models Note: same for both units 119-Gallon Hot Water Outlet Connection Storage Tank Securing Bracket 2-Unit Tankless Rack System Recovery Gas Line Pumps and Isolation Valves... - Page 8 Model Number CHS398100HCX CHS398100HCXA*** Dimensions (Assembled) in. (mm) w x h x d: 38.81 x 71.10 x 45.32 (985.8 x 1,806.8 x 1,151) Rack (with 2 Tankless Water Heaters): 220 lbs (100 kg); Weight Tank: 310 lbs (141 kg) Complete System: 530 lbs (240 kg) Installation Type Internal (Indoor) Commercial Applications Category and Ignition System...
- Page 9 Model Number CHS398100HVCX CHS398100HVCXA*** CHS320100HVCXIN Dimensions w x h x d: 33.7 x 81.09 x 40.1 (856 x 2,060 x 1,021.1) (Assembled) in. (mm) Weight Tank: 310 lbs (141 kg) Complete System: 530 lbs (240 kg) Installation Type Internal (Indoor) Commercial Applications Category and Ignition Category IV, Direct Electronic Ignition System...
- Page 10 Recovery Capabilities for CHS398100 models U.S. Gallons / Hour Liters / Hour at Temperature Rise Indicated °F Tank Capacity °C 119 Gal. GPH 1,528 1,147 450 Liters LPH 5,784 4,342 3,471 2,892 2,479 2,169 1,931 1,738 1,579 1,446 1,336 1,242 Recovery Capabilities for CHS320100HV U.S.
- Page 11 Models Measurements below CHS398100HCX are shown in inches (millimeters). CHS398100HCXA LEFT RIGHT 58.30 in.* (1481 mm) 43.72 in. (1110 mm) GAS *Temperature and Pressure Relief Valve 45.20 in. (1,148 mm) FRONT Ø 28.16 in. (715 mm) 5.91 in. (150 mm) Typical 20.50 in.
- Page 12 Measurements below Models are shown in inches CHS398100HVCX (millimeters). CHS398100HVCXA CHS320100HVCX FRONT RIGHT 4.14 (105) 1-1/2 in. MNPT Cold 18.12 (460) Ø 28.16 (715) T&P 28.76 (730) Demand Duo H-Series with SENSEI CX Installation Instructions...
-
Page 13: Guidelines
Installing venting through components and reduce the life of your a wall or roof; and training in installation of appliance. tankless water heaters. Training for Rinnai • DO NOT install the Demand Duo Tankless Water Heaters is accessible online at outdoors. - Page 14 Field ❷ Item Supplied ❶ ✓ Hot Water Outlet ❶ Hot Water Outlet ✓ ❷ Shut-Off Valve ❸ Cold and Hot ✓ ❸ Unions Temperature- Pressure ❽ ⓫ Relief Valve ✓ ❹ ❾ Discharge Pipe (do ❻ not cap, plug or reduce) ⓬...
- Page 15 Carefully unpack the shipping boxes and verify the following contents are included. If any items are damaged or missing, contact your local dealer/distributor or call Rinnai Customer Care at 1-800-621-9419. Do not attempt to use any item that appears damaged.
- Page 16 • Level • Soap or gas leak detector solution • Approved venting This section provides information on the importance of water quality to the Rinnai • Teflon tape (recommended) or pipe Tankless Water Heater. The information is compound intended to serve as general guidelines only and •...
- Page 17 Therefore, it is recommended to install as a direct vent (use outside air for combustion). In applications utilizing room air where there are high levels of particulates, Rinnai offers a room air screen. The water heater, venting, and vent termination(s) should not be installed in any areas 2 in.
-
Page 18: Step 1: Transport
Topics in this section Step 1: Transport Step 2: Secure for Earthquake Step 3: Position Tank and Connect Water Step 4: Install Rack Frame Legs Step 5: Position Rack NOTICE Step 6: Install Water Flex Lines Step 7: Secure Rack Step 8: Install Vent System Products installed in the state of California must Step 9: Install Relief Valve Lines... - Page 19 4. Install a shut-off valve on the cold and hot water lines (see E). 5. Rinnai recommends to install unions on the cold and hot water lines so that the water heater can easily disconnect if servicing is required (see F).
- Page 20 To install the rack frame legs: 1. Lay the rack assembly down on the shipping pallet. 2. Position the frame legs (supplied) on each rack leg so that the threaded inserts are centered over the open slots. Frame leg Threaded NOTE inserts The pallet may need to be...
- Page 21 To position the rack: 1. Loop hoisting straps (field-supplied) around the rack top frame. Straps should support approximately 220 lb (100 kg). Loop hoisting straps around rack top frame. 2. Position the rack in front of the tank, and then gently push the rack back as close to the tank as possible so that the flex lines can connect the two assemblies.
- Page 22 To install flex lines: 1. Connect the 18 in. (457 mm) flex line from the cold water manifold to the threaded connection on the tank. Tighten to 25 ft-lb torque. Ensure the gasket is in the flex line. Threaded connection Cold water manifold on tank 18 in.
- Page 23 To secure the rack: 1. The rack system must be anchored and secured in accordance with national and/or local codes having jurisdiction. Base holes to secure the rack are 0.5 in. (13 mm) in diameter. Reference local codes regarding minimum concrete thickness and use appropriate expansion anchors that are capable of supporting the rack...
- Page 24 To secure the rack: Refer to the Tankless Water Heater Installation and Operation Manual (supplied with each Tankless Water Heater in the Demand Duo system) for complete venting information and instructions. Topics in this manual include: Venting Guidelines; Venting Installation Sequence and Instructions; Venting Options;...
- Page 25 To secure the rack: A Pressure Relief Valve (PRV) is pre-installed on each tankless water heater in the Demand Duo system. A combination Temperature and Pressure (T&P) Relief Valve is pre-installed on the tank. Install a drain pipe from each PRV and T&P Valve into a floor drain as shown in the diagram below. Refer to the guidelines on the next page.
- Page 26 • An approved PRV (pre-installed on each tankless water heater in the Demand Duo • For safe operation, the relief valve(s) must not system) is required by the American National be removed from its designated point of Standard (ANSI Z21.10.3) for all water heating installation or plugged.
- Page 27 When filling the system with water, follow these guidelines: • To prevent damage to the water heater, all air must be relieved from the system and a hot water fixture must be flowing water before the water heater is plugged in and turned on. DO NOT OPERATE THE WATER HEATER UNLESS IT IS COMPLETELY NOTICE FULL OF WATER.
- Page 28 • A condensate neutralizer kit is available from Rinnai. The kit allows condensate to flow through neutralizing media that raises the pH of the condensate to a level that will help prevent corrosion of the drain and public sewer system.
- Page 29 WARNING • A licensed professional must install the gas supply. • Turn off 120V power supply. • Turn off the gas. • Gas is flammable. Do not smoke or provide other ignition sources while working with gas. • Do not turn on the water heater or gas until all fumes are gone. To connect the gas supply: 1.
- Page 30 When connecting the power supply, follow these guidelines: • Do not rely on the gas or water piping to ground the water heater. Ground locations are provided inside the water heater. • Do not exceed the limits of the 15A circuit. •...
- Page 31 1. Locate the electric conduit on the side of 5. Strip the green, white, and black field the water heater. supplied wires 1/2 in. Make sure the conductors are completely bare.. 2. Remove the two screws around the outlet cover. Remove the outlet cover and prewired outlet.
- Page 32 Complete the following checklist when installation is complete. You should be able to answer YES to each question. If you answer NO, installation is not complete. Refer to the applicable section in this manual and the tankless water heater installation and manual for additional information. YES NO INSTALLATION DETAILS ...
- Page 33 Rinnai strongly recommends to inspect the anodes every two (2) years. If more To drain the storage tank: than half of the anodes have been consumed, they should be replaced.
-
Page 34: Piping Diagram For Basic Installations
Topics in this section • Piping Diagram for Basic Installations • Controller Diagnostics • Replacement Parts Hot Water Supply Line LEGEND Union Ball Valve Check Valve Circulation Pump Expansion Tank Gas Supply Condensate Drain Line Cold Water Supply Building Pipe Circulation Pump Temperature and Pressure... - Page 35 WARNING • Do not use an extension cord or adapter plug with this appliance. • The water heater must be electrically grounded in accordance with local codes and ordinances or, in the absence of local codes, in accordance with the National Electrical Code, ANSI/NFPA No. 70. •...
- Page 36 ❾ ❹ ❻ ❼ ❸ ❼ ITEM NO. PART # DESCRIPTION CX199iN Rinnai SENSEI CX Tankless Water Heater 109001379 TRW02 Frame 109000738 Left Frame Base 109000739 Right Frame Base 107000382 1 in. X 36 in. Water Flex Line 107000524 1 in. X 18 in. Water Flex Line...
- Page 37 ITEM NO. PART # DESCRIPTION ⓬ 107000637 119-Gallon Tank 105000337 Electrical Assembly Temperature and Pressure 107000437 (T&P) Relief Valve ❼ 107000438 1 in. Street Elbow NPT ❷ 107000440 1 in. X 3 in. Dielectric Nipple ❸ ❹ 105002048 Dual Thermistor ❶...
- Page 38 Replacement Parts for Vertical Models Item No. Part Number Description Rinnai SENSEI Tankless CX199iN/CX160iN ❶ Water Heater 119 Gallon Tank 107000637 119 Gallon ASME Tank (for 107000672 ASME models only) Grundfos UPML 25-104 Pump 107000458 Electrical Assembly 105000337 Temperature and Pressure 107000437 (T&P) Relief Valve...
-
Page 39: Warranty
Rinnai’s sole discretion. The warranty claim for product parts and labor may be denied if a component or product returned to Rinnai is found to be free of defects in material or workmanship; damaged by improper installation, use or operation; or damaged during return shipping. - Page 40 Limitation on Warranties No one is authorized to make any other warranties on behalf of Rinnai America Corporation. Except as expressly provided herein, there are no other warranties, expressed or implied, including, but not limited to...
Need help?
Do you have a question about the Demand Duo 2 H Series and is the answer not in the manual?
Questions and answers