
Related Manuals for Synco Xtalk


Summary of Contents for Synco Xtalk
- Page 1 Xtalk Full Duplex Wireless Intercom Headset System User Manual Thank you for choosing SYNCO product. Please read this manual carefully before use and follow all instructions mentioned herein.
-
Page 2: Packing List
Caring For Your SYNCO Product · Please keep the product in a dry, clean, dust-free environment. · Keep corrosive chemicals, liquids and heat sources away from the product to prevent mechanical damage. · Use only a soft and dry cloth for cleaning the product. - Page 3 Headset x5 Carrying Bag x5 Charging Station x3 Charging Storage Bag x1 Cable x3 Rechargeable One-Ear Foam Mic Windshield Warranty Card x1 Battery x5 Cushions x5 Headset x9 Storage Bag x1 Carrying Bag x9 Charging Station x5 Charging Cable x5 Rechargeable One-Ear Foam Mic Windshield...
-
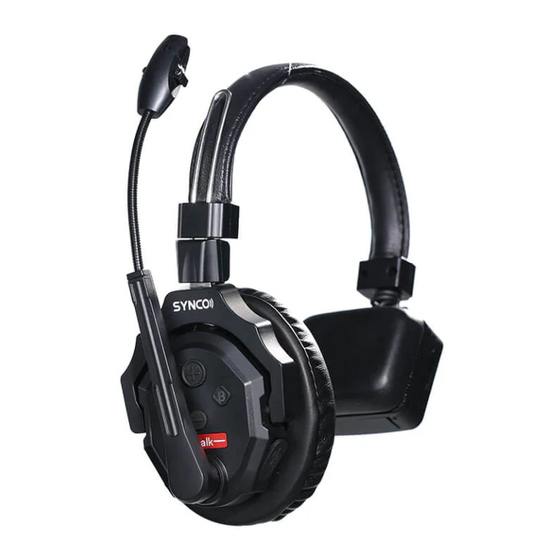
Page 4: Product Introduction
Product Introduction ① 3.5mm Mic In Port ② Power On/Off Toggle ③ Indicator Light ④ Button A ⑤ Volume + & Voice Prompts Button ⑥ Button B ⑦ Volume - ⑧ Type-C Port Operations and Functions of Buttons Note: The operations may vary depending on the firmware version. Please follow the instructions below to check the current firmware version. - Page 5 Button A Pairing/Unpairing Long press for 3 seconds to hear the first "beep" sound Voice Prompts: Connecting and Pairing/ then release Unpairing Long press for 5 seconds to Set as the Master hear the second "beep" sound Voice prompt: Master Mode then release Long press for 8 seconds to Set as Connection Level One...
- Page 6 Volume + Short Press Volume Up Voice Prompts: Master Mode/Remote Long Press for 3 seconds to Mode(Previous Firmware) hear the first "beep" then Voice Prompts: Master Mode/Level 1 release Pairing/Level 2 Pairing(New Firmware) Volume - Short Press Volume Down Long Press for 3 seconds to hear Switch Boost Mode 1/2/3(New the first "beep"...
- Page 7 Operations Catalog 1. Power On/ Off 5. Noise Cancellation 2. Master/Remote Settings 6. Mute/Unmute 3. Pairing 7. Domination Mode Pairing Method for Previous Firmware Version 8. Boost Mode Pairing Method for New Firmware Version 9. Indicator Light Status Pairing operation example 10.
- Page 8 3. Pairing Please follow these guidelines carefully for the successful pairing: *Products are pre-paired from the factory (except X1) and ready to use without manual pairing. *Ensure headsets have the same firmware version before pairing, or pairing will not be possible.
- Page 9 ② Pairing: long press all the button A for 3 seconds in 1 min, release after the first beep, and a voice prompt will say "Connecting and Pairing". When the indicator light stays green, pairing is successful. Clear pairing: Long the button A for 3 seconds, release after the first beep, and a voice prompt will say "unpairing".
- Page 10 3.2.2 Pairing Method for 6-13 Headsets Long the button A to set up 1 master, 4 Connection Level 1, and 1-8 Connection Level 1. Then press button A to pair all the headsets. Refer to the following instructions: (1 ≤ n ≤ 8) Long To hear the X times Beep then Description...
- Page 11 before setting up Connection Level 2. *The Connection Level 2 must be paired with the Connection Level 1 before it can connect to the Master. They cannot directly pair for communication. 3.3. Pairing operation example (Take X9 as example) 3.3.1. Set the Master first Long press the button A for 5 seconds to hear the second "beep"...
- Page 12 3.3.4. Pairing the Master and Connection Level 1 In 1 minute, Long press all the buttons A for 3 seconds to hear the first "beep" then release, the voice prompt will say "Connecting and Pairing" "Pairing Succeed" or wait for the indicator light of all headph1s to stay green, and all are paired.
- Page 13 3.4. Pairing with different SKUs (X1 pairing with X1, or X1 pairing with X2, etc.) X1 is set as the Master by default, while X2 and above models are set as the Master plus several remotes. Before pairing with other SKUs, please set the role for each headset. A communication group can only have 1 Master.
-
Page 14: Volume Settings
4. Volume Settings Short press the volume up/down button to increase/decrease the volume. 5. Noise Cancellation Short press the B button to turn on/off the noise cancellation feature. 6. Mute/Unmute Rotate the boom arm up/down (see the picture below) to mute/unmute. * The Mute/Unmute mode voice prompt will be played once the Mute/Unmute is activated. -
Page 15: Indicator Light Status
8. Boost Mode When poor signal, switch the Boost Mode to amplify the signal, improving communication clarity and stability, and reducing interruptions and disconnections. It is set to Mode 1 by default. Long press the volume- for 3 seconds to hear a "beep" to switch between Mode 1, Mode 2 or Mode 3. -
Page 16: Real-Time Monitoring
* This port is only for monitoring and is not the outputting port. 12. Firmware Update 1. Connect the Xtalk headset to the PC using a data-capable USB-C cable and power on the Xtalk. 2. Long press Volume+ and Volume- for 10 seconds until you hear “BiBi” twice. -
Page 17: Specifications
Specifications Wireless Technology Digital 2.4GHz Transmission Mode Full-Duplex Operating Range 350m (LOS) Frequency Band 2.4GHz Latency About 120ms Approximate RF Sensitivity <-90dBm Radio Output Frequency 20dBm Power USB-C 5V Battery Capacity 1050mAh Li-ion Battery Working Time Charging Time About 2.5H Frequency Response 150Hz~7KHz Signal-To-Noise Ratio... -
Page 18: Warranty Period
2. Please retain your sales receipt and warranty certificate as proof of purchase. If any of these documents is missing, only sales return or chargeable service will be provided. 3. If the SYNCO product is out of the warranty coverage, the service and the parts cost will be charged. - Page 19 Guangzhou Zhiying Technology Co., Ltd Room 2401, 24 / F, South Tower, Lisheng Plaza, No. 68 Huadi Avenue, Liwan District, Guangzhou, China, 510000 support@syncoaudio.com www.syncoaudio.com https://www.facebook.com/syncomicrophones...
Need help?
Do you have a question about the Xtalk and is the answer not in the manual?
Questions and answers