
Related Manuals for Chefman 4-Speed Glass Jar RJ27-15-GPI-MX


Summary of Contents for Chefman 4-Speed Glass Jar RJ27-15-GPI-MX
- Page 1 4-Speed Glass Jar 1.5L Blender USER GUIDE • Safety Instructions • Features • Operating Instructions • Blending Tips • Cleaning and Maintenance • Notes • Terms and Conditions • Warranty Registration RJ27-15-GPI-MX...
- Page 2 COOKING FORWARD™ Welcome! Whether this is your first Chefman® appliance or you’re already part of our family, we’re happy to be cooking with you! With your new 4-Speed Glass Jar 1.5L Blender, blending has never been easier, faster, or more convenient.
-
Page 3: Table Of Contents
CONTENTS Safety Instructions Features Operating Instructions Blending Tips Cleaning and Maintenance Notes Terms and Conditions Warranty Registration... -
Page 4: Safety Instructions
Never pull from the power cord. Avoid contacting moving parts. Do not operate any appliance with a damaged cord or plug or after the appliance malfunctions, or is dropped or damaged in any manner. Contact Chefman ® Customer Support for examination, repair, or adjustment. - Page 5 SAFETY INSTRUCTIONS IMPORTANT SAFEGUARDS The use of attachments not recommended or sold by Chefman ® may cause fire, electric shock or injury. Do not use outdoors. Do not let cord hang over edge of table or counter. 10. Keep hands and utensils out of container while blending to reduce the risk of severe injury to persons or damage to the blender.
- Page 6 SAFETY INSTRUCTIONS IMPORTANT SAFEGUARDS WARNING: This appliance has a polarized plug (one blade is wider than the other). This plug is intended to fit into a polarized outlet only one way. If the plug does not fit fully into the outlet, reverse the plug. If it still does not fit, contact a qualified electrician.
-
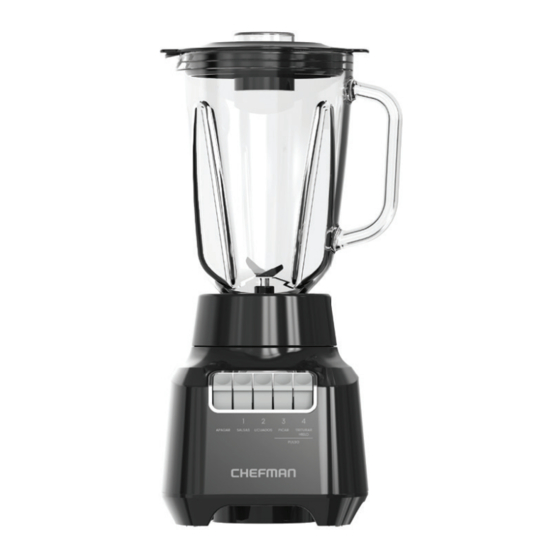
Page 7: Features
FEATURES 30-mL Measuring Cup Pour-Through Lid 1.5-Liter Glass Jar Blade Assembly Sealing Gasket Blade Assembly Collar Motor Housing Base OFF Button LOW and HIGH Buttons (continuous blending) 2 Pulse Buttons... -
Page 8: Operating Instructions
OPERATING INSTRUCTIONS BEFORE FIRST USE For best results, follow these steps before using your blender for the first time. Remove all packaging materials, and check to ensure that all parts and accessories are accounted for. Wipe down the base with a damp cloth to remove any packaging debris. - Page 9 OPERATING INSTRUCTIONS Position the jar on the motor base and rotate slightly clockwise so that it lowers into place. The bottom of the blade assembly collar should fit flush against the base and not wobble. It is recommended to operate this appliance on a separate outlet and circuit from other appliances to avoid overloading the circuit.
-
Page 10: Blending Tips
BLENDING TIPS • Cut solid foods into uniform sizes (about 2.5 cm or smaller) for easy blending and consistent results. • Leave room at the top of the container as blending can cause the liquid level to rise and may overflow if too full. •... - Page 11 BLENDING TIPS Do not remove the blender lid while operating. To add liquid • ingredients while blending, remove the center piece of the two-piece lid and pour ingredients through the opening. Do not put a utensil or any other object through the opening in the lid. •...
-
Page 12: Cleaning And Maintenance
CLEANING AND MAINTENANCE Cleaning the blender is easy and should be done after every use. It’s best to clean the blender shortly after use, before ingredients have a chance to dry out and adhere to the blades or other parts. Before cleaning, wait until the blade fully stops and unplug the blender. - Page 13 CLEANING AND MAINTENANCE TO STORE Be sure all parts are clean and dry. Store the blender in its box or in a clean, dry place. Never store it while it is hot or wet. Store the blender with the lid slightly open to avoid trapping odors or stagnant water in the jar.
-
Page 14: Notes
NOTES... - Page 15 NOTES...
-
Page 16: Terms And Conditions
Warranty eligibility. We encourage you to register your product. Registering can make the Warranty process easier and can keep you informed of any updates or recalls on your product. To register, follow the directions on the Chefman Warranty ® Registration page in the Chefman User Guide. - Page 17 User Guide. If your product does not work as it should, please contact ® Customer Support at support@chefman.com so that we may assist you. THIS WARRANTY DOES NOT COVER • Misuse - Damage that occurs from neglectful or improper use of products,...
-
Page 18: Warranty Registration
AC ONLY/ AC SEULEMENT NOTE: Label depicted here is an example. How do I register my product? All you need to do is fi ll out a simple Chefman registration form. You can ® easily access the form in one of the two ways listed below: Visit Chefman.com/register. - Page 19 CHEFMAN W ARRANTY REGISTRATION ® For product information Please visit us at Chefman.com. EXCEPT WHERE SUCH LIABILITY IS REQUIRED BY LAW, THIS WARRANTY DOES NOT COVER, AND CHEFMAN SHALL NOT BE LIABLE FOR, ® INCIDENTAL, INDIRECT, SPECIAL, OR CONSEQUENTIAL DAMAGES,...
- Page 20 C H E F M A N . C O M | @ M YC H E F M A N © C H E F M A N 2 0 2 3 RJ27-15-GPI_UG_FINAL_OTP_022423...
Need help?
Do you have a question about the 4-Speed Glass Jar RJ27-15-GPI-MX and is the answer not in the manual?
Questions and answers