
Subscribe to Our Youtube Channel
Related Manuals for Chefman RJ19-RS1-BP


Summary of Contents for Chefman RJ19-RS1-BP
- Page 1 ® Cordless Power IMMERSION BLENDER SET USER GUIDE Safety Instructions Features Operating Instructions Blending Tips Cleaning and Maintenance Notes Terms and Conditions Warranty Registration RJ19-RS1-BP...
- Page 2 COOKING FORWARD™ Welcome! Whether this is your first Chefman appliance or you’re already part of our family, ® we’re happy to be cooking with you! With your new Cordless Power Immersion Blender Set, blending has never been easier, faster, or more convenient. Purée a soup right in the pot with no worry about a power cord, effortlessly mix smoothie ingredients to delicious perfection, or whip cream to voluminous heights in seconds.
-
Page 3: Table Of Contents
CONTENTS Safety Instructions Features Operating Instructions Blending Tips Cleaning and Maintenance Notes Terms and Conditions Warranty Registration... - Page 4 IMPORTANT SAFEGUARDS WHEN USING ELECTRICAL APPLIANCES, BASIC SAFETY PRECAUTIONS SHOULD ALWAYS BE FOLLOWED, INCLUDING: Read all instructions. 2. Be sure to detach the USB cord before using. Detach the shaft from the motor housing before putting on or taking off parts, and before cleaning. 3.
- Page 5 11. WARNING: The mixing blades are sharp. Handle with care when using and cleaning the product. 12. Always place the blender on a firm, stable surface when not in use. 13. The use of attachments not recommended or sold by Chefman ® may cause fire,...
- Page 6 IMPORTANT SAFEGUARDS WHEN USING ELECTRICAL APPLIANCES, BASIC SAFETY PRECAUTIONS SHOULD ALWAYS BE FOLLOWED, INCLUDING: 14. Never use abrasive cleaning agents or abrasive cloths when cleaning the blender. 15. Do not use fingers to scrape food away from the cutting blade while the blender is under power.
- Page 7 DO NOT PLACE THE APPLIANCE ON A STOVETOP OR ANY OTHER HEATABLE SURFACE, EVEN IF THE STOVETOP IS NOT ON. DOING SO IS A FIRE HAZARD.
-
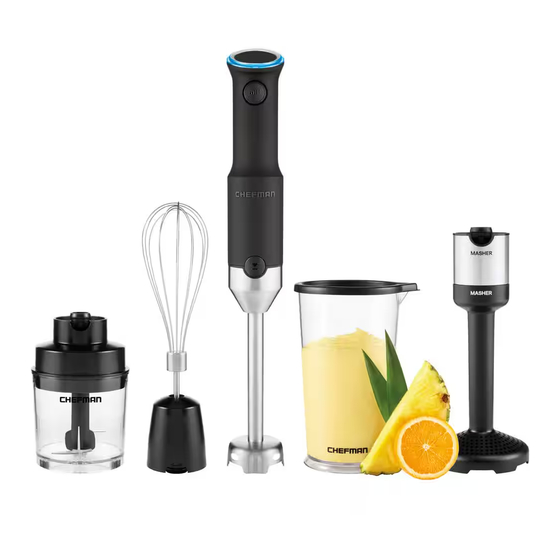
Page 8: Features
FEATURES LED Charge Indicator Ring changes color to indicate charge level Variable Speed–Control Button pressure adjusts blending speed Motor Housing with comfort grip Attachment–Release Button releases attachments from housing Blender Blade Shaft stainless steel and dishwasher-safe Blender Blade stainless steel Blender Blade Guard covers blade while in storage Blender Blade Edge Guard... - Page 9 FEATURES 13. Chopper bowl 18. Masher 250ml; 1 cup 19. Masher connector 14. Chopper blade 20. Mixing beaker 15. Chopper lid 21. Beaker lid 16. Whisk 22. Storage Case (not shown) 17. Whisk connector...
- Page 10 FEATURES LED CHARGE INDICATOR COLORS Blue Orange 50%–100% 20%–50% 5%–20% Red and Blinking (up to 18 minutes of use) (time to recharge) 5% or less...
- Page 11 NOTES...
-
Page 12: Operating Instructions
OPERATING INSTRUCTIONS BEFORE FIRST USE For best results, follow these steps before using your Cordless Power Immersion Blender Set for the first time. Remove all packaging materials and check to ensure that all parts and accessories are accounted for. 2. Wipe down the motor housing, chopper lid, whisk connector, and masher connector with a damp cloth to remove any packaging residue. - Page 13 OPERATING INSTRUCTIONS 3. During charging, the LEDs will slowly pulse. The colors will change from red to orange to blue as the blender becomes more charged. The blue lights will pulse once 85% charged and will become steady once the blender is fully charged. A full charge will provide up to 18 minutes of use.
- Page 14 OPERATING INSTRUCTIONS HOW TO USE THE BLENDER The blender’s blade is specially designed for processing and pureeing all kinds of foods, including salad dressings, smoothies, and sauces. It can also whisk dry ingredients and chop foods like onions and nuts. Ensure the food to be processed is in a sufficiently deep container to inhibit splatter.
- Page 15 OPERATING INSTRUCTIONS 8. To stop blending, release the speed-control and safety-lock buttons. Do not lift the blender out of the mixture until the blade has stopped. WARNING: If a piece of food becomes lodged in the blade, remove the blending shaft before trying to dislodge it. Then use a spatula or similar utensil to carefully remove the food.
- Page 16 OPERATING INSTRUCTIONS HOW TO USE THE WHISK To assemble the whisk: Insert the whisk shaft into the socket of the whisk connector until you feel and hear them click together. 2. Align the motor body housing with the whisk connector and push the pieces together until you feel (and hear) them click together.
- Page 17 OPERATING INSTRUCTIONS HOW TO USE THE MASHER To assemble the masher: Seat the masher connector onto the pin of the masher itself, then twist clockwise until you feel and hear the pieces click together. 2. Align the motor body housing with the masher connector and push the pieces together until you feel (and hear) them click together.
-
Page 18: Blending Tips
BLENDING TIPS Cut solid foods into uniform sizes for easy blending and consistent results. 2. To avoid splatter, do not turn on the blender, whisk, or masher until the blade/whisk is beneath the surface of the food; then turn the blender off before removing it. Never take the blender, whisk, or masher out of a mixture while it is running. -
Page 19: Cleaning And Maintenance
CLEANING AND MAINTENANCE With top-rack dishwasher-safe attachments, the immersion blender is easy to clean. Follow these steps for safety and best results. IMPORTANT: Make sure that the safety- lock button is not being pressed while attaching or removing parts or accessories. Before cleaning, detach the shaft from the housing by pressing the shaft- release button. -
Page 20: Notes
NOTES... - Page 21 NOTES...
-
Page 22: Terms And Conditions
® . Any changes to the Terms and Conditions of this Warranty must be in writing, signed by a representative of Chefman ® No other party has the right or ability to alter or change the Terms and Conditions of this Warranty. - Page 23 ® — and workmanship, under normal household use, for a period of 1 year from the date of purchase when used in accordance with the directions listed in the Chefman User ® Guide. If your product does not work as it should, please contact Customer Support at support@chefman.com so that we may assist you.
-
Page 24: Warranty Registration
CHEFMAN W ARRANTY REGISTRATION ® WHAT DO I NEED TO REGISTER MY PRODUCT? Contact Information 2. Model Number 3. Proof of Purchase: online confirmation, receipt, gift receipt 4. Date Code 5. Access Code Model/Modele: RJ25-C Conveyor toaster 120v~60hz 1800W CONFORMS TO UL STD. 1026 CERTIFIED TO CSA STD.C22.2 No.64... - Page 25 CHEFMAN W ARRANTY REGISTRATION ® HOW DO I REGISTER MY PRODUCT? All you need to do is fill out a simple Chefman registration form. ® You can easily access the form in one of the two ways listed below: Visit Chefman.com/register 2.
- Page 26 ® ©CHEFMAN 2022 RJ19-RS1-BP_UG_FINAL_OTP_031422...
Need help?
Do you have a question about the RJ19-RS1-BP and is the answer not in the manual?
Questions and answers