Advertisement
Quick Links
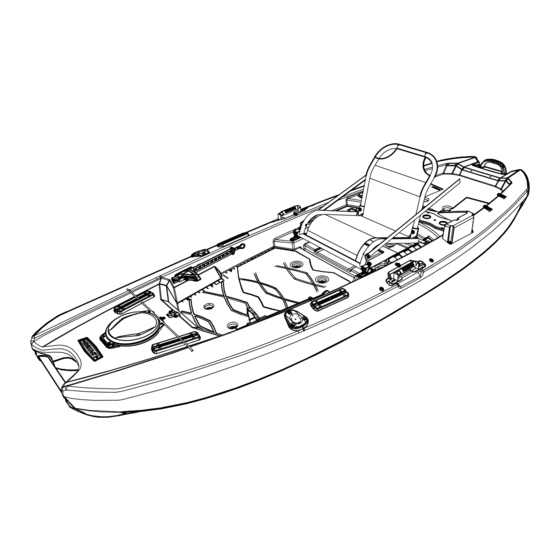
MANTA 120
ANGLER KAYAK WITH MOTOR MOUNT
SAVE THIS INSTRUCTION IN THE EVENT THE MANUFACTURER NEEDS TO BE CONTACTED.
TOOLS REQUIRED (ONLY FOR ATTACHING THE MOTOR MOUNT)
Electric drill
(x1)
NEED HELP? TALK TO US!
Dial 1-800-225-3865
Live Chat: www.lifetime.com/customerservice/home
#2 Phillips Screwdriver
(x1)
1/4" (≈6mm) Drill bit
(x1)
Lifetime's assembly experts offer quick responses and great
customer service.
OWNER'S
7/16" (≈11mm) wrench
(x1)
Product ID:
MANUAL
Advertisement

Related Manuals for Lifetime MANTA 120


Summary of Contents for Lifetime MANTA 120
- Page 1 TOOLS REQUIRED (ONLY FOR ATTACHING THE MOTOR MOUNT) #2 Phillips Screwdriver 7/16" (≈11mm) wrench (x1) (x1) 1/4" (≈6mm) Drill bit Electric drill (x1) (x1) Lifetime’s assembly experts offer quick responses and great NEED HELP? TALK TO US! customer service. Dial 1-800-225-3865 Product ID: Live Chat: www.lifetime.com/customerservice/home...
- Page 2 • Registration is fast, easy, and completely voluntary. LIFETIME’S PROMISE TO YOU: Maintaining your privacy is our long-standing policy at Lifetime ® . And you can rest assured that Lifetime ® will not sell or provide your personal data to other third parties, or allow them to use your personal data for their own purposes.
- Page 3 FEATURES Adjustable frame fold-down seat Center accessory-mounting tracks Front accessory-mounting tracks Hull ID Drain plug Fishing rod holders Water resistant hatch Stability strap for stand-up support Quick adjust foor braces Bait bucket recess Motor mount Dual fishing rod holder covers Dual skegs •...
- Page 4 INSTALLING THE ADJUSTABLE SEAT ADJUSTABLE SEAT ASSEMBLY 1.1 When unpacking the kayak for the first time, remove the seat from the kayak and unfold. 1.2 On the bottom of the seat, wrap the wings of the seat around the seat frame and securely tighten the straps.
- Page 5 INSTALLING THE ADJUSTABLE SEAT ADJUSTABLE SEAT INSTALLATION AND ADJUSTMENT 1.3 Press the capped ends of the frame into the slots in the kayak in one of two possible configurations: Seated high to easily transition from sitting to standing. *Seat frame shown without covering for illustrative purposes only.
- Page 6 ATTACHING THE MOTOR MOUNT 1/4" (≈6mm) Drill bit IMPORTANT: THIS SECTION IS ONLY REQUIRED IF YOU PLAN TO ATTACH THE MOTOR MOUNT INCLUDED WITH THIS KAYAK. IF NOT, SKIP TO SECTION 3. 2.1 Before attaching the motor mount, look for the three divots in the left side of the hull of the Manta at the locations indicated.
- Page 7 ATTACHING THE MOTOR MOUNT (CONTINUED) 2.2 Using a #2 Phillips screwdriver, remove the five (5) screws securing the rod holder cover to the hull. Save the screws for later. Remove the rod holder cover. Rod holder cover 2.3 Remove the rod holder. Rod holder...
- Page 8 ATTACHING THE MOTOR MOUNT (CONTINUED) 7/16" (≈11mm) Drill bit 2.4 Set the motor mount (CXR) on the hull and align the three holes in the mount with the three holes in the hull. Insert a bolt (ELK) through each of the three holes.
- Page 9 ATTACHING THE MOTOR MOUNT (CONTINUED) 1/4" (≈6mm) Drill bit 7/16" (≈11mm) Drill bit 2.5 Now that the motor mount is in place, there is still one more hole. Using the 1/4" (≈6mm) drill bit, drill through the hole in the motor mount and into the hull at the location shown.
- Page 10 ATTACHING THE MOTOR MOUNT (CONTINUED) 2.5 Reinsert the rod holder, oriented as shown.
- Page 11 ATTACHING THE MOTOR MOUNT (CONTINUED) 2.6 Reattach the rod holder cover using the screws removed in step 2.2. Rod holder cover...
- Page 12 TRANSPORTATION 3.1 When transporting, NEVER transport the kayak on its side (as when using a J-rack). Tie down the Manta bottom or top down against the roof of the vehicle, preferrably with a blanket or similar between the kayak and the roof of the vehicle.
-
Page 13: Warning Sticker
• ALWAYS bring a paddle along when kayaking, in case of a motor or battery malfunction. • MAXIMUM weight on kayak includes the kayaker, the motor and battery. MAINTENANCE Congratulations on your Lifetime watercraft purchase. By following the instructions below, your new ®... - Page 14 NOTES...
- Page 15 Please keep these documents in a safe, secure place. All warranty claims must fi rst be submitted in writing to Lifetime Products, Inc. PO Box 160010 Clearfi eld, UT 84016-0010 for determination of service or replacement of any defective watercraft hull.
- Page 16 ENHANCE YOUR LIFETIME WATERCRAFT BY ADDING ® ACCESSORIES OR OTHER GREAT PRODUCTS To purchase accessories or other Lifetime products, visit us at: www.lifetime.com Or dial 1-800-424-3865 www.lifetime.com 1235690 3/13/2024...
Need help?
Do you have a question about the MANTA 120 and is the answer not in the manual?
Questions and answers