Table of Contents
Advertisement
Quick Links
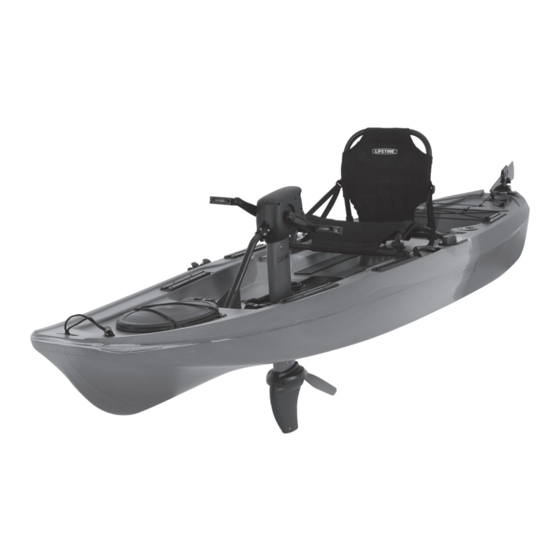
SIT-ON-TOP FISHING KAYAK
RENEGADE 116
GET ASSEMBLY HELP
WATCH THE INSTRUCTIONAL VIDEOS ON YOUTUBE.
Scan the code, or search http://go.lifetime.com/pedaldrive
Save this instruction in the event you need to contact the manufacturer.
TOOLS REQUIRED
1/8"
(x1,
)
included
QUESTIONS?
Dial 1-800-225-3865
(English, Spanish, French)
Live Chat: www.lifetime.com/customerservice/home
5/32"
(x1,
included
CONTACT LIFETIME
®
™
TABLE OF CONTENTS
Registration..................................2
Safety Instructions............................2
Parts Identifier..................................3
Features.........................................4
)
Seat Assembly..................................5
Rudder Assembly...........................11
Pedal Drive Assembly.....................16
General Use & Transport................20
Warranty....................................27
CUSTOMER SERVICE:
OWNER'S
MANUAL
Product ID:
Advertisement
Table of Contents

Related Manuals for Lifetime RENEGADE 116


Summary of Contents for Lifetime RENEGADE 116
-
Page 1: Table Of Contents
SIT-ON-TOP FISHING KAYAK RENEGADE 116 ™ GET ASSEMBLY HELP WATCH THE INSTRUCTIONAL VIDEOS ON YOUTUBE. Scan the code, or search http://go.lifetime.com/pedaldrive Save this instruction in the event you need to contact the manufacturer. TOOLS REQUIRED TABLE OF CONTENTS Registration........2 Safety Instructions......2 1/8"... -
Page 2: Registration
We invite you to read our privacy policy at www.lifetime.com REGISTER today! **U.S. and Canada customers ONLY**... -
Page 3: Parts Identifier
PARTS IDENTIFIER Large parts GXK (x1) GXH (x1) GXL (x1) Paddle may vary from model shown GXI (x1) (Left) HDI (x1) (Right) GXS (x1) GXE (x1) GXJ (x1) GXD (x1) GXB (x2) AYU (x2) HARDWARE REQUIRED Hardware bag... -
Page 4: Features
FEATURES Fold-Down Angler Seat Water-resistant hatch Tiller handle Paddle keeper Universal accessory mounting tracks • UV-Protected Durable, High-Density Polyethylene (HDPE) Construction Drain Plug Rudder deploy- ment cord Fishing Rod Holders Specifications: Length: 11 feet 6 inches (350,5 cm) Width: 32 inches (81,2 cm) Weight: 99 lb (44,9 kg) Hull ID Maximum Weight Capacity: 350 lb (158,8 kg)*... -
Page 5: Seat Assembly
SEAT ASSEMBLY HARDWARE REQUIRED Hardware Bag GXA (x2) GXC (x2) PARTS REQUIRED AYU (x2) GXB (x2) GXJ (x1) GXK (x1) TOOLS REQUIRED... - Page 6 • In case you have trouble with the assembly in this section, check out our assembly-help video by scanning the QR code below or by entering the address in any browser: http://go.lifetime.com/pedaldrive-section1 • When unpacking the kayak for the first time, remove the seat (GXJ) from the kayak and unfold.
- Page 7 u SECTION 1 TOOLS AND HARDWARE REQUIRED • On the bottom of the seat, wrap the wings of the seat around the seat frame and securely tighten the straps.
- Page 8 u SECTION 1 TOOLS AND HARDWARE REQUIRED GXA (x2) • Slide each carriage bolt (GXA) about halfway up the seat tracks. Seat track • Slide a seat bracket (GXB) onto the forward-facing cross bar on the seat frame.
- Page 9 u SECTION 1 TOOLS AND HARDWARE REQUIRED GXC (x2) • Lower the seat onto the seat tracks so the bolts pass through the hole in the seat brackets. • Press a hex nut (GXC) into the top of each adjustment handle (AYU), then use the adjustment handles to secure the seat to the seat track.
- Page 10 u SECTION 1 TOOLS AND HARDWARE REQUIRED • Locate the strap on the lower rear cross tube of the seat. Run the strap through the loop behind the seat, pulling hard to allow the stitched seam on the strap through the loop. Fasten the strap until the seam is flush with the buckle.
-
Page 11: Rudder Assembly
RUDDER ASSEMBLY HARDWARE REQUIRED PARTS REQUIRED GXH (x1) GXS (x1) TOOLS REQUIRED... - Page 12 QR code below or by entering the address in any browser: http://go.lifetime.com/pedaldrive-section2 • Remove the cotter ring from the pin on the bottom of the rudder assembly (GXH). Insert the pin into the bracket at the back of the hull.
- Page 13 u SECTION 2 TOOLS AND HARDWARE REQUIRED • Insert the cotter ring back through the hole at the bottom of the pin to secure the rudder assembly to the bracket. Cotter Ring...
- Page 14 u SECTION 2 TOOLS AND HARDWARE REQUIRED • Turn the rudder just enough to insert the control rod into the clamp. • Face the rudder and tiller handle straight forward, then tighten the knob. • If the kayak begins steering sharply to one side, loosen the knob and reset the tiller handle and rudder to these centered positions.
- Page 15 u SECTION 2 TOOLS AND HARDWARE REQUIRED • Thread the end of the pull cord (GXS) through the pad eyes (1 & 2), and tie it to the lower hole (3) in the rudder. Press the pull cord into the cleat (4). Toggle ball Upper hole Lower hole...
-
Page 16: Pedal Drive Assembly
PEDAL DRIVE ASSEMBLY HARDWARE REQUIRED Hardware bag GXF (x2) GXR (x2) GXP (x1) 1/8" AKH (x1) GXQ (x1) 5/32” GXG (x2) PARTS REQUIRED GXE (x1) GXD (x1) GXI (x1) (Left) HDI (x1) (Right) TOOLS REQUIRED 5/32" 1/8" (x1) Adjustable (x1, (x1, included included... - Page 17 QR code below or by entering the address in any browser: http://go.lifetime.com/pedaldrive-section3 • Apply a thin layer of silicone grease (AKH) to the end the brace (GXD). Loosen the hardware shown, then insert the brace into the pedal drive assembly (GXE).
- Page 18 u SECTION 3 TOOLS AND HARDWARE REQUIRED (x1) GXR (x2) • Insert a plug (GXR) into each end of the cross tube on the brace (GXD). • Use an adjustable wrench to attach the left and right pedals (GXI and HDI) to the the crank arms of the pedal drive assembly.
- Page 19 u SECTION 3 TOOLS AND HARDWARE REQUIRED • Place the brace in the recess of the hull, and rest the pedal drive assembly on the cover tray. Cover tray • Secure the brace to the hull by turning the lock knobs into the locked position.
-
Page 20: General Use & Transport
QR code below or by entering the address in any browser: http://go.lifetime.com/pedaldrive-section4 SHALLOW WATER / PADDLE MODE / STORAGE When launching the kayak, returning to shore, or paddling in shallow water, raise the rudder and the pedal drive out of the water as shown. - Page 21 OPEN WATER / PEDAL DRIVE MODE In open water, lower the rudder and deploy the pedal drive mechanism as shown. The pedal drive mechanism should only be deployed in water that is at least 24-inches deep and free from obstructions. •...
- Page 22 TRANSPORT To avoid damage to the kayak or any of its parts, transporting should be done in the following manner: 1. Remove the pedal drive mechanism and stow it inside the vehicle. 2. Remove the seat, or fold it down with the straps tightened. 3.
-
Page 23: Warning Sticker & Maintenance
• ALWAYS wear a helmet when appropriate. • Check your equipment PRIOR to each use for signs of wear or failure. 1169432 MAINTENANCE Congratulations on your Lifetime watercraft purchase. By following the instructions below, your new ® Lifetime watercraft should provide you with years of service and enjoyment. - Page 24 NOTES...
- Page 25 NOTES...
- Page 26 NOTES...
-
Page 27: Warranty
Please keep these documents in a safe, secure place. All warranty claims must fi rst be submitted in writing to Lifetime Products, Inc. PO Box 160010 Clearfi eld, UT 84016-0010 for determination of service or replacement of any defective watercraft hull. - Page 28 ENHANCE YOUR LIFETIME WATERCRAFT BY ADDING ® ACCESSORIES OR OTHER GREAT PRODUCTS To purchase accessories or other Lifetime products, visit us at: www.lifetime.com Or dial 1-800-424-3865 www.lifetime.com 1219391 B 5/12/2023...
Need help?
Do you have a question about the RENEGADE 116 and is the answer not in the manual?
Questions and answers