Advertisement
Advertisement
Table of Contents

Subscribe to Our Youtube Channel
Related Manuals for Hyundai power products HTDT46354F


Summary of Contents for Hyundai power products HTDT46354F
- Page 2 Congratulation! Dear Customer, The team of HYUNDAI would like to thank you for the choice and for the confidence shown to our product. Our aim is, always to offer an innovative, high-class-strong and prize-adequate product to the customer. We wish you much pleasure in do-it-yourselfers activity, free of friction with this machine.
-
Page 3: Table Of Contents
CONTENTS SAFETY INSTRUCTIONS THE TOOL ASSEMBLY MAINTENANCE AND STORAGE PROTECTION OF THE ENVIRONMENT EC DECLARATION... -
Page 4: Safety Instructions
SAFETY INSTRUCTIONS 1) General Safety instructions for thermal mowers Instructions Read the instructions carefully. Be familiar with the controls and proper use of the equipment. Never allow children to use this mower. If the mower is given to an other people, also give this manual. - Page 5 blade lock are not worn or damaged. Replace blades and blade assemblies that are not in good condition to maintain balance. The blades must be balanced to ensure proper operation and to be able to work safely. Operation Do not use the machine in a confined space or hazardous carbon monoxide emissions can be collected.
- Page 6 Do not place hands or feet near or under rotating parts. Keep clean the mouth of the grass extractor. Never take or carry the mower while the machine is running. Stop the machine and remove the ignition key, disconnect the spark plug from the spark plug: Before cleaning or unclogging the grass extractor.
- Page 7 2) Special safety instructions Always use the mower with its pick-up bag and / or deflector in the intended position. Switch off the engine before emptying the pick-up bag or before changing the cutting height. While the engine is running, never put your hands or feet under the mower or under the grass ejection area.
- Page 8 If the mower vibrates abnormally, try to understand the reason and bring your lawnmower to an authorized repair center. Regularly check that the bolts, nuts and screws are properly tightened for safe use of the mower. Do not use the tool where there is the possibility of thunderstorms and lightnings.
- Page 9 discharge opening device in place; Caution: watch for exhaust fumes. Do not inhale them. Wear suitable clothing such as long pants and protective equipment: anti-slip shoes, hearing protection, eye protection and gloves. To avoid health problems, limit the running time. Get enough rest. Exposure to noise and vibration can have serious health consequences.
- Page 10 Even if you use this product in compliance with all safety requirements, the potential risks of injury and damage remain. The following hazards may arise in the structure and design of this product: There are adverse health consequences resulting from the emission of vibration if the product is used for long periods of time or not properly managed and properly maintained.
- Page 11 B.1 Read the instructions manual. B.2 Beware of projections! Keep spectators away from the work area B.3 Danger! Keep your hands and feet away from the cutting element! B.4 Fuel is flammable, keep it away from the fire. Do not add fuel while the machine is running.
-
Page 12: The Tool
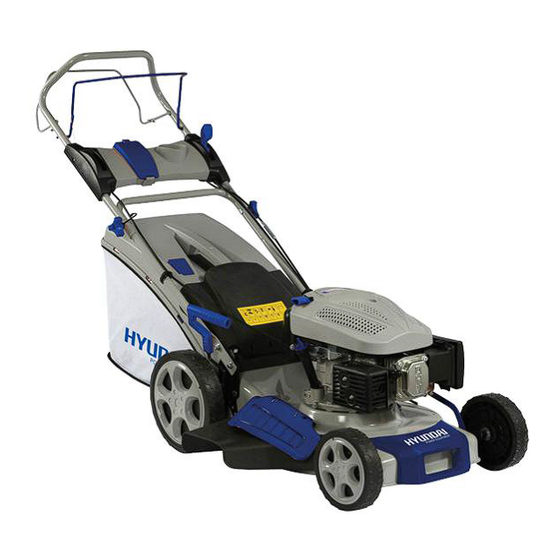
THE TOOL 1) Description of the tool 1. Upper handlebar 9. Deflector 2. Engine control bar 10. Grass box 3. STARTER lever 11. Propeller bar 4. Panel 12. Height adjustment lever 5. Engine 6. Carter 7. Side protection 8. Fall opening... -
Page 16: Use
1) Filling the tank The fuel should meet the following criteria: Clean, new and unleaded gasoline. A minimum octane number of 87/87 AKI (91 RON). For high altitude use, see below. Gasoline containing up to 10% ethanol is acceptable. ... - Page 17 engine. Fuel tank capacity: 1.2 L (Picture3A) Image 3A Image 3B 2) Engine oil Recommended oil: We recommend the use of a high-quality detergent oil classified for SF, SG, SH, SJ or higher. Do not use special additives. External temperatures determine the proper viscosity of the oil for the engine. Use the table to choose the best viscosity for the expected outdoor temperature range.
- Page 18 Checking the oil level Check the oil level once the engine is switched off and lays horizontally. 2. Remove the dipstick/gauge from the oil tank and wipe it off. 3. Insert the oil tank dipstick/gauge into the tank neck as shown, without screwing it back in, then remove it to check the oil level.
- Page 19 running or before the engine has cooled down for at least 15 minutes after use. 3) Cutting height Push the lever outwards to release it from the housing. Move it forward or backward to adjust the height. (Picture 3) Picture 3 4) Mounting the side discharge deflector - Push the flap locking device, so that it can be lifted.
- Page 20 ejected downward. 6) Start-up The tool is equipped with a rubber cap located above the spark plug. Make sure the metal loop at the end of the spark plug cable (in the rubber cap) is tightened around the metal end of the spark plug. To start the cold engine, turn the choke to the "START"...
-
Page 21: Maintenance And Storage
away from the blade. Do not tilt the mower when starting the engine. Start the mower on a horizontal surface, free from tall grass and obstacles. Keep hands and feet away from rotating parts. 7) Traction of the mower Once the engine has started, return the wheel clutch lever to the handlebar and hold it in this position. - Page 22 WARNING: Stop the engine and unplug the spark plug before any repairing or maintenance. Check regularly the oil level and add some oil or replace it if necessary. Frequently check the lawn mower and make sure that all grass deposits are removed from beneath the deck.
-
Page 24: Protection Of The Environment
PROTECTION OF THE ENVIRONMENT Selective collection of electrical and electronic equipment waste. Electrical products should not be disposed of with household products. According to the European Directive 2012/19/UE for electrical and electronic equipment waste and its implementation in national law, used electrical products should be collected separately and disposed of at collection points provided for this purpose.
Need help?
Do you have a question about the HTDT46354F and is the answer not in the manual?
Questions and answers